How to change ownership and group membership of managed devices
Click 'Devices' > 'Device List'
-
Endpoint Manager lets you you assign device ownership from one user to another, belonging to the same customer or a different customer.
-
You can also add a device to a new device group or remove the device from a group at any time.
-
The configuration templates applied to a device because of the user / user group and the device group are also changed if you change the device ownership and group membership.
Use the links to jump to the task you need help with:
-
Login to Xcitium
-
Click 'Applications' > 'Endpoint Manager'
-
Click the 'Devices' tab on the left and choose 'Device List'
-
Click the 'Device Management' tab at the top of the main configuration pane
-
Select a company or a group to view their devices
Or -
Select 'Show all' on the left to view every device enrolled to EM
-
-
Click the name of the device whose ownership is to be changed.
The 'Device Details' interface opens.
-
Click 'Owner' from the options at the top or click 'More' and choose 'Owner' from the drop-down
-
Select 'Change Owner' from the options
-
Start typing the first few characters of the name of the new user to whom the device is to be assigned and choose the user from the options

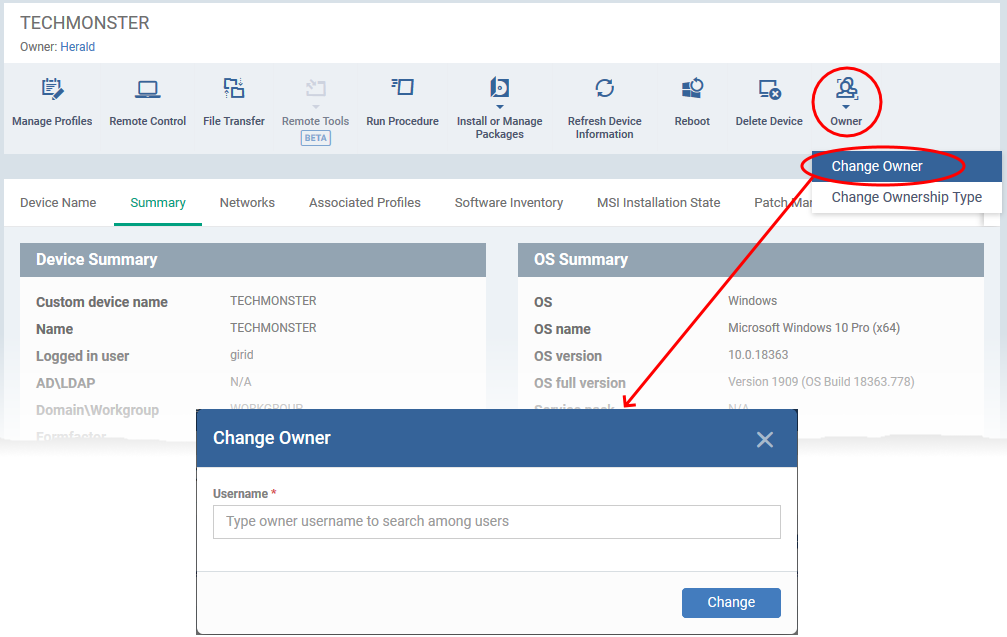
The ownership of the device is changed to the new user.
-
The configuration profiles in effect on the device, associated with the previous user and the user group to which the previous user is a member, are removed
-
The profiles, pertaining to the new user and the user group to which the new user is a member, are applied to the device.
-
See this wiki if you need help on configuration profiles associated with users and user groups.
-
-
If you change the user from a different customer organization, the device is also removed from its existing device group(s) and placed into the default group of the new customer.
-
The profiles active on the device are also accordingly changed.
Change the group membership of a device
-
Device groups make it easy to manage large numbers of Android, iOS, Mac, Windows or Linux devices.
-
You can add a single device to any number of groups belonging to the same company
-
The configuration profiles assigned to a device group are applied to all devices in the group, depending on their operating systems
-
If a device belongs to multiple groups, then all group profiles are applied to the device. If the settings in one profile clash with those of another then EM applies the more restrictive of the two settings. For example, if one profile allows the use of the camera and another blocks it, then the device cannot use the camera.
-
You can add a device to a new group or remove a device from a group at anytime.
-
There are two ways to manage group membership of a device:
-
Device Management - Change the group membership of a selected device from the device details interface
-
Group Management - Add or remove devices to a selected group
-
-
Click the 'Devices' tab on the left and choose 'Device List'
-
Click the 'Device Management' tab at the top of the main configuration pane
-
Select a company or a group to view their devices
Or -
Select 'Show all' on the left to view every device enrolled to EM
-
-
Click the name of a Windows device then select the 'Groups' tab:

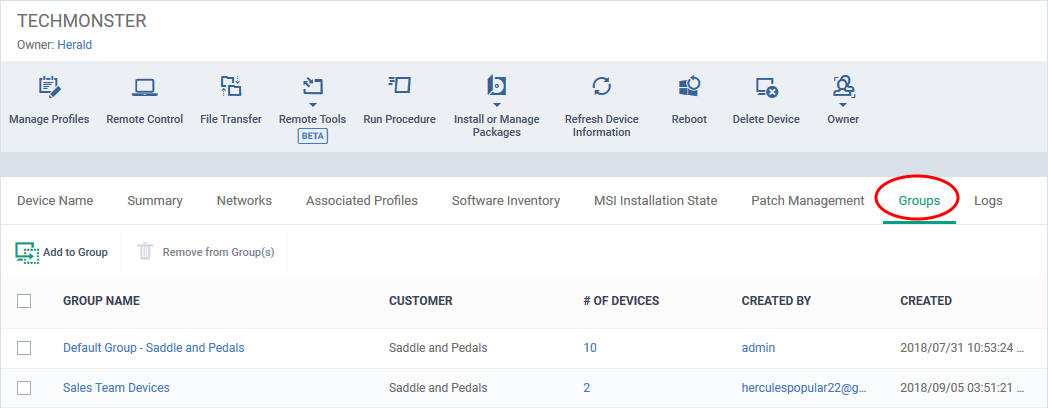
The interface lists all groups of which the device is a member. You can:
-
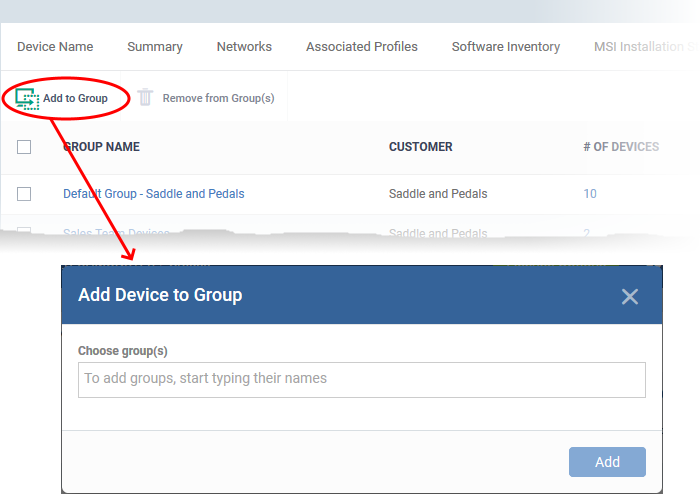
Click 'Add to Group'

-
Choose Group(s) - Start typing the name of the group which you want the endpoint to join. Select the correct group from the list of suggestions.
-
Repeat the process to add the device to other groups.
-
Click 'Add'.
The device is added to the group or groups. Any profiles assigned to the group(s) are applied to the device.
Remove the device from a group
-
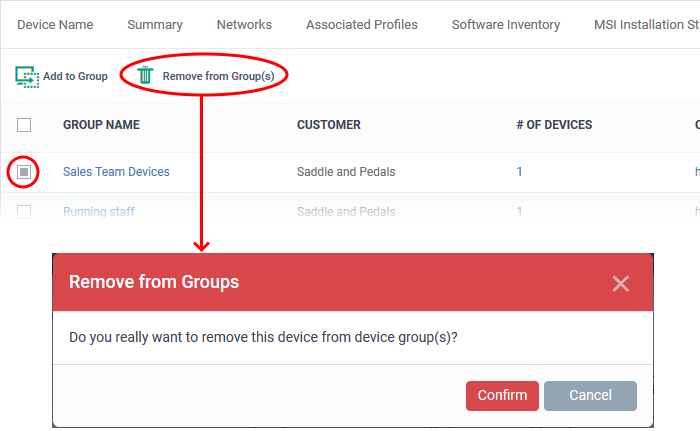
Select the group from the list and click 'Remove from Group'.

-
Click 'Confirm' to remove the device from the group.
The device is removed from the group. Group profiles are also be removed from the device.
-
Click 'Devices' > 'Device List' > 'Group Management'
-
Select a customer from the middle column to view the device groups associated with the customer
-
Select a device group under a customer to view the devices belonging to the group
The group management interface lets you add new devices to a group or remove devices from a group.
Add new devices to a group
-
Click 'Devices' > 'Device List'
-
CD MSP / C1 MSP customers customers - choose the parent company on the left
-
Click the name of the group you want to edit
-
Click the 'Group Management' tab
-
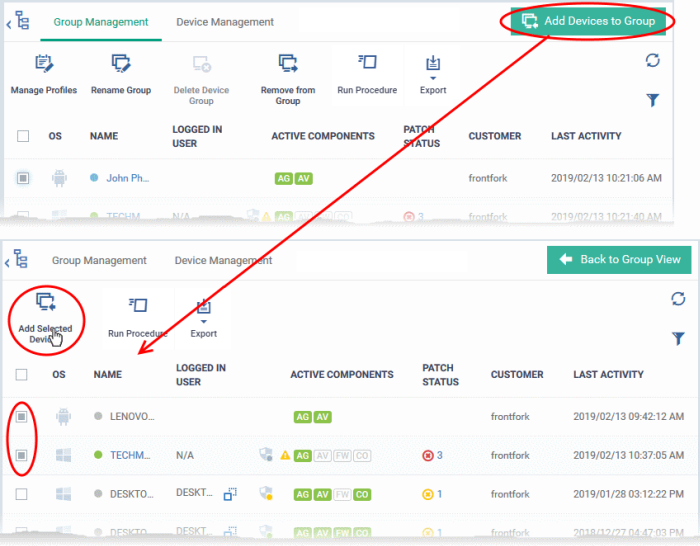
Click 'Add Devices to Group' at the top right.
Note: You can only add devices which belong to the same company as the group.
The interface shows all devices enrolled to the company that are not already in the target group:

-
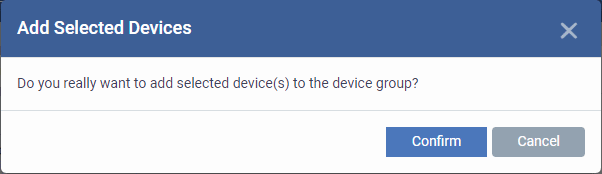
Select the devices to be added to the group and click 'Add Selected Devices'.
Tip: You can filter or search for specific devices using the filter options that appear on clicking the funnel icon at the top right.

Once the device are added to the group, the configuration profiles, associated with the group, are also applied to the device, in addition to the profiles, which are already in effect on the device.
Remove Devices from a Group
-
Click 'Devices' > 'Device List'
-
CD MSP / C1 MSP customers - choose the parent company on the left
-
Click the name of the group you want to edit
-
Click the 'Group Management' tab
-
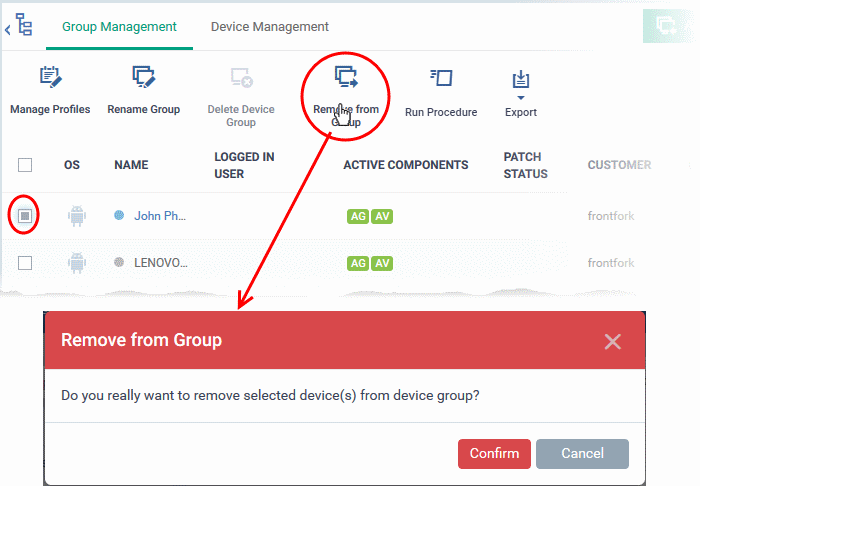
Choose the devices you want to remove
-
Click 'Remove from Group'

-
Click 'Confirm' in the confirmation dialog.
If a device is removed from a group, any group profiles will also be removed from the device.


---