How to configure antivirus scan settings in CCS for Mac
Click 'Antivirus' > 'Scanner Settings'
- CCS uses a range of technologies, including real-time monitoring and on-demand scans to keep devices totally free of malware
- You can set up the behaviour of the antivirus scanner for different types of scans
- You can also exclude files, folders and processes that should be skipped by the scans
Click 'Antivirus' > 'Scanner Settings'
- The settings area lets you configure real-time scans, manual scans, scheduled scans and exclusions
- The settings you implement here will apply to all future scans of that type
- Items added to 'Exclusions' are omitted from all types of scan
Open scanner settings
- Open xcitium Client Security
- Click the 'Antivirus' tab
- Click 'Scanner Settings'

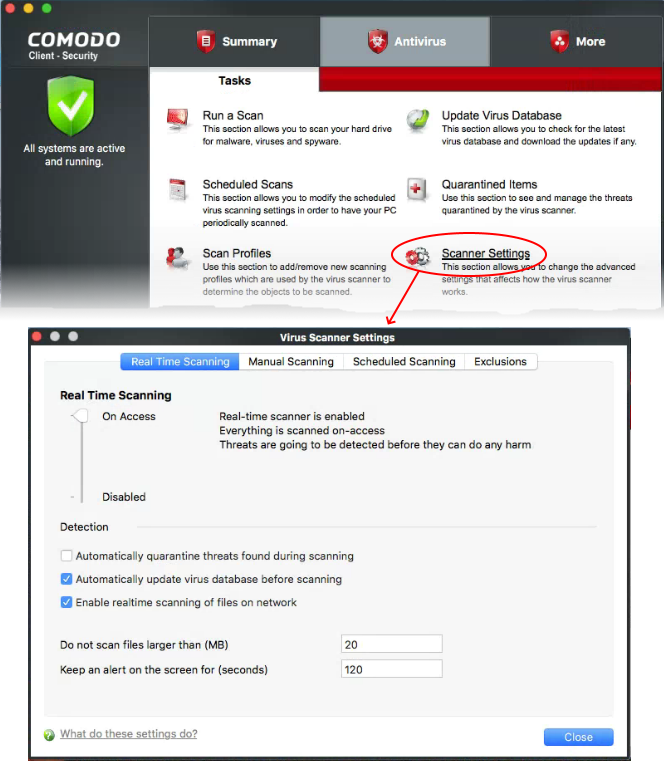
The virus scanner settings interface has the following tabs:
- Real Time Scanning - Configure the 'always-on' virus monitor
- Manual Scanning - Configure scanner behaviour for on-demand scans
- Scheduled Scanning - Configure scanner behaviour for automated-scheduled scans
- Exclusions - View and manage items skipped by virus scans.
Click 'Antivirus' > 'Scanner Settings' > 'Real Time Scanning'
- The real-time scanner is the 'always on' virus monitor which runs in the background, checking files when they are opened, copied or downloaded.
- The real-time scanning area lets you enable or disable the scanner and configure scan options. We highly recommend you keep the real-time scanner active at all times.
Configure real time scanner settings
- Click 'Antivirus' > 'Scanner Settings'
- Click the 'Real Time Scanning' tab, if it is not already open

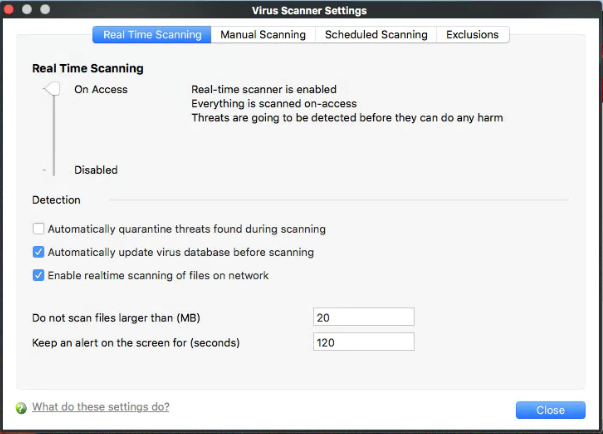
Real-Time Scanning
- Use the slider to activate or deactivate the real-time virus monitor:
- On Access - Any file opened is scanned before it is allowed to run.
- Disabled - Switches the real-time scanner off.
- On Access - Any file opened is scanned before it is allowed to run.
Detection Settings
- Automatically quarantine threats found during scanning – Select whether or not CCS should automatically take action against malware found by the scan (Default = Disabled).
Enabled = CCS moves detected malware into an encrypted holding area known as 'quarantine'. Files in quarantine cannot run and pose no threat to your system.
- Click 'Antivirus' > 'Quarantined Items' to review quarantined files. You can restore items to their original location or permanently delete them. See 'Manage quarantined items' in this wiki to read more.
Disabled = CCS shows an alert when malware is found, with its details. You can choose to clean the malware or to ignore the alert.
- Automatically update virus database before scanning - CCS will check for and download of automatic antivirus database updates executed before the commencement of every scheduled scanning (Default = Enabled).
- Enable realtime scanning of files on network - CCS will activate or deactivate automatic scans of files on network drives.
Enabled = CCS checks every file you interact with on a network drive, even if you do not copy it to your local machine.
Disabled = CCS will not check files on network unless you copy them to your local machine.(Default)
- Do not scan files larger than - Specify the largest file size that the antivirus should scan. CCS will not scan files bigger than the size specified here (Default = 20 MB).
- Keep an alert on the screen for - Specify the length of time that virus alerts should stay on the screen. (Default = 120 seconds).
- Click 'Close' to apply your changes.
Click 'Antivirus' > 'Scanner Settings' > 'Manual Scanning'
The options you set here apply to all on-demand scans on your computer. For example, these settings are used when:
- You click 'Scan Now' on the home screen then run a full or quick scan
- You scan an item by dragging it into the scan-box on the home screen
- You scan a file in the 'Run A Scan' from the 'Antivirus' menu
Configure manual scan settings
- Open xcitium Client Security
- Click 'Antivirus' > 'Scanner Settings'
- Click the 'Manual Scanning ' tab
The options in this pane are similar to those for real time scanning settings, except for:

Scan archive files - The scan will include compressed file formats such as .ZIP and .RAR files. Supported formats include RAR, WinRAR, ZIP, WinZIP ARJ, WinARJ and CAB archives (Default = Enabled).
Enable cloud scanning - Improves scan accuracy by augmenting the local scan with an online look-up of xcitium's latest virus database. Cloud Scanning means CCS can detect the latest malware even if your database is out-dated. (Default = Enabled).
- Click 'Close' to apply your changes.
Click 'Antivirus' > 'Scanner Settings' > 'Scheduled Scanning':
- The options you set in the 'Scheduled Scanning' tab apply to all your scheduled scans. See this wiki to read more.
Configure scheduled scan settings
- Open xcitium Client Security
- Click 'Antivirus' > 'Scanner Settings'
- Click the 'Scheduled Scanning ' tab:

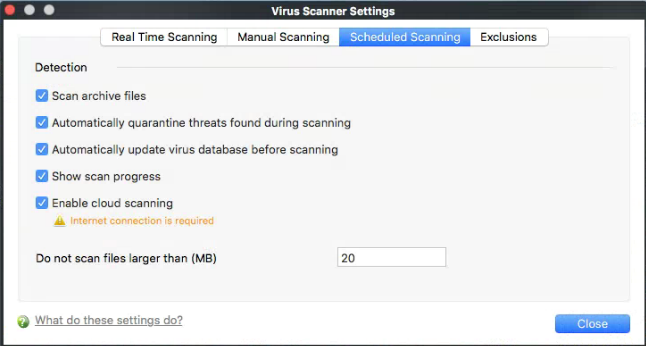
The options in this pane are similar to those for manual scanner settings, except for:
Show scanning progress - Displays a progress bar when a scheduled scan starts. Clear this box if you do not want to see the scan progress status (Default = Enabled).
- Click 'Close' to apply your changes.
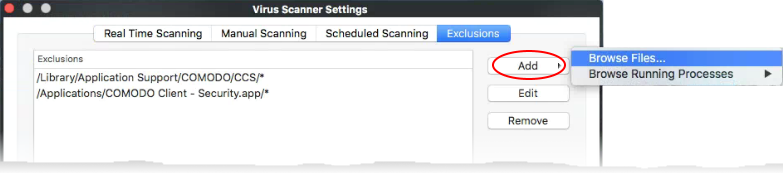
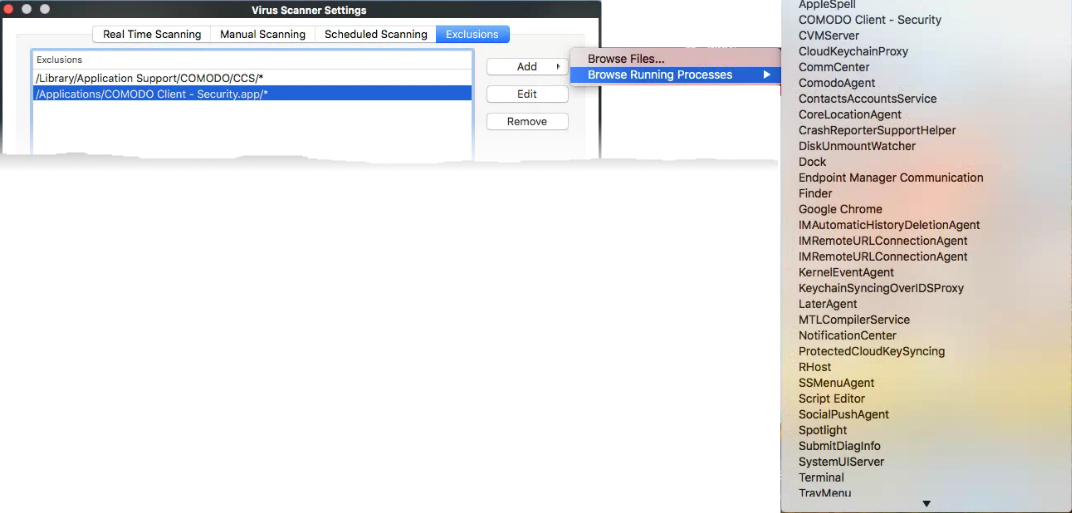
Click 'Antivirus' > 'Scanner Settings' > 'Exclusions'
- The exclusions area shows files and paths that you have chosen to skip during virus scans.
- CCS will not generate an alert for an excluded item, even if the item is rated as malicious in the global blacklist.
- Items may have been added to this list because you selected 'Ignore' at the scan results window, or because you added them to exclusions at an alert.
- Use this interface to add or remove exceptions.
Add and manage exclusions
- Open xcitium Client Security
- Click 'Antivirus' > 'Scanner Settings'
- Click the 'Exclusions' tab:
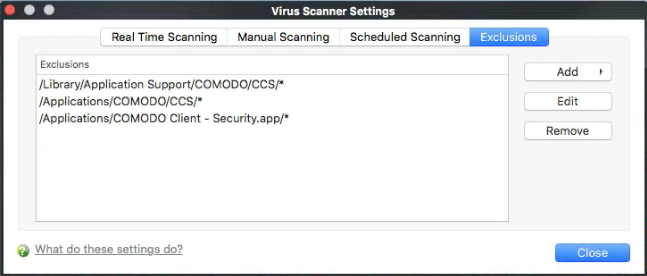
- Click the 'Add' button
- There are two ways to choose the application that you want to exclude:

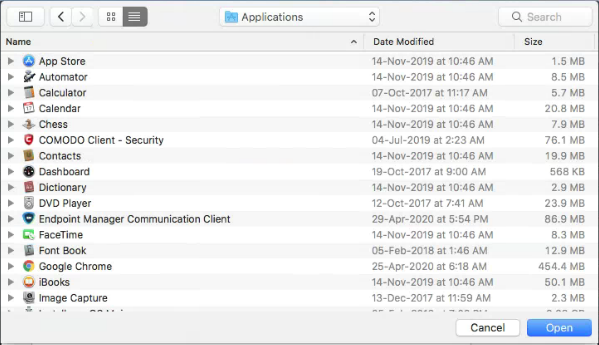
Browse Files... - Navigate to the file/folder you want to exclude in the left pane and move it to the right pane by clicking the right arrow:
Browse Running Processes - Choose the target application from a list of processes running on your PC. The parent file of the process is added to exclusions.

- Repeat the process to add more exclusions
- Click 'Close' to register your exclusions.


---