How to create auto-containment rules in a Windows profile
What is an auto-containment rule?
- Auto-containment rules let you define which applications can run on managed devices, and what privileges they are allowed.
- Xcitium Client Security (CCS) on a device consults these rules every time a program is opened.
- Each rule consists of 3 basic elements:
- Action - choice of:
- Run Virtually - The application is run inside the container, a highly secure environment that is isolated from the rest of the endpoint.
- Run Restricted - The application has limited privileges, can access very few operating system resources and can only open 10 processes at a time.
- Block - The application is not allowed to run at all.
- Ignore - The application can run as normal outside the container.
- Run Virtually - The application is run inside the container, a highly secure environment that is isolated from the rest of the endpoint.
- Target - The applications, file groups or folders that you want to monitor in the rule. You can also add filters to target files that meet certain conditions.
- Options - Choose the trust level of the files you picked in #2. You can also set limits on memory consumption, execution time, and log options.
- Action - choice of:
- This tutorial explains how to create auto-containment rules in a Windows profile.
Create an auto-containment rule
- Login to Xcitium
- Click 'Applications' > 'Endpoint Manager'
- Click ‘Configuration Templates’ > ‘Profiles’
- Open the Windows profile applied to your target devices
- Open the 'Containment' tab
OR
- Click 'Add Profile Section' > 'Containment', if it hasn't yet been added:
- Open the 'Containment' tab
- Click the 'Rules' tab
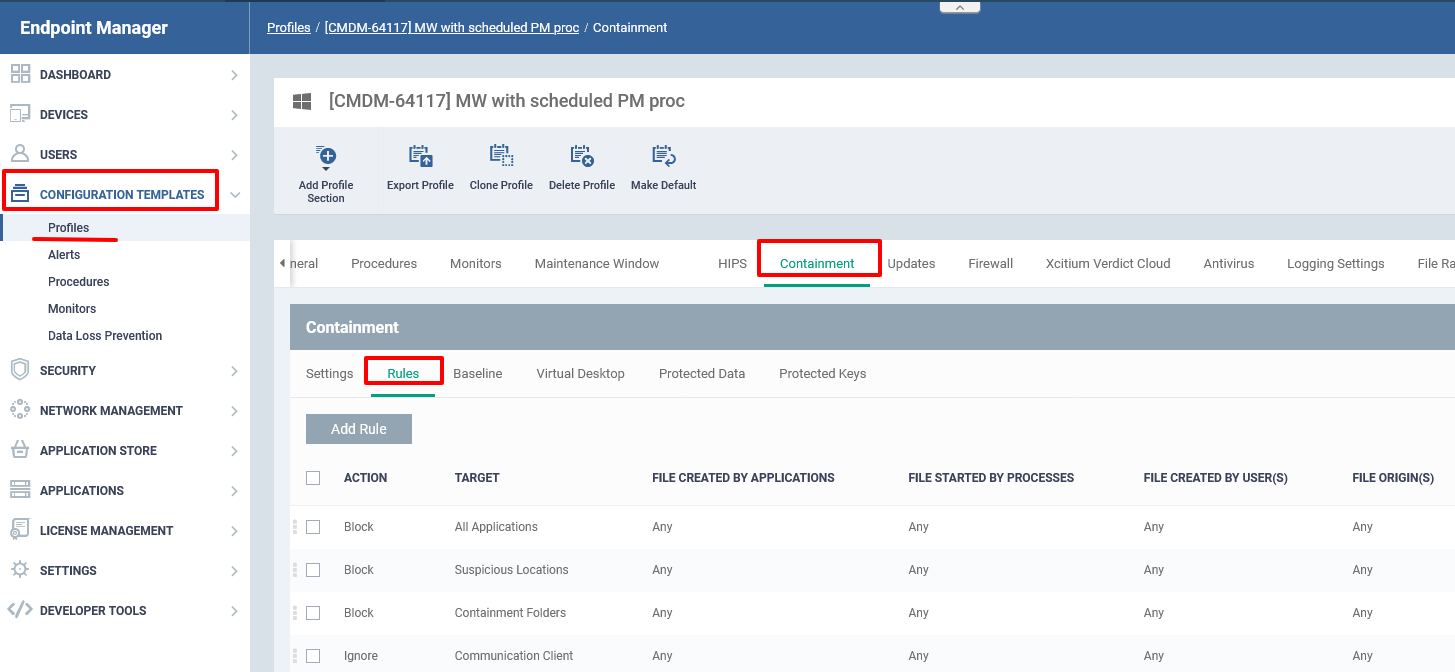
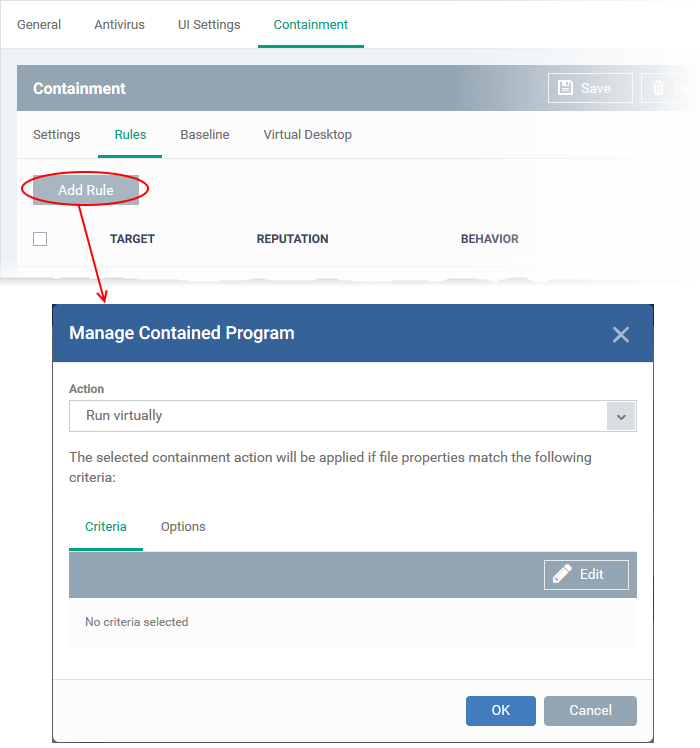
- Click 'Add Rule'

Follow these three steps to create your rule:
- Step 1 – Choose the action
- Step 2 – Select targets and set filters
- Step 3 – Select additional options
The 'Action', in combination with the restriction level in the 'Options' tab, determines the privileges of a contained application.

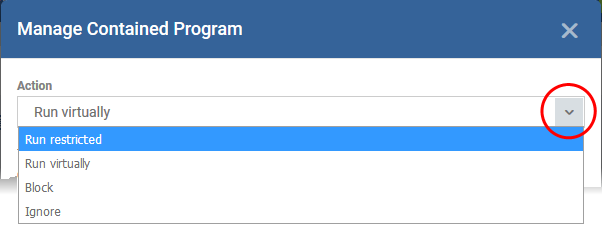
Choose one of the following actions:
- Run Virtually - The application is run inside the container, a highly secure environment that is isolated from the rest of your computer.
- Run Restricted - The application is allowed to access very few operating system resources. It is not allowed to execute more than 10 processes at a time and has very limited privileges. Some applications, like computer games, may not work properly under this setting.
- Block - The application is not allowed to run at all.
- Ignore- The application can run as normal outside the container.
Step 2 – Select rule targets and filters
- The targets are the files/folders/groups that are covered by the rule.
- You can filter a rule so it applies to a narrower sub-set of files.
- For example, you can specify 'All executables' as the target, then add a filter so it only affects executables from the internet.
- Another example is if you want to allow unknown files created by a specific user to run outside the container. You would create an 'Ignore' rule with 'All Applications' as the target, then add 'Files created by a specific user' as the filter.
- For example, you can specify 'All executables' as the target, then add a filter so it only affects executables from the internet.
Set target and filters
- Click the 'Criteria' tab
- Click 'Edit' at top-right:

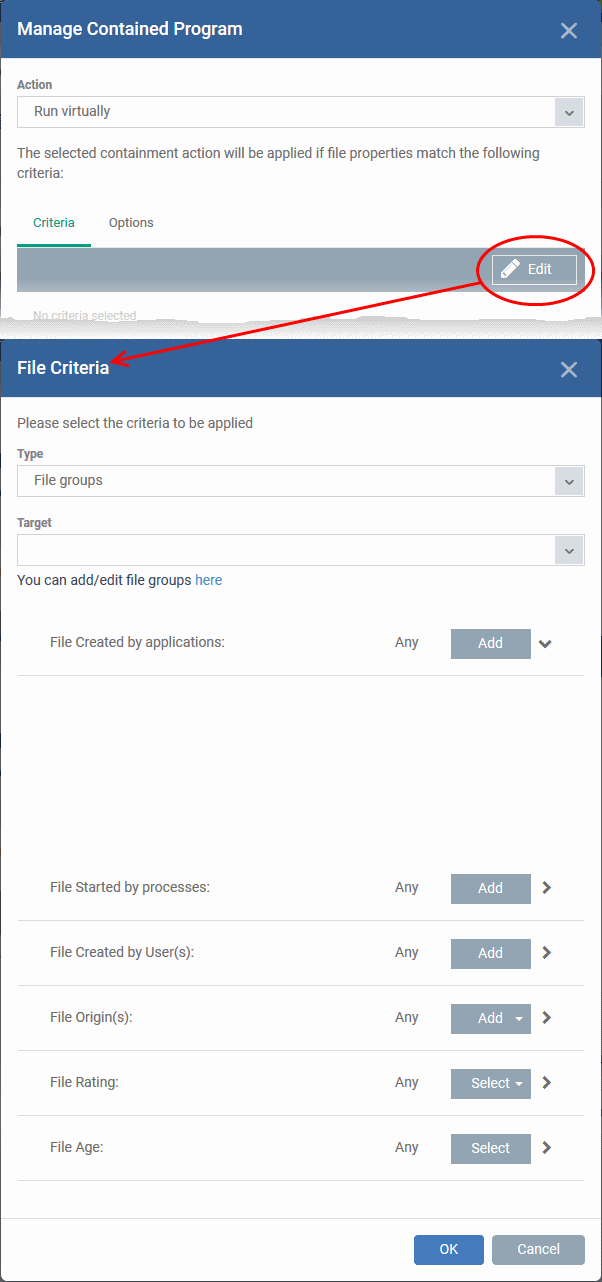
- Click ‘Browse’ to choose the file/folder/group you want to target with the rule.
- Choose any filters you require from the list. Filters let you narrow the scope of the rule so it only catches files that meet certain conditions.
- If you don’t want any filters then skip straight to step 3
- Click ‘OK’
See the following links if you want help to select a target or add a filter:
- Click 'Type' drop-down to choose an application, file group, hash, or folder as your target
- Files - Browse to a specific file.
- File Groups - Apply the rule to predefined file groups.
- A filegroup is a collection of files which (usually) share similar attributes and/or functionality. For example, the 'Executables' group is a list of file types that can run code on your computer.
- You can view and manage file groups in 'Settings' > 'System Templates' > 'File Groups Variables'.
- A filegroup is a collection of files which (usually) share similar attributes and/or functionality. For example, the 'Executables' group is a list of file types that can run code on your computer.
- Folder - Apply the rule to all files in a folder or drive
- File Hash - Apply the rule to all files that have a specific SHA1 hash value.
- A hash value is a large number that is generated by passing the file through a hashing algorithm. The number uniquely identifies the file, and it is extremely unlikely that two files will ever generate the same hash value. The benefit of using a file hash is that the rule will still work even if the file name changes.
- Enter the SHA1 hash value of the target executable file in the 'Target' field.
- A hash value is a large number that is generated by passing the file through a hashing algorithm. The number uniquely identifies the file, and it is extremely unlikely that two files will ever generate the same hash value. The benefit of using a file hash is that the rule will still work even if the file name changes.
- Process Hash - Apply the rule to files whose processes have a specific SHA1 hash value. Please see the description above if required.
- Enter the SHA1 hash value of the process created by the target file in the 'Target' field.
- Files - Browse to a specific file.
Filters let you narrow the scope of a rule. Once set, the rule will only apply if the target file meets the conditions you specify.
The available filters are:
- By application that created the file
- By process that created the file
- By user that created the file
- By file origin
- By file rating
- By file age
Files created by a specific application
Apply the rule to a file based on its source application.
You can also specify the file rating of the source application. The rule will only contain a file if its parent app has a certain trust rating.
Specify the source application:
- Click the 'Add' button in the 'File Created by applications' stripe.

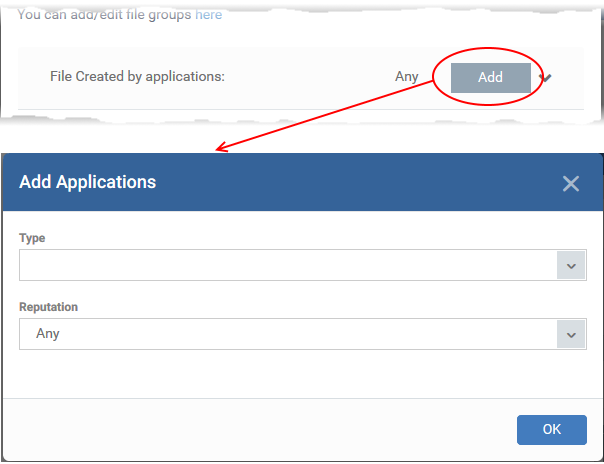
- Type - The target types are the same as explained above.
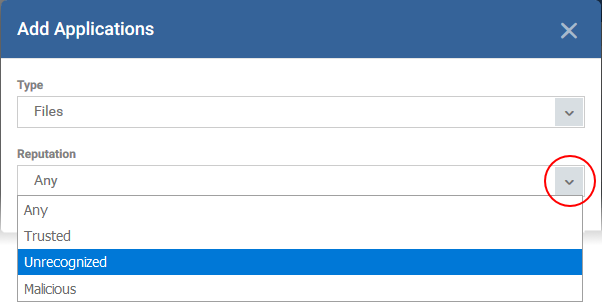
- Reputation - Choose the file rating of the source you specified in the 'Type' drop-down:

- Click 'OK' to save your settings
- Repeat the process to add more source applications
Files created by a specific process
- Applies the rules to files created by a particular parent process.
- You can also specify:
- The file rating of the source. The rule will only contain a file if its parent process has a certain trust rating.
- The number of levels in the process chain that should be inspected.
- The file rating of the source. The rule will only contain a file if its parent process has a certain trust rating.
Specify source processes
- Click the 'Add' button in the 'File Created by Process(es)' stripe:

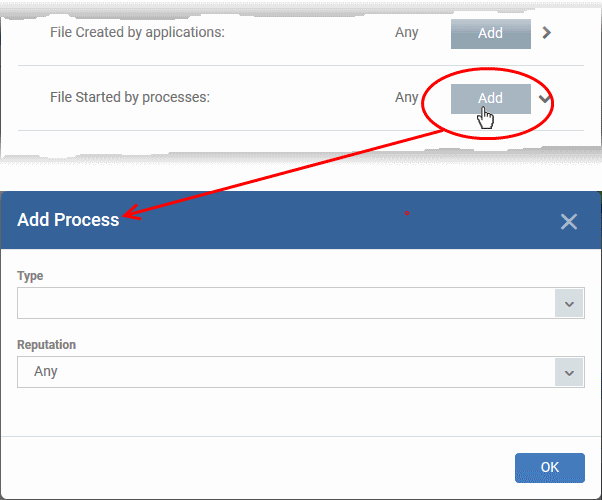
- Type - See target types above for more details.
- Reputation - Choose the file rating of the source you specified in the 'Type' drop-down:

- Click 'OK'
The source process type will be added.

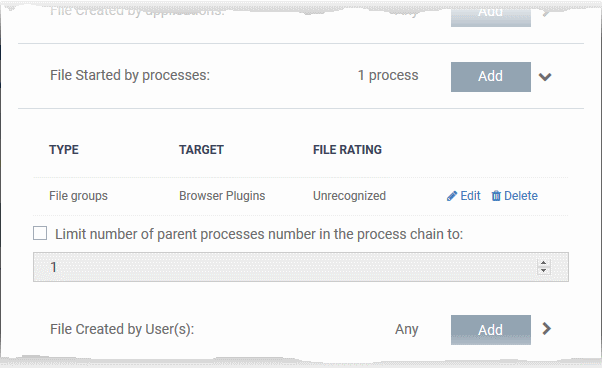
- Limit number of parent processes in the process chain to' - Specify how far up the process tree CCS should check when inspecting the file's sources. 1 = will only check the file's parent process. 2 = will check the parent process and the grand-parent process, etc.
- Repeat to add more source processes
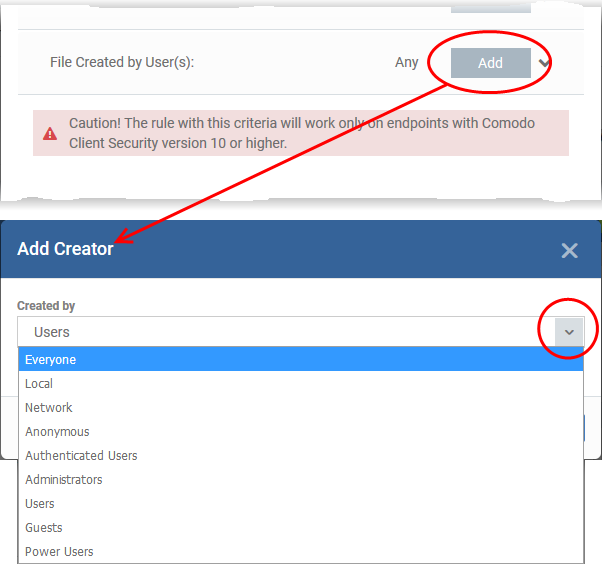
Files created by specific users
- Applies the rule to any files created by a certain user or user group.
- Click the 'Add' button in the 'File Created by User(s)' bar.
- Next, select the target user group:

- Repeat the process to add more user groups
- Applies the rule to files that were copied/downloaded from certain locations.
- Click the 'Add' button in the 'File Origin(s)' bar.
- Choose the source from the options:

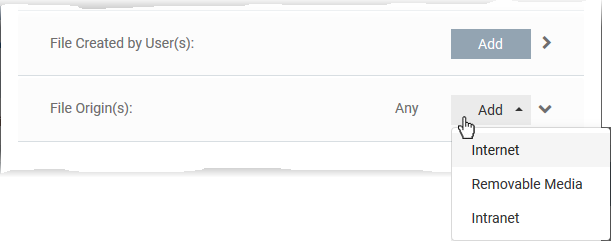
- Internet - The rule only applies to files downloaded from the internet.
- Removable Media - The rule only applies to items copied from external devices. For example, from a USB drive, CD/DVD, or external storage.
- Intranet - The rule only applies to items downloaded from the local network.
Repeat the process to add more sources
Files which have a specific trust rating
- Applies the rule to files that have the trust rating you set.
- Click the 'Select' button in the 'File Rating' stripe

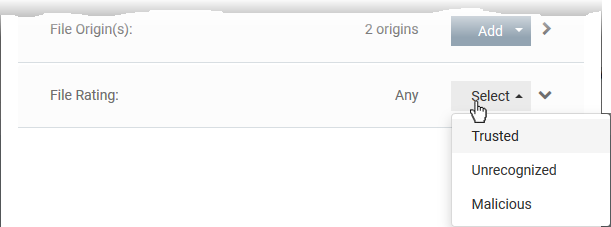
- You can choose from the following trust ratings:
- Trusted - Applications that are safe to run. A file is trusted if:
- The file is on the global whitelist of safe files
- The file is signed by a vendor with 'Trusted' rating in CCS vendor List
- The file was installed by a trusted installer
- The file was given a trusted rating by an admin ('Settings' > 'Application Control')
- The file is on the global whitelist of safe files
- Malicious - Malware files. These files are on the blacklist of known harmful files.
- Unrecognized - Files that do not have a current trust rating. These files are not on the blacklist nor the whitelist, so are given an 'unknown' trust rating.
- Trusted - Applications that are safe to run. A file is trusted if:
Set the file age as filter criteria
- Applies the rule to files based on their created date, or their age.
- Click the 'Select' button in the 'File age' stripe.


There are two ways to specify file age:
- File Creation Date - Apply the rule to files created before or after a certain date.
- File age - Apply the rule to files less than, or greater than, a certain number of days old.
Click 'OK' once you have selected your filters. All filters you added will be listed in the ‘Criteria’ tab:

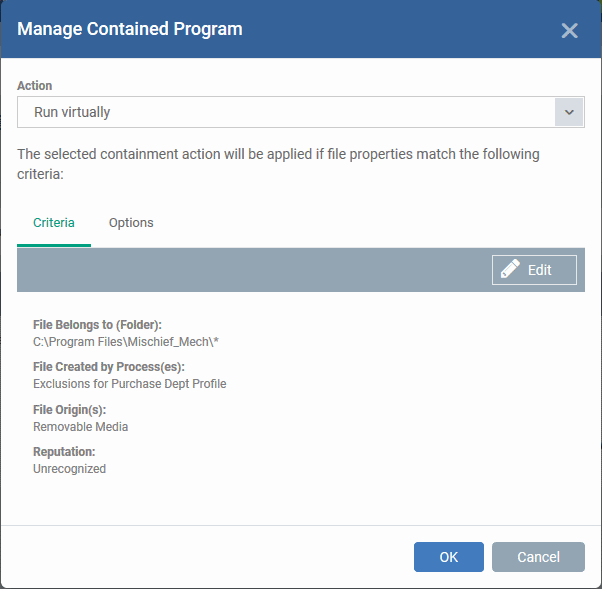
The next step is to choose additional options and restrictions on items contained by the rule.
- Click the 'Options' tab.


The options available depend on the action chosen in step 1.
Here are the options for each action:
- Ignore:
- Log when this action is performed - A CCS containment log is created whenever this rule is triggered.
- Don't apply the selected action to child processes - Child processes are those started by the target application.
- This option is disabled by default, so the ignore rule also applies to child processes.
- If enabled, the ignore rule does not apply to child processes. Each child process will be inspected individually and all relevant rules applied.
- This option is disabled by default, so the ignore rule also applies to child processes.
- Log when this action is performed - A CCS containment log is created whenever this rule is triggered.
- Run Restricted and Run Virtually:
- Log when this action is performed – See above.
- Set Restriction Level - The available restriction levels are:
- Partially Limited - The application is allowed to access all operating system files and resources like the clipboard. Modification of protected files/registry keys is not allowed. Privileged operations like loading drivers or debugging other applications are also not allowed.
- Limited - The application can only access selected operating system resources. The application is not allowed to execute more than 10 processes at a time and is run without admin privileges.
- Restricted - The application is allowed to access even fewer operating system resources than the ‘Limited’ option. The application is not allowed to execute more than 10 processes at a time. Some applications, like computer games, may not work properly under this setting.
- Untrusted - The application is not allowed to access any operating system resources and cannot execute more than 10 processes at a time. Some applications that require user interaction may not work properly under this setting.
- Partially Limited - The application is allowed to access all operating system files and resources like the clipboard. Modification of protected files/registry keys is not allowed. Privileged operations like loading drivers or debugging other applications are also not allowed.
- Limit maximum memory consumption to - Specify how much RAM the application can use.
- Limit program execution time to - The maximum time the program can run. The program is terminated after the specified length of time.
- Log when this action is performed – See above.
- Block:
- Log when this action is performed - See above.
- Quarantine program - If checked, the blocked file will be automatically moved to quarantine on the device.
- Quarantine is a secure holding area for potentially dangerous files. All quarantined files are encrypted, so they cannot run or cause harm to the computer.
- Click 'Security Sub-Systems' > 'Antivirus' > 'Quarantined Files' to view and manage quarantined items.
- See https://wiki.xcitium.com/frontend/web/topic/how-to-manage-quarantined-items-in-endpoint-manager or more help with this.
- Quarantine is a secure holding area for potentially dangerous files. All quarantined files are encrypted, so they cannot run or cause harm to the computer.
- Log when this action is performed - See above.
Click 'OK' to save your rule. Use the ‘On/Off’ switch to activate or deactivate the rule:

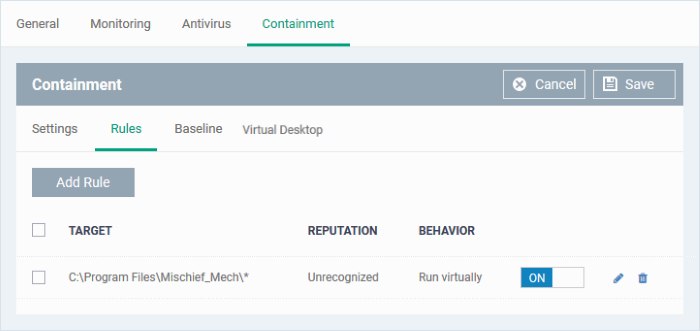
- Repeat the process to add more rules
- You can drag-and-drop the rules to re-prioritize them. Rules at the top of the table have a higher priority than those underneath. The setting in the rule nearer the top will prevail in the event of a conflict between rules.
- You can edit or remove rules using the options at the right.


---