How to create auto-containment rules in CCS
What is an auto-containment rule?
- Auto-containment rules let you define which applications can run on your computer, and what privileges they are allowed.
- Each rule consists of 3 basic elements - ‘Action’, ‘Target’ and ‘Options’.
- Action - choice of:
- Run Virtually - The application is run inside the container, a highly secure environment which is isolated from the rest of your computer.
- Run Restricted - The application has limited privileges, can access very few resources, and can only open 10 processes at a time.
- Block - The application is not allowed to run at all.
- Ignore - The application can run as normal outside the container.
- Run Virtually - The application is run inside the container, a highly secure environment which is isolated from the rest of your computer.
- Target - The applications, file groups or folders that you want to monitor in the rule. You set the targets in the ‘Criteria’ tab. You can also add filters to target files that meet certain conditions.
- Options - Choose the trust level of the files you picked in #2. You can also set limits on memory consumption, execution time, and log options.
- This tutorial explains how to create auto-containment rules in CCS.
Create an auto- containment rule
- Open Xcitium Client Security (CCS)
- Click ‘Settings’ on the CCS home screen
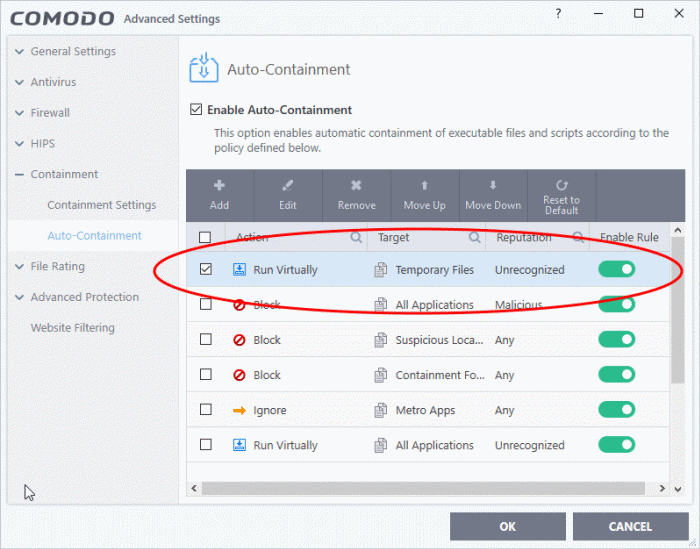
- Click ‘Containment’ > ‘Auto-Containment’ on the left
CCS ships with a set of canned containment rules which provide maximum protection against unknown, potentially malicious applications. You can also create your own custom rules.
- Click the 'Add' button at the top of the list in the 'Auto-Containment' panel:

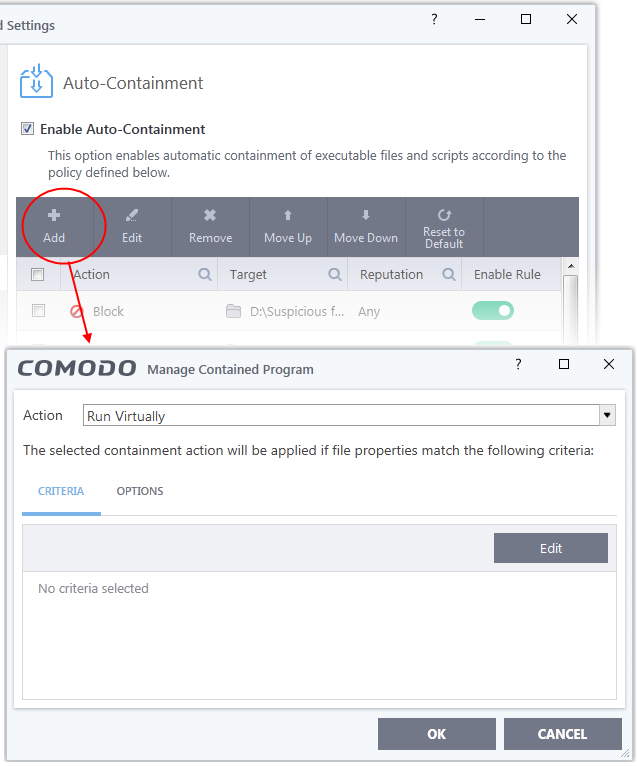
There are three steps to create a containment rule:
- Step 1 - Choose the action
- Step 2 - Select the targets and set filters
- Step 3 - Select additional options
The 'Action', in combination with the restriction level in the 'Options' tab, determines the privileges of a contained application.

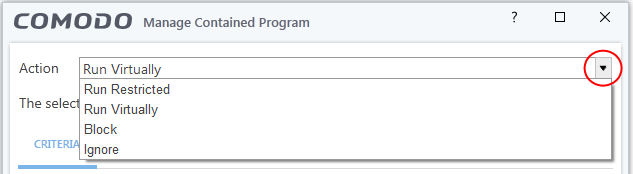
Choose one of the following actions:
- Run Virtually - The application is run inside the container, a highly secure environment which is isolated from the rest of your computer.
- Run Restricted - The application is allowed to access very few operating system resources. It is not allowed to execute more than 10 processes at a time and has very limited privileges. Some applications, like computer games, may not work properly under this setting.
- Block - The application is not allowed to run at all.
- Ignore- The application can run as normal outside the container.
Step 2 - Select rule targets and filters
- The targets are the files/folders/groups that are covered by the rule.
- You can filter a rule so it applies to a narrower subset of files.
- For example, you can specify 'All executables' as the target, then add a filter so it only affects executables from the internet.
- Another example is if you want to allow unknown files created by a specific user to run outside the container. You would create an 'Ignore' rule with 'All Applications' as the target, then add 'Files created by a specific user' as the filter.
- For example, you can specify 'All executables' as the target, then add a filter so it only affects executables from the internet.
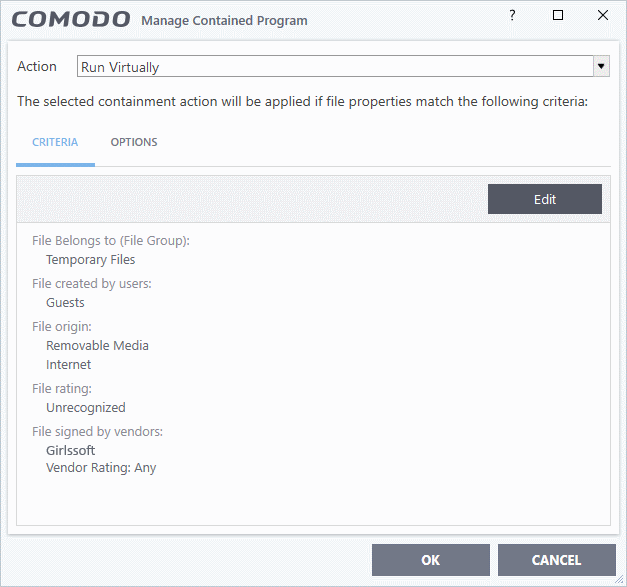
Set target and filters
- Click the 'Criteria' tab
- Click 'Edit' at top-right:

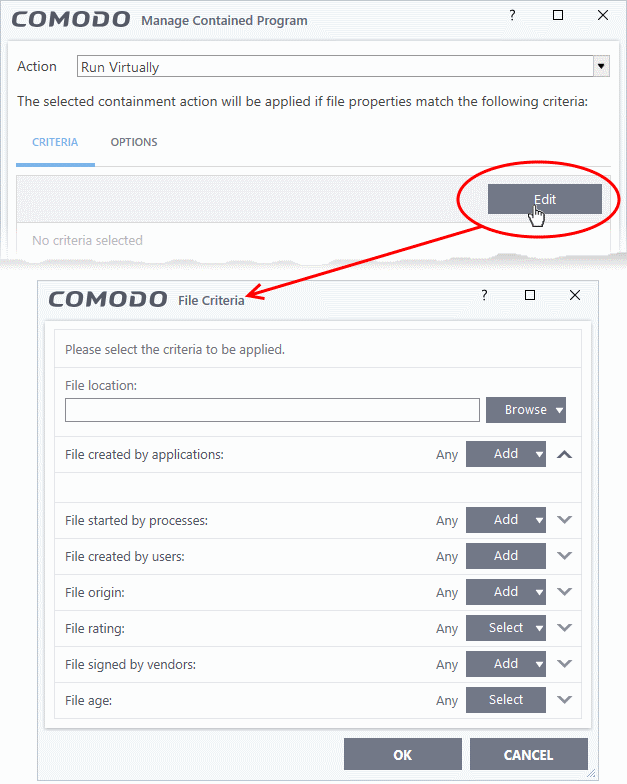
- Click ‘Browse’ to choose the file/folder/group you want to target with the rule.
- Choose any filters you require from the list. Filters let you narrow the scope of the rule so it only catches files that meet certain conditions.
- If you don’t want any filters then skip straight to step 3
- Click ‘OK’
See the following links if you want help to select a target or add a filter:
- Click the 'Browse' button beside the 'File Location' field:
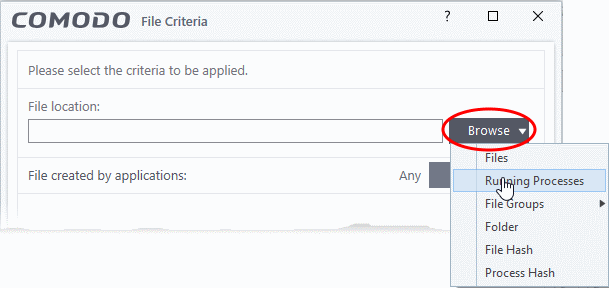

There are six types of target you can add:
- Files - Apply the rule to specific files on your drive.
- Running Processes - Apply the rule to a process that is currently running on your computer.
- File Groups - Apply the rule to predefined file groups.
- A filegroup is a collection of files which (usually) share similar attributes and/or functionality. For example, the 'Executables' group is a list of file types that can run code on your computer.
- You can view and manage file groups in 'Settings' > 'Fie Rating' > 'File Groups' interface.
- A filegroup is a collection of files which (usually) share similar attributes and/or functionality. For example, the 'Executables' group is a list of file types that can run code on your computer.
- Folder - Apply the rule to a folder or drive.
- File Hash - Create a hash value from a file and use it as the rule target. A hash value is a large number which is generated by passing the file through a hashing algorithm. The number uniquely identifies the file, and it is extremely unlikely that two files will ever generate the same hash. The benefit of using a file hash is that the rule will still work even if the file name changes.
- Process Hash - Create a hash value of a process and use it as the rule target. Please see description above if required.
Choose 'Files' from the 'Browse' drop-down

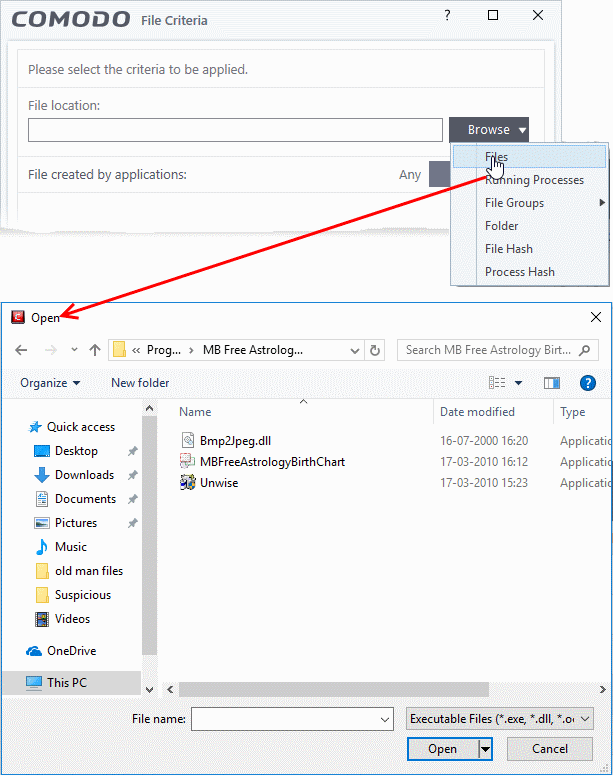
- Navigate to the file you want to target then click 'Open'
The file will be shown as the rule target. It will run as per the action you chose in step 1.


- Click 'OK' if you want to simply apply the action from step 1 to the target
Add a currently running application by choosing its process
- Choose 'Running Processes' from the 'Browse' drop-down.

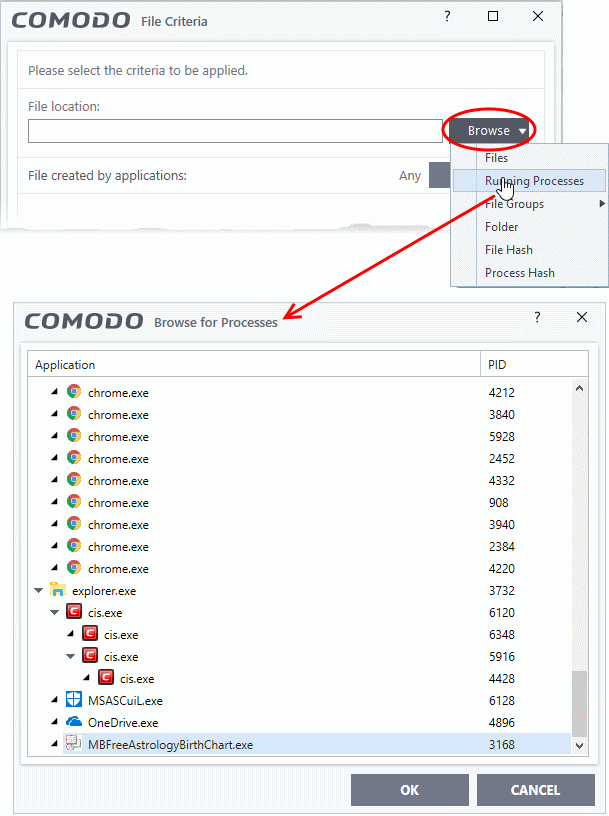
A list of currently running processes in your computer will be displayed.
- Select the process of the target application then clicks ‘OK’.
The parent application of the process is added as the target. It will run as per the action in step 1.

- Click 'OK' if you want to simply apply the action from step 1 to the target
- Choose 'File Groups' from the 'Browse' drop-down.

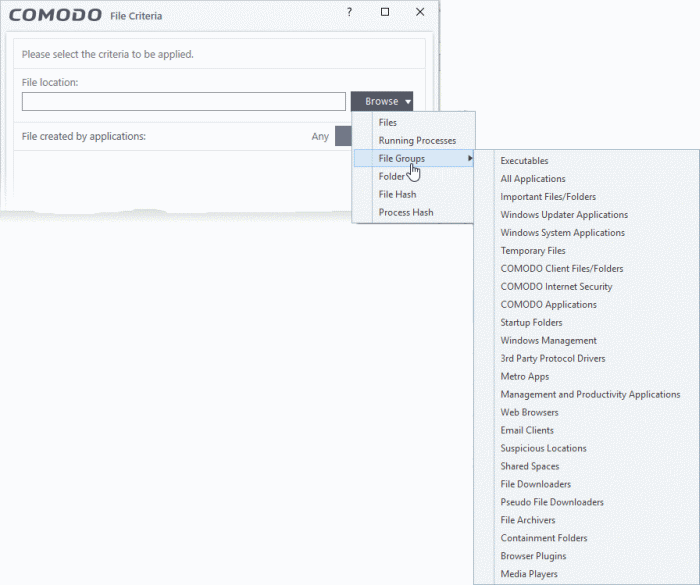
- Select the group from the drop-down.
The filegroup will be added as target and run as per the rule-action in step 1.
- Click 'OK' if you want to simply apply the action from step 1 to the target
- Alternatively, you can refine the rule with filters and configure additional options.
- Choose 'Folder' from the 'Browse' drop-down.

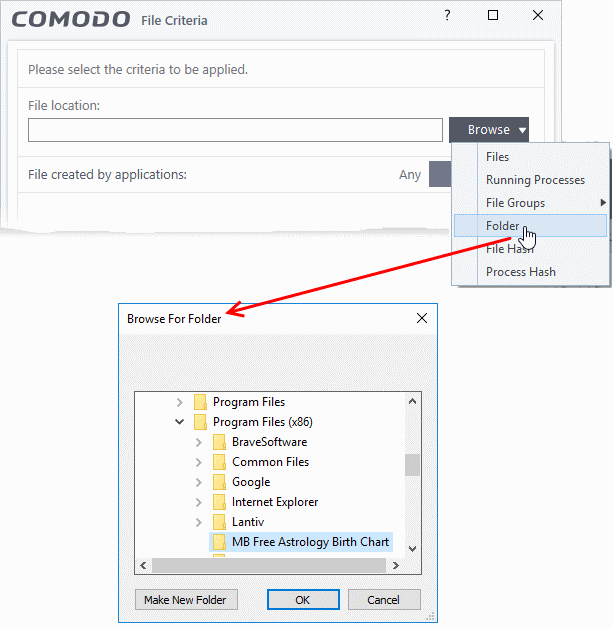
The 'Browse for Folder' dialog will appear.
- Navigate to the drive partition or folder you want to add as target and click 'OK'
The drive partition/folder will be added as the target. All executable files in the folder will be run as per the action is chosen in step 1.
- Click 'OK' if you want to simply apply the action from step 1 to the target
- Alternatively, you can refine the rule with filters and configure additional options.
Add a file based on its hash value
- Choose 'File Hash' from the 'Browse' drop-down


- Navigate to the file whose hash value you want to target.
- Click 'Open'.
- CCS generates the hash of the parent file and stores it as the target.
- The advantage is that the rule will catch the file even if the file name changes.
- Click 'OK' if you want to simply apply the action from step 1 to the target
- Alternatively, you can refine the rule with filters and configure additional options.
Add by creating a hash from a running process
- Choose 'Process Hash' from the 'Browse' drop-down.
- This shows a list of currently running processes on your computer:

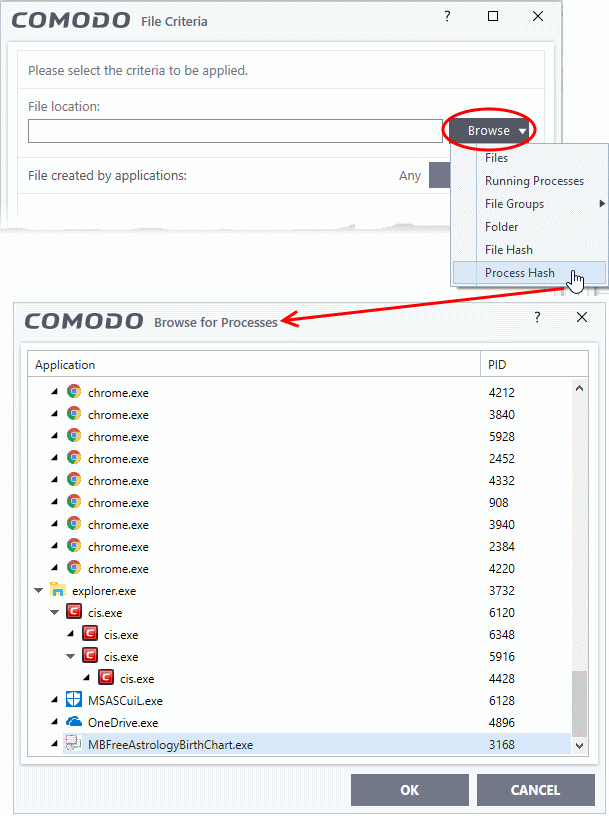
- Select the target process and click 'OK'
- CCS generates a hash of the parent file and stores it as the target.
- The advantage is that the rule will catch the file even if the file name changes.
- Click 'OK' if you want to simply apply the action from step 1 to the target
- Alternatively, you can refine the rule with filters and configure additional options.
Filters let you narrow the scope of a rule. Once set, the rule will only apply if the target file meets the conditions you specify.
The available filters are:
- By application that created the file
- By process that created the file
- By user that created the file
- By file origin
- By file rating
- By vendor who signed the file
- By file age
Auto-contain a file if it was created by a specific application
Apply the rule to a file based on its source application.
You can also specify the file rating of the source application. The rule will only contain a file if its parent app has a certain trust rating.
Specify source application:
- Click the 'Add' button in the 'File Created by applications' stripe.

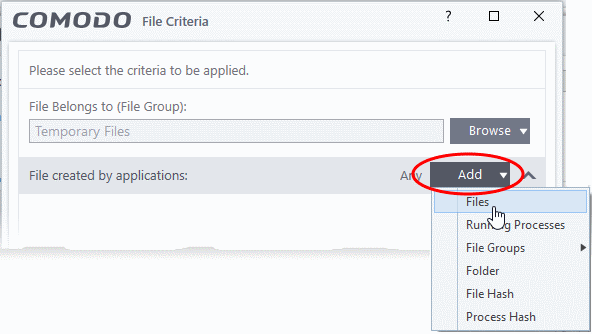
- The options available are the same as explained above.
- The selected source app/filegroup/folder will be added to the list.
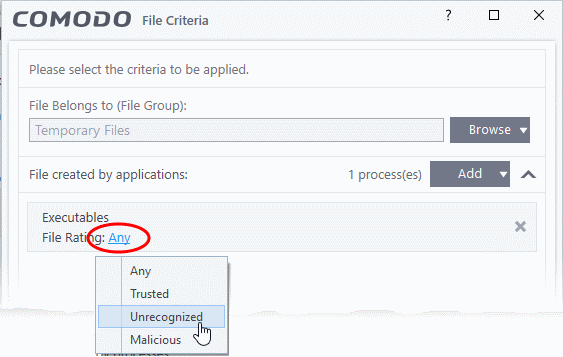
- Click the 'Any' link and select the rating of the source:

- Repeat the process to add more applications or groups/folders.
Auto-contain a file if it was created by a specific process
- Apply the rule if the file was created by a certain process.
- You can also specify:
- The file rating of the source. The rule will only contain the file if its parent process has a certain rating.
- The number of levels in the process chain that should be inspected.
- The file rating of the source. The rule will only contain the file if its parent process has a certain rating.
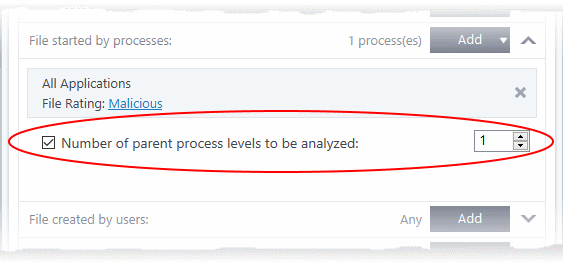
Specify source processes
- Click the 'Add' button in the 'File Created by Processes' stripe.

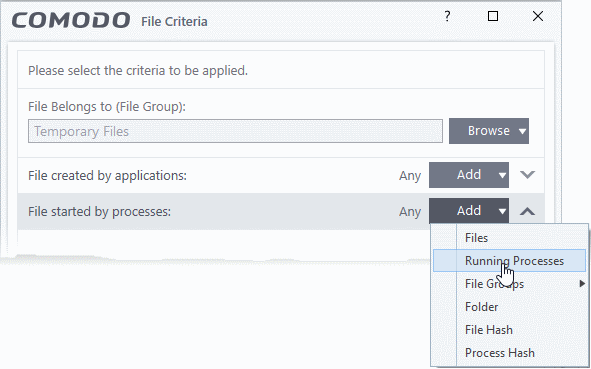
- The ‘Add’ options are the same as explained above.
- Any files created by the selected process will be targeted by the rule.
- Click the 'Any' link and select the rating of the source.

- 'Number of parent process levels to be analyzed' - Specify how far up the process tree CCS should check when inspecting the file's sources. 1 = will only check the file's parent process. 2 = will check the parent process and the grand-parent process, etc., etc.

- Repeat the process to add more processes
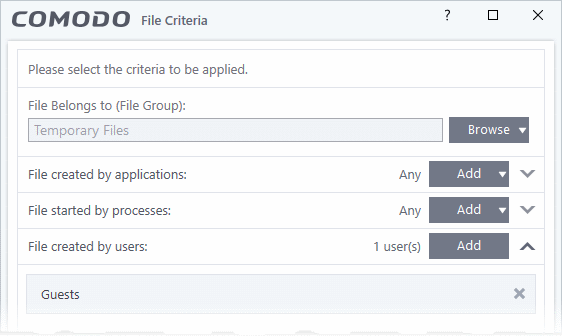
Auto-contain a file created by specific users
- Click the 'Add' button in the 'File Created by Users' stripe.

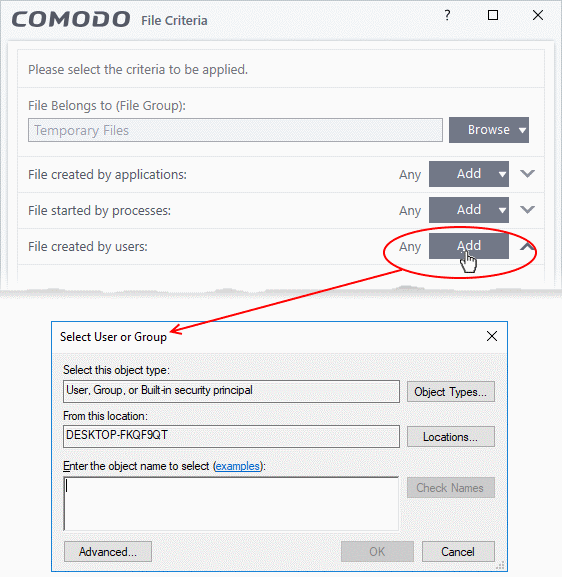
- The 'Select User or Group' dialog will appear.
- Type the names of the users to be added to the rule. Use the format <domain name>\<user/group name> or <user/group name>@<domain name>.
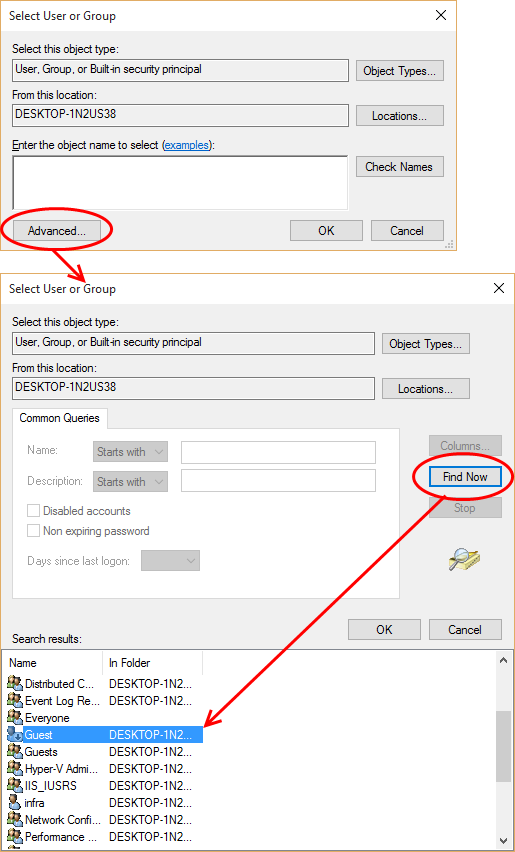
- Alternatively, click 'Advanced' then 'Find Now' to locate specific users. Click 'OK' to confirm the addition of the users.
- Type the names of the users to be added to the rule. Use the format <domain name>\<user/group name> or <user/group name>@<domain name>.

The user will be added to the list.

- Repeat the process to add more users.
Auto-contain a file downloaded/copied from a specific source
- Click the 'Add' button in the 'File Origins' stripe.
- Choose the source from the options:

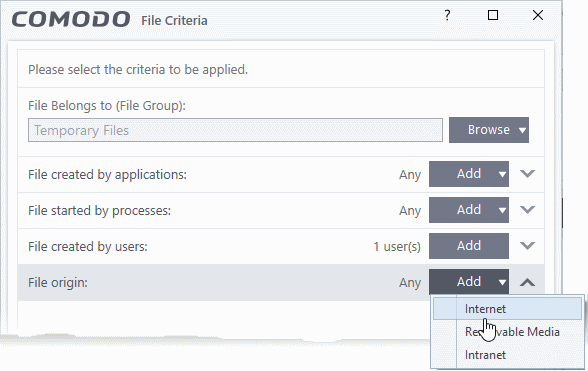
- Internet - The rule will only apply to files that were downloaded from the internet.
- Removable Media - The rule will only apply to items copied to the computer from removable devices like a USB drive, CD/DVD or external storage.
- Intranet - The rule will only apply to files that were downloaded from the local network.
- Repeat the process to add more sources
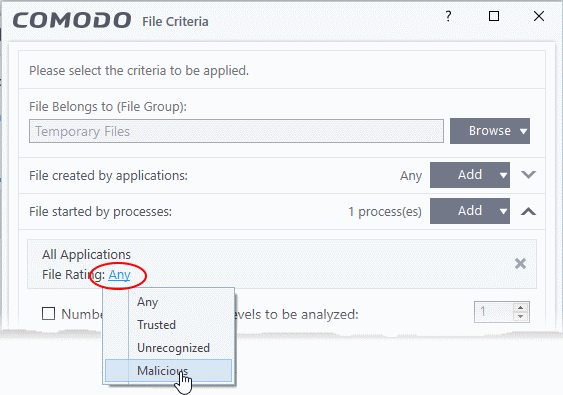
Select the file rating as filter criteria
- Click the 'Select' button in the 'File Rating' stripe:

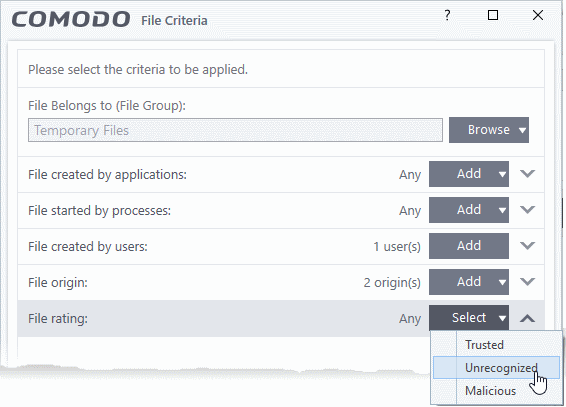
- This will apply the rule to files which match the trust rating you set. You can choose from the following trust ratings:
- Trusted - Applications are categorized as 'Trusted' if:
- The file is on the global whitelist of safe files
- The file is signed by a vendor with 'Trusted' rating in local vendor List
- The file was installed by a trusted installer
- The file was given a trusted rating by an administrator or user.
- The file is on the global whitelist of safe files
- Unrecognized - Files that do not have a current trust rating. The file is on neither the blacklist nor the whitelist, so is given an 'unknown' trust rating.
- Malware - Malicious files - those that are on the blacklist of known harmful files..
- Trusted - Applications are categorized as 'Trusted' if:
Auto-contain a file based on the software vendor
- You can apply an action to a file based on the vendor who digitally signed the file. The vendor is a software company that created the file.
- You can also specify the file rating of the vendor. The rule will only contain a file if its vendor has a certain trust rating.
Specify vendors
- Click the 'Add' button in the 'File signed by vendors' stripe.
- There are three ways you can add a vendor:
1. Directly select a vendor

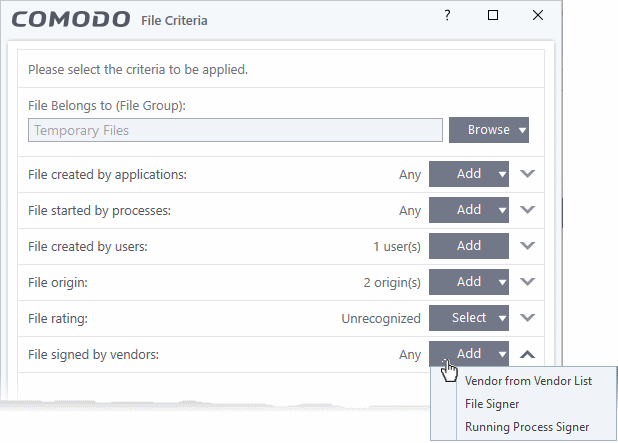
- Choose 'Vendor from a Vendor List' from the drop-down
- The 'Add Vendor' dialog opens with a list of vendors in the local 'Vendor List' in CCS
- You can view and manage a list of vendors and their trust ratings from the Vendor List interface
- Click 'Settings' > 'File Rating' 'Vendor List' to open the 'Vendor List' interface
- You can view and manage a list of vendors and their trust ratings from the Vendor List interface

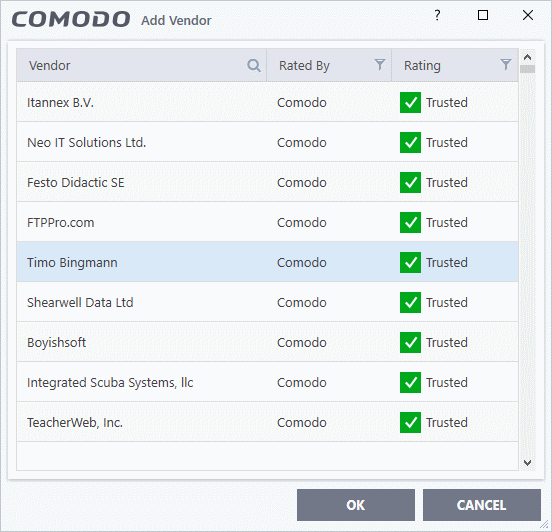
- Use the sort and filter options in the column headers to search for the vendor to be specified
- Choose the vendor and click 'OK'. The vendor will be added to the filters.
2. Specify an executable file on your local drive
- Choose 'File Signer' from the drop-down
- Navigate to the executable file whose publisher you want to add as the criteria and click 'Open'.
- CCS checks that the .exe file is signed by the vendor and counter-signed by a Trusted CA. If so, the vendor is added as a criteria
3. Select a currently running process
- Choose 'Running Process Signer' from the drop-down
- A list of all processes running at present on your computer is shown
- Select the process to specify the publisher of the application that started the process and click 'OK'
- CCS checks that the .exe file that started the process is signed by the vendor and counter-signed by a Trusted CA. If so, the vendor is added as a criteria
The selected vendor is added:

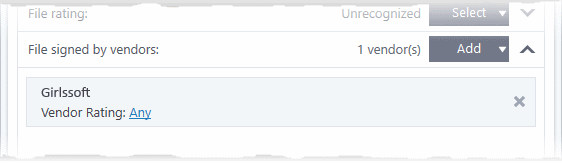
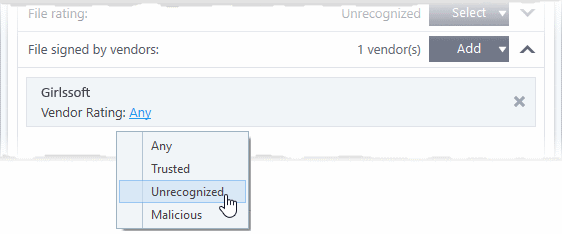
- Vendor Rating - The rule will only apply to the vendor's files IF the vendor has this rating at the time the file is checked. Note, the rating you set here can be different from the actual vendor rating in 'Settings' > 'File Rating' > 'File List' > 'Vendor Rating'.
- Example. If you select 'Trusted' here, then CCS will apply the rule if the vendor is trusted at the time the file is checked. If the vendor's rating changes to 'Malicious' or 'Unrecognized', then the rule isn't applied.

- Repeat the process to add more vendors
Set the file age as filter criteria
- Click the 'Select' button in the 'File age' stripe.

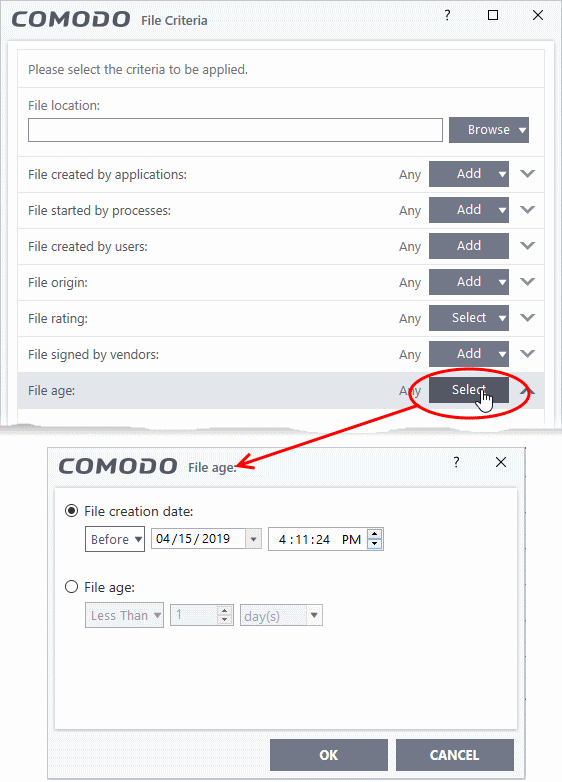
There are two ways you can specify file age:
- File Creation Date - Target files created before (or after) the date you specify. Choose 'Before'/'After' from the first drop-down then specify the date/time.
- File age - Target files that are younger (or older) than a specific age. ‘Age’ means the length of time since the file was first created on, or copied to, the host.
- Less Than - CCS will check the file reputation if the file is younger than the age you set here.
- More Than - CCS will check the file reputation if the file is older than the age you set here.
- Less Than - CCS will check the file reputation if the file is younger than the age you set here.
- Click 'OK' after selecting your filters to save the settings to the rule. The list of criteria will be shown in the ‘Criteria’ tab of the 'Manage Contained Program' dialog

The next step is to choose additional options and restrictions on items contained by the rule.
- Click the 'Options' tab.


The options available depend on the 'Action' chosen in step 1.
- The 'Ignore' action has the following options:
- Log when this action is performed - A CCS containment log is created whenever this rule is triggered. You can view the logs at 'Tasks' > 'Advanced Tasks' > 'View Logs' > select 'Containment Events' from the drop-down menu.'
- Don't apply the selected action to child processes - Child processes are those started by the target application.
- This option is disabled by default, so the ignore rule also applies to child processes.
- If enabled, the ignore rule does not apply to child processes. Each child process will be inspected individually and all relevant rules applied.
- This option is disabled by default, so the ignore rule also applies to child processes.
- Log when this action is performed - A CCS containment log is created whenever this rule is triggered. You can view the logs at 'Tasks' > 'Advanced Tasks' > 'View Logs' > select 'Containment Events' from the drop-down menu.'
- The 'Run Restricted' and 'Run Virtually' actions have the following options:
- Log when this action is performed - See above.
- Set Restriction Level - When 'Run Restricted' is selected in 'Action', then this option is automatically selected and cannot be unchecked. For 'Run Virtually' action the option can be checked or unchecked. The options for Restriction levels are:
- Partially Limited - The application is allowed to access all operating system files and resources like the clipboard. Modification of protected files/registry keys is not allowed. Privileged operations like loading drivers or debugging other applications are also not allowed.(Default)
- Limited - Only selected operating system resources can be accessed by the application. The application is not allowed to execute more than 10 processes at a time and is run without Administrator account privileges.
- Restricted - The application is allowed to access very few operating system resources. The application is not allowed to execute more than 10 processes at a time and is run with very limited access rights. Some applications, like computer games, may not work properly under this setting.
- Untrusted - The application is not allowed to access any operating system resources. The application is not allowed to execute more than 10 processes at a time and is run with very limited access rights. Some applications that require user interaction may not work properly under this setting.
- Partially Limited - The application is allowed to access all operating system files and resources like the clipboard. Modification of protected files/registry keys is not allowed. Privileged operations like loading drivers or debugging other applications are also not allowed.(Default)
- Limit maximum memory consumption to - Enter the memory consumption value in MB that the process should be allowed.
- Limit program execution time to - Enter the maximum time in seconds the program should run. After the specified time, the program will be terminated.
- Log when this action is performed - See above.
- The 'Block' action has the following options:
- Log when this action is performed - See above.
- Quarantine program - If checked, the file will be automatically moved to quarantine.
- Quarantine is a secure holding area for potentially dangerous files. All quarantined files are encrypted, so they cannot run or cause harm to the computer.
- Click 'General Tasks' > 'View Quarantine' to see and manage the files moved to quarantine
- Quarantine is a secure holding area for potentially dangerous files. All quarantined files are encrypted, so they cannot run or cause harm to the computer.
- Log when this action is performed - See above.
- Choose the options and click 'OK' to save them for the rule. The rule will be added and displayed in the list.

You can move the rule up or down the list to change its priority.


---