How to run on-demand antivirus scans in CCS on Windows devices
Click 'Tasks' > 'General Tasks' > 'Scan'
- CCS leverages multiple technologies, including real-time monitoring and on-demand scans, to keep endpoints totally free of malware
- You can scan any folders, files drives or any area on your device any time for malware
- You can also create your own scan profiles to scan specific files, folders and drives and schedule scans to run at specific time
- CCS shows the list of items identified as malware at the end of each scan. You can choose ignore, or clean the infected files.
Use the following links to jump to the task you need help with:
Instantly scan files and folders
Instantly scan files and folders
- You can scan individual files, folders or drives to instantly to check whether they contain threats.
- For example, this is useful if you are wary about an item you have copied from an external source or downloaded from the internet.
Instantly scan an item
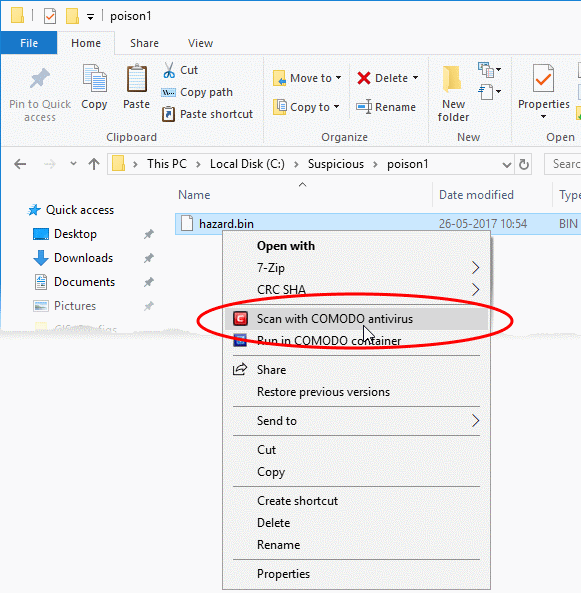
- Right-click on the item and select 'Scan with Xcitium Antivirus' from the menu:
The item is scanned immediately.
Note - CCS skips files which are larger than the max. size, and those that take longer to scan than the max time allowed. Click 'Settings' > 'Antivirus' > 'Scans', then open the 'Full Scan' profile to view these thresholds.
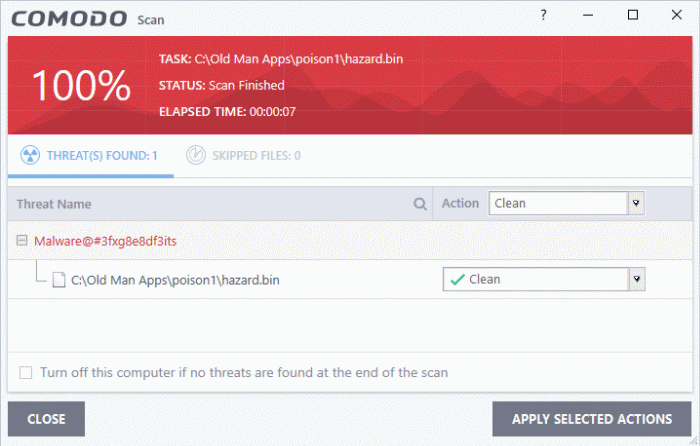
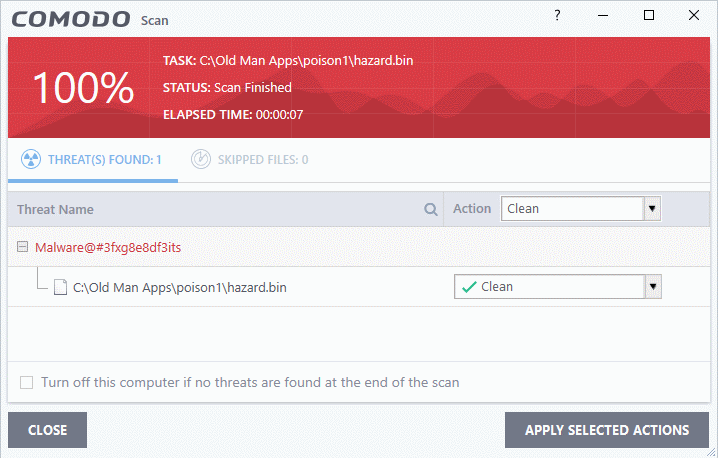
- Scan results are shown when the scan finishes:
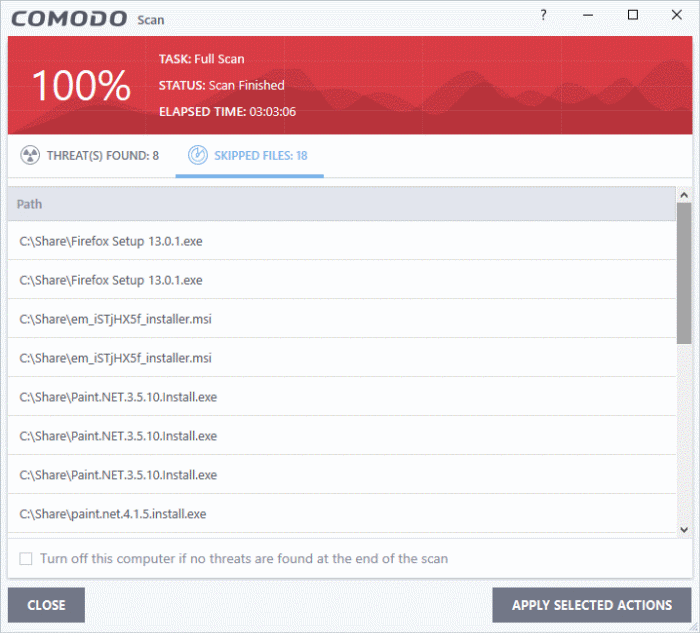
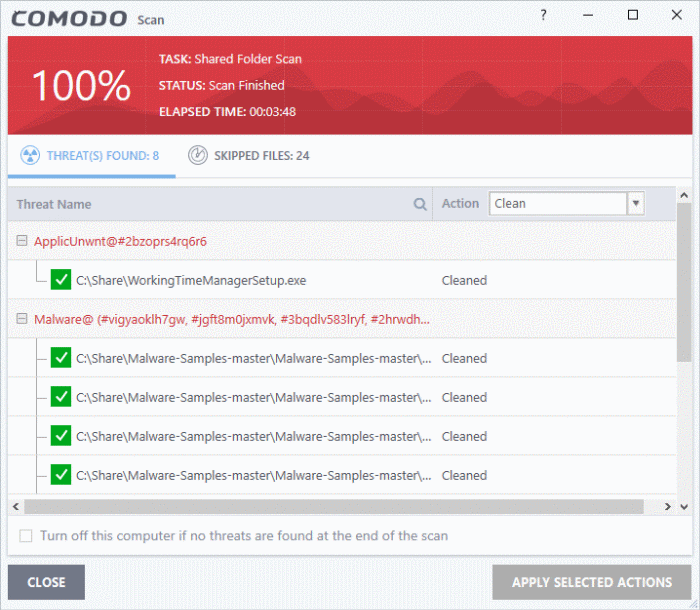
The results window has two tabs:
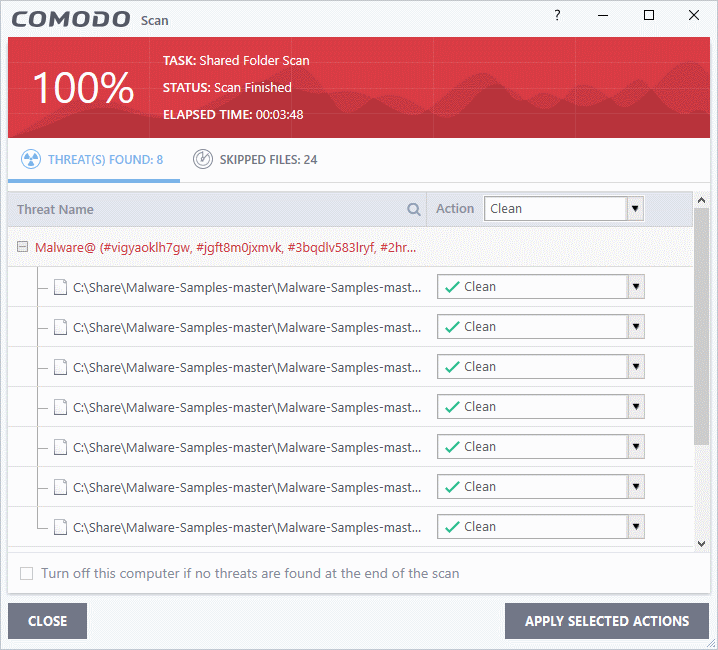
- Threats Found: The number of files scanned and the number of viruses found.
- Use the drop-down to choose whether to clean or ignore the threat.
- See 'Process infected files' if you need help with these options.
- Use the drop-down to choose whether to clean or ignore the threat.
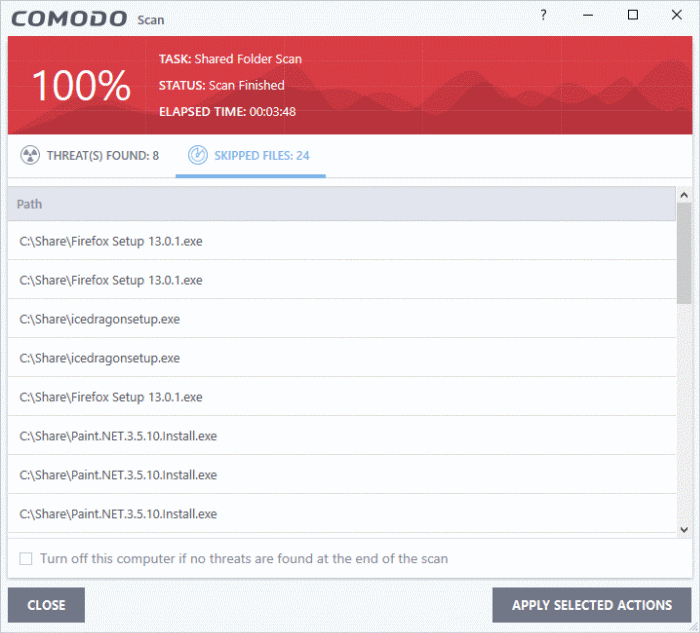
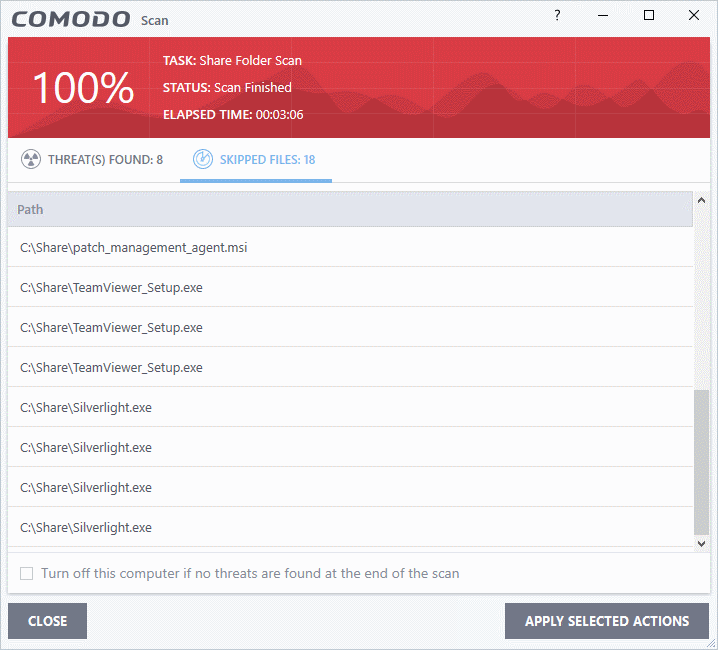
- Skipped Files: Files that were not checked for viruses. The scanner skipped these files as they took longer than the scan time limit (default = 9 mins).
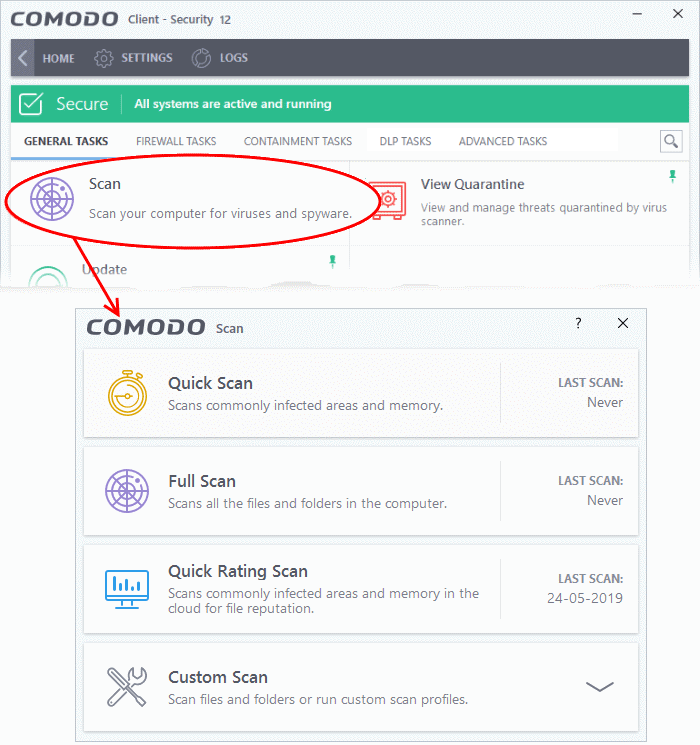
- Click the 'Scan' tile on the CCS home screen
OR
- Click 'Tasks' > 'General Tasks' > 'Scan'
- Quick scan - Checks important and commonly infected areas
- Full scan - Checks your entire computer
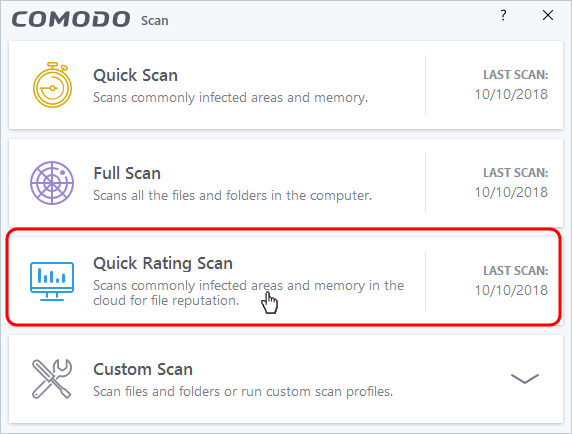
- Rating scan - Searches for unknown files on your computer. Assigns a trust rating to your files where possible.
- Custom scan - You choose specific areas to scan.
The following sections explain more about each scan type:
Click 'Tasks' > 'General Tasks' > 'Scan' > 'Quick Scan'
- The quick scan profile scans important areas of your computer which are most prone to attack.
- This includes system files, auto-run entries, hidden services, boot sectors, and important registry keys
. - These areas are of great importance to the health of your computer, so it is essential to keep them free of infection.
Run a Quick Scan
- Click the 'Scan' tile on the CCS home screen
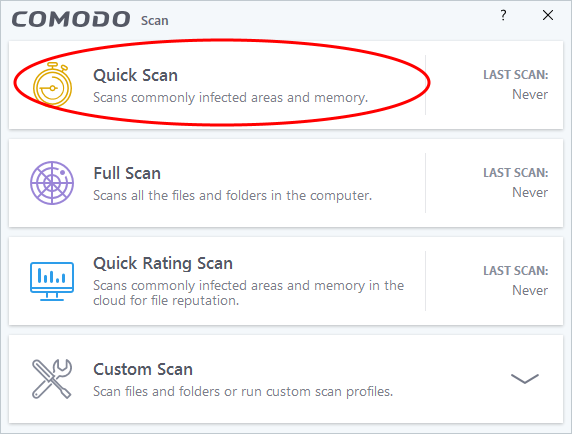
- Select 'Quick Scan' from the 'Scan' interface
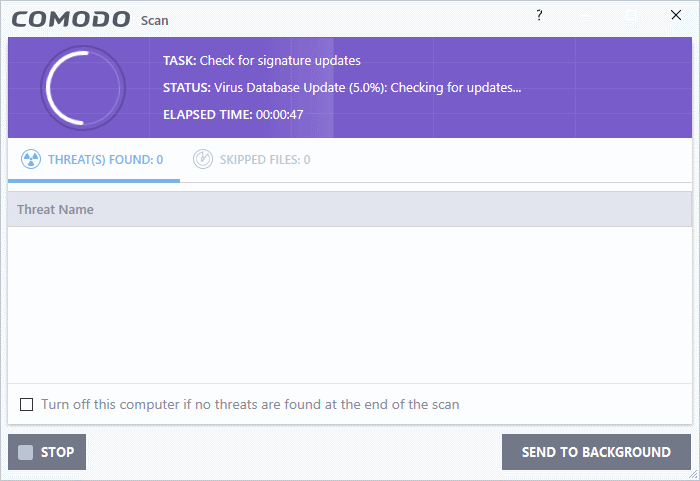
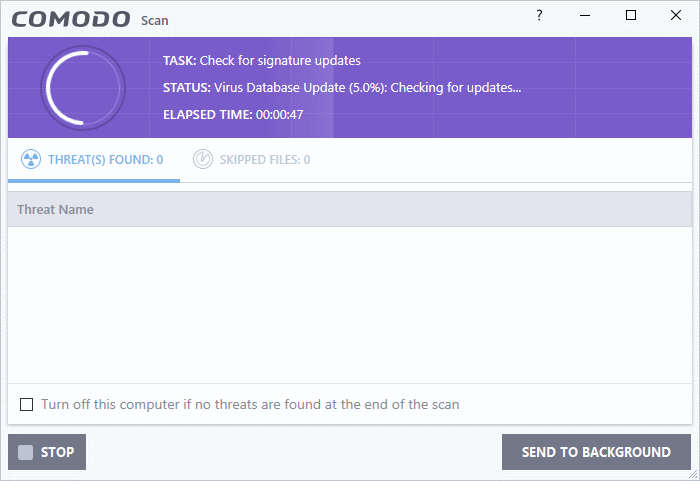
- The scanner first checks whether your virus database is up-to-date:
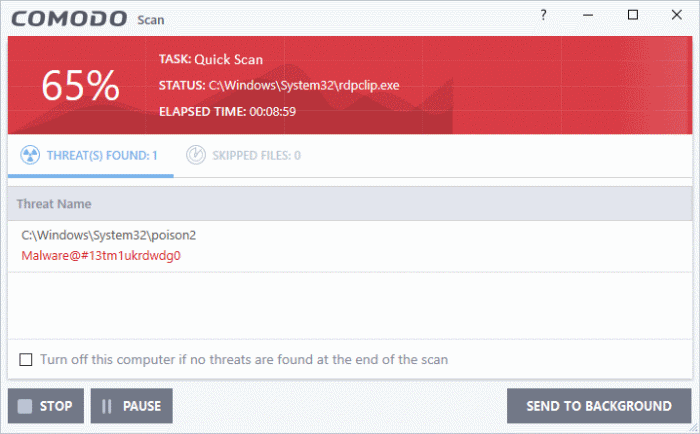
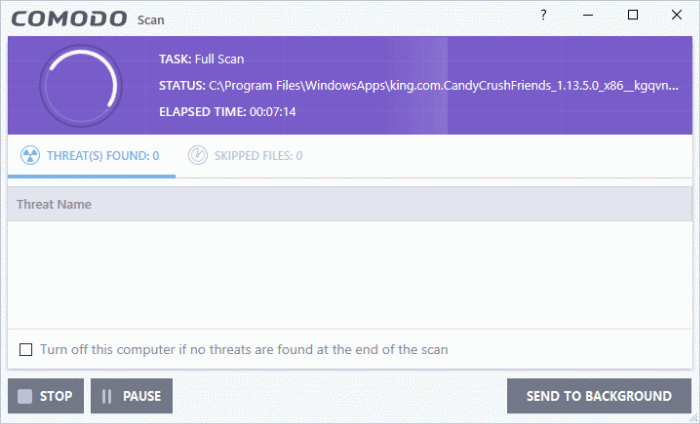
- The scans starts after any updates have been installed:
Note - CCS skips files which are larger than the max. size, and those that take longer to scan than the max time allowed. Click 'Settings' > 'Antivirus' > 'Scans', to view these thresholds.
- You can pause, resume or stop the scan by clicking the appropriate button.
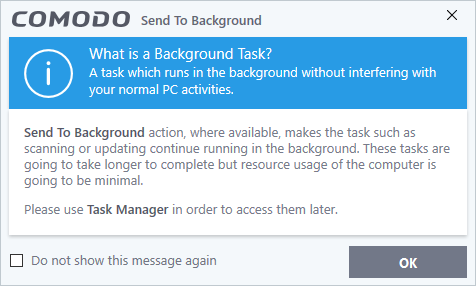
- Send to Background - Runs the scan as a background process which consumes fewer resources. You can still keep track of the scan in the task manager - 'Tasks' > 'Advanced Tasks' > 'Open Task Manager'.
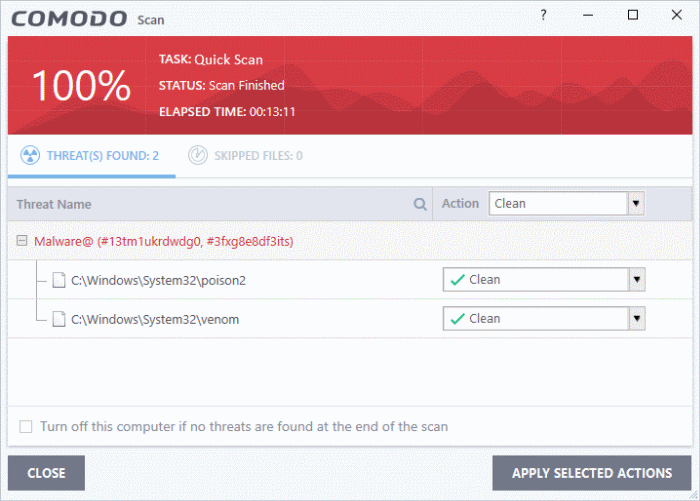
Scan results are shown when the scan finishes:
The results window has two tabs:
- Threats Found: The number of files scanned and the number of viruses found.
- Use the drop-down to choose whether to clean or ignore the threat.
- See 'Process infected files' if you need help with these options.
- Use the drop-down to choose whether to clean or ignore the threat.
- Skipped Files: Files that were not checked for viruses. The scanner skipped these files as they took longer than the scan time limit (default = 9 mins).
Click 'Tasks' > 'General Tasks' > 'Scan' > 'Full Scan'
- A full scan checks every file, folder and drive on your computer. USB and other external drives are also scanned.
Run a Full Computer Scan
- Click the 'Scan' tile on the CCS home screen
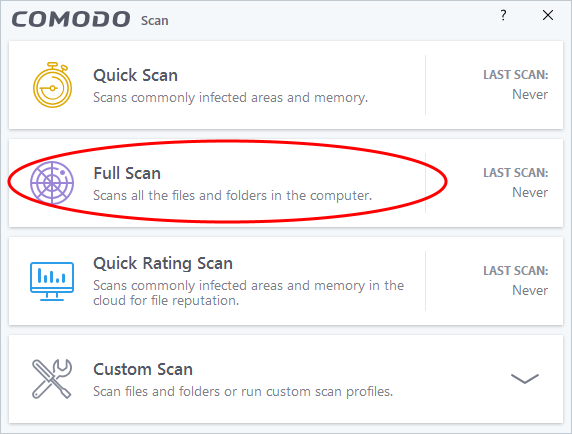
- Select 'Full Scan':
- The scanner checks whether your virus database is up-to-date:
- The scans starts after any updates have been installed:
Note - CCS skips files which are larger than the max. size, and those that take longer to scan than the max time allowed. Click 'Settings' > 'Antivirus' > 'Scans', to view these thresholds.
- You can pause, resume or stop the scan by clicking the appropriate button.
- Send to Background - Runs the scan as a background process which consumes fewer resources. You can still keep track of the scan in the task manager - 'Tasks' > 'Advanced Tasks' > 'Open Task Manager'.
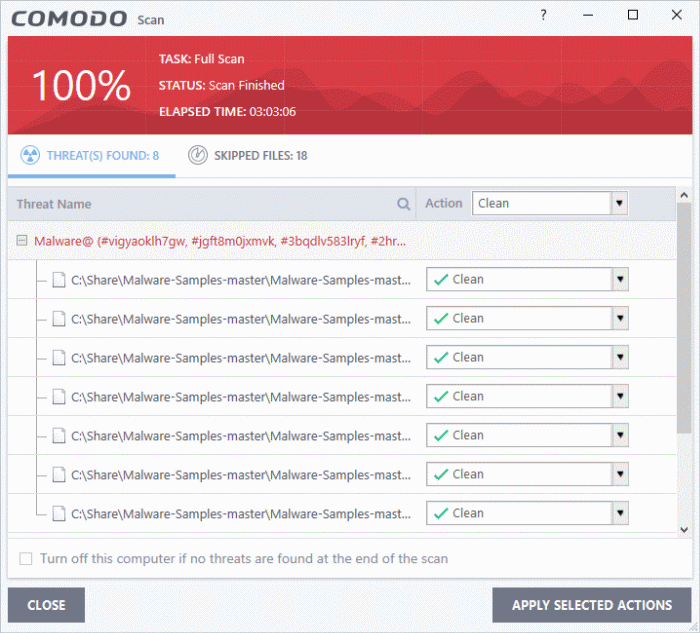
Scan results are shown when the scan finishes:
The results window has two tabs:
- Threats Found: The number of files scanned and the number of viruses found.
- Use the drop-down to choose whether to clean or ignore the threat.
- See 'Process infected files' if you need help with these options.
- Use the drop-down to choose whether to clean or ignore the threat.
- Skipped Files: Files that were not checked for viruses. The scanner skipped these files as they took longer than the scan time limit (default = 9 mins).
Click 'Tasks' > 'General Tasks' > 'Scan' > 'Rating Scan'
- A rating scan checks the trust-rating of files on your computer.
- Trust ratings are as follows:
- Trusted - The file is safe to run.
- Malicious - The file is malware. Depending on your settings, CCS will either quarantine the file immediately or present you with disinfection options.
- Unrecognized - Xcitium does not currently have a trust rating for the file. Unrecognized files should be run in the container to prevent them potentially attacking your computer. You can simultaneously submit them to Xcitium for a trust-rating analysis.
- Trusted - The file is safe to run.
Run a Rating scan
- Click the 'Scan' tile on the CCS home screen (click here for alternative ways to open the scan interface)
OR
- Click 'Tasks' > 'General Tasks' > 'Scan'
- Select 'Ratings Scan':
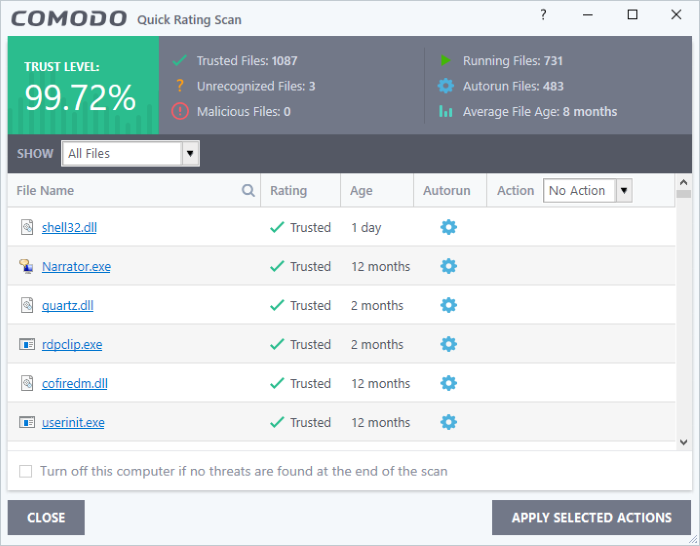
CCS analyzes all files on your computer and assigns them a trust rating. File ratings are shown in the results table at the end of the scan:
- File Name - The label of the scanned item
- Rating - The trust level of the file as per the cloud based analysis. The possible values are:
- Trusted
- Unrecognized
- Malicious
- Trusted
- Age - The length of time the item has been on your computer
- Auto-run - Whether or not the file automatically runs without user intervention.
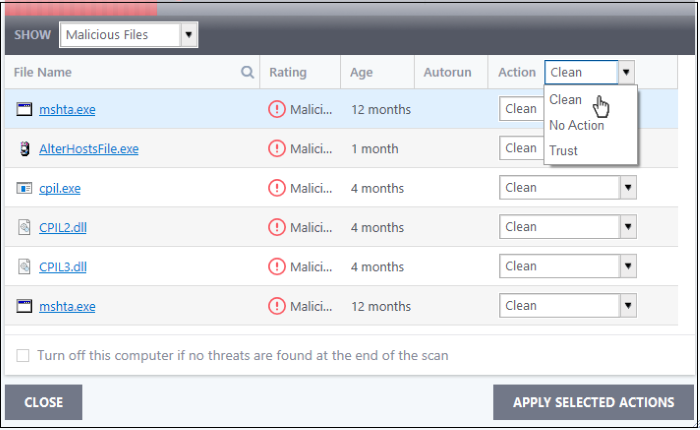
- Action - Select how you want to deal with the listed item.
Clean - Only for malicious items. The threat is placed in quarantine for your review. Click 'Tasks' > 'General Tasks' > 'View Quarantine' to open this area. You can restore or permanently delete files from quarantine as required. See Manage quarantined items to read more.
No Action - Ignores the warning this time only. The file not placed in quarantine. Use this option with caution. The file will be caught again by the next rating scan you run.
Trust - The file is awarded trusted status in the File List ('Settings' > 'File Rating' > 'File List'). The file will be excluded from any future rating scans. Only select this option if you are sure the item is trustworthy.
- Use the drop-down in the 'Action' column header to apply your choice to all listed files:
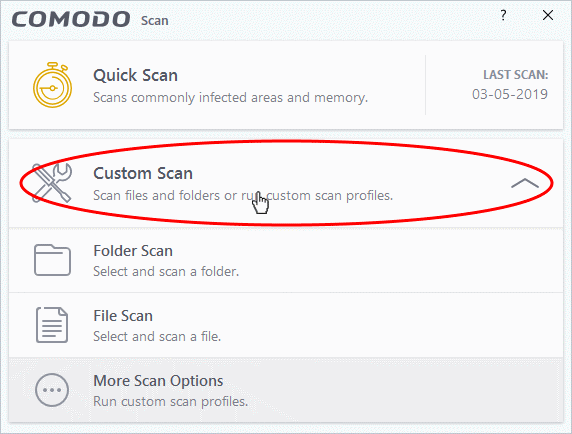
- Click 'Tasks' > 'General Tasks' > 'Scan' > 'Custom Scan'
- A custom scan lets you check specific files, folders, drives and areas on your computer.
You now have the following options:
- Folder Scan - scan individual folders or drives
- File Scan - scan an individual file
- More Scan Options - create a custom scan profile
Click 'Tasks' > 'General Tasks' > 'Scan' > 'Custom Scan' > 'Folder Scan'
- Folder scans let you check specific folders on your hard drive, CD/DVD, or external device.
Scan a specific folder
- Click the 'Scan' tile on the CCS home screen
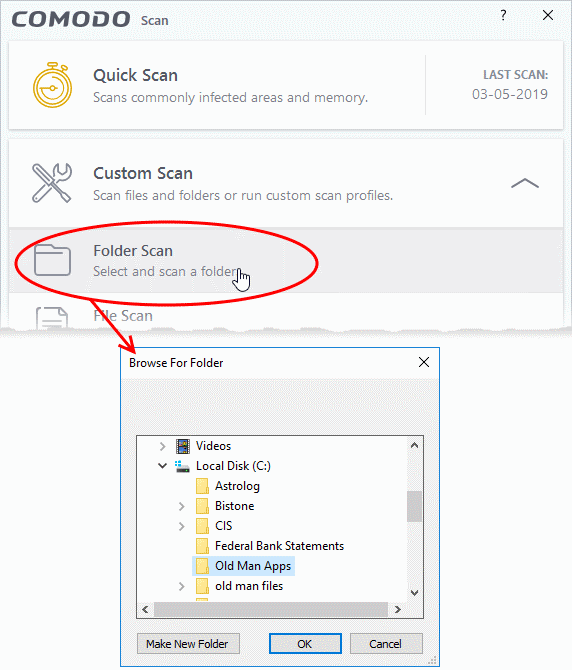
- Select 'Custom Scan' > 'Folder Scan'
- Browse to the folder you want to check then click 'OK':
- The CCS updates its virus signature database if required and starts scanning the items in the folder.
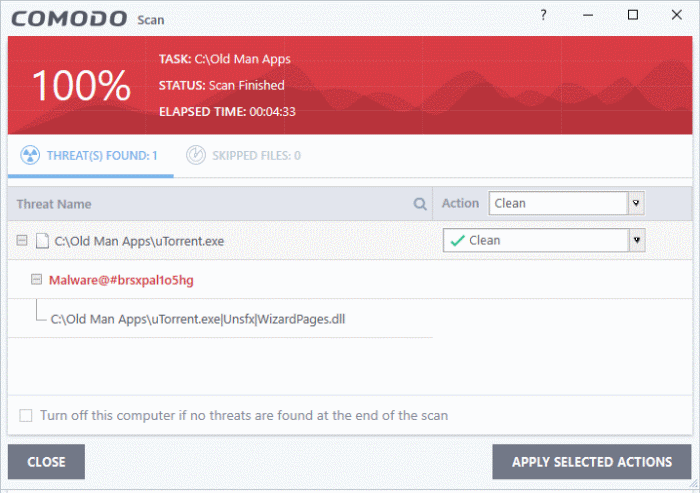
- Scan results are shown when the scan finishes:
The results window has two tabs:
- Threats Found: The number of files scanned and the number of viruses found.
- Use the drop-down to choose whether to clean or ignore the threat.
- See 'Process infected files' if you need help with these options.
- Use the drop-down to choose whether to clean or ignore the threat.
- Skipped Files: Files that were not checked for viruses. The scanner skipped these files as they took longer than the scan time limit (default = 9 mins).
Click 'Tasks' > 'General Tasks' > 'Scan' > 'Custom Scan' > 'File Scan'
- File scans let you check specific files on your hard drive, CD/DVD, or external device.
- For example, you might have downloaded a file from the internet which you want to scan before running.
Scan a specific file
- Click the 'Scan' tile on the CCS home screen
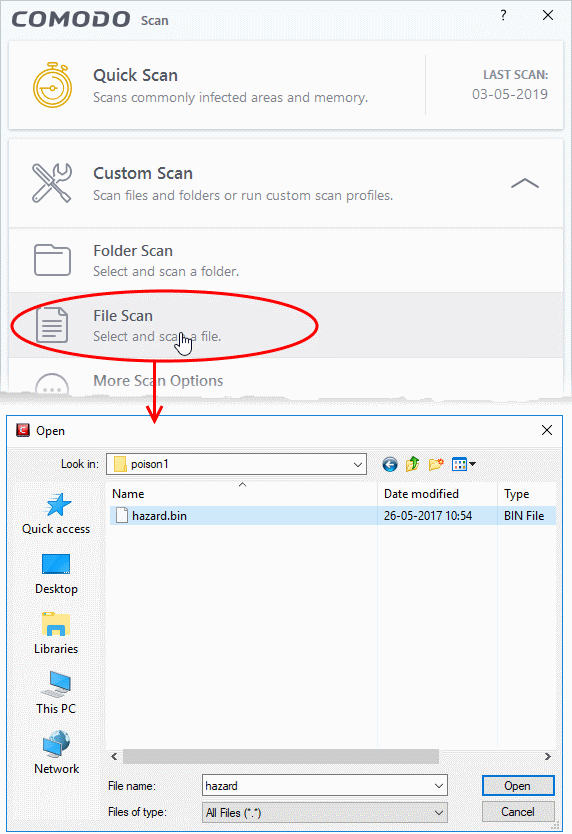
- Select 'Custom Scan' > 'File Scan'
- Browse to the file you want to scan and click 'Open'.
- The CCS updates its virus signature database if required and starts scanning the items in the folder.
- Scan results are shown when the scan finishes:
The results window has two tabs:
- Threats Found: The number of files scanned and the number of viruses found.
- Use the drop-down to choose whether to clean or ignore the threat.
- See 'Process infected files' if you need help with these options.
- Use the drop-down to choose whether to clean or ignore the threat.
- Skipped Files: Files that were not checked for viruses. The scanner skipped these files as they took longer than the scan time limit (default = 9 mins).
Create schedule and run a custom scan
Click 'Tasks' > 'General Tasks' > 'Scan' > 'Custom Scan' > 'More Scan Options'
- A custom scan profile lets you configure your own malware scan with your own settings.
- You can define exactly which files and folders to scan, what time they should be scanned, and other settings.
- Once saved, you can select and run your custom scan at any time
- See the following for more help:
- Click the 'Scan' tile on the CCS home screen
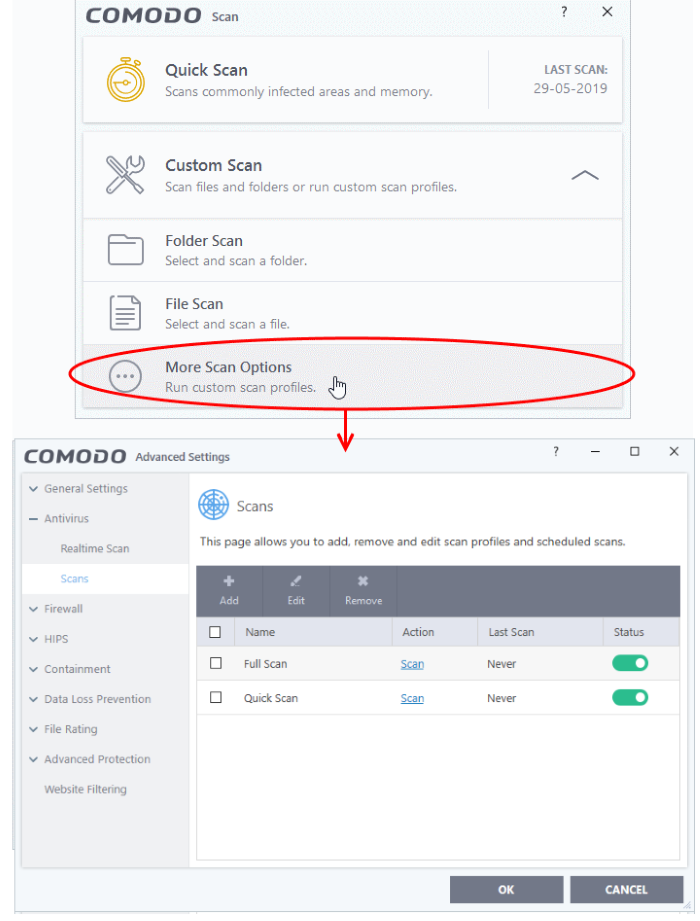
- Select 'Custom Scan' then 'More Scan Options'
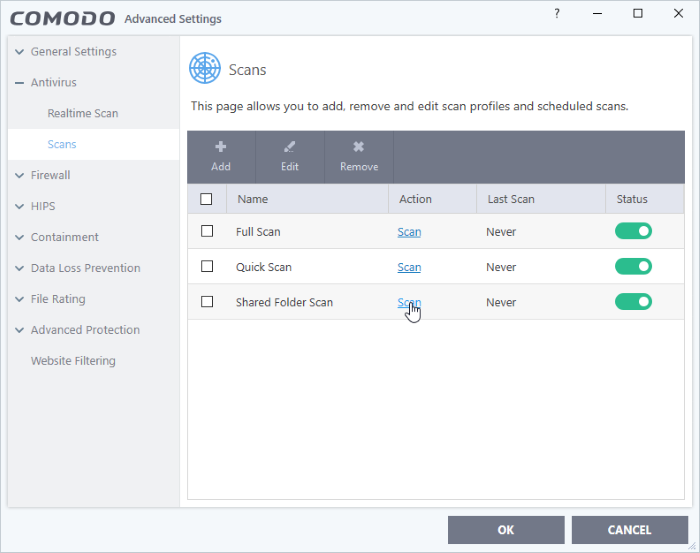
The scans page shows pre-defined and user created scan profiles. You can create and manage new profiles in this page:
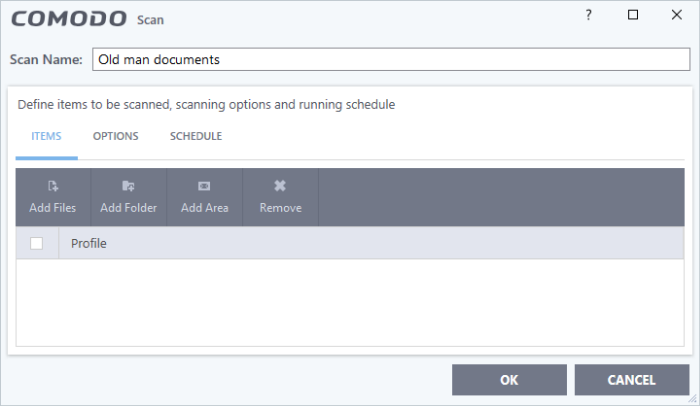
- Click 'Add' to create a new custom scan profile.
First, create a name for the profile. The next steps are:
- Click the 'Items' button at the top of the scan interface.
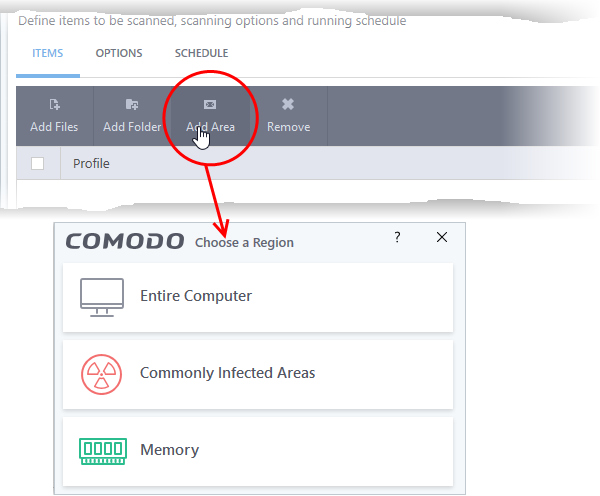
You can add items as follows:
- Add File – Pick individual files that you want to scan.
- Add Folder - Add entire folders to the profile. All files in the folder are covered by the scan.
- Add Area - Scan a computer region. The choices are 'Full Computer', 'Commonly Infected Areas' and 'System Memory'. See screenshot below:|
- Repeat the process to add more items to the profile. You can mix-and-match files, folders and areas in your custom scan.
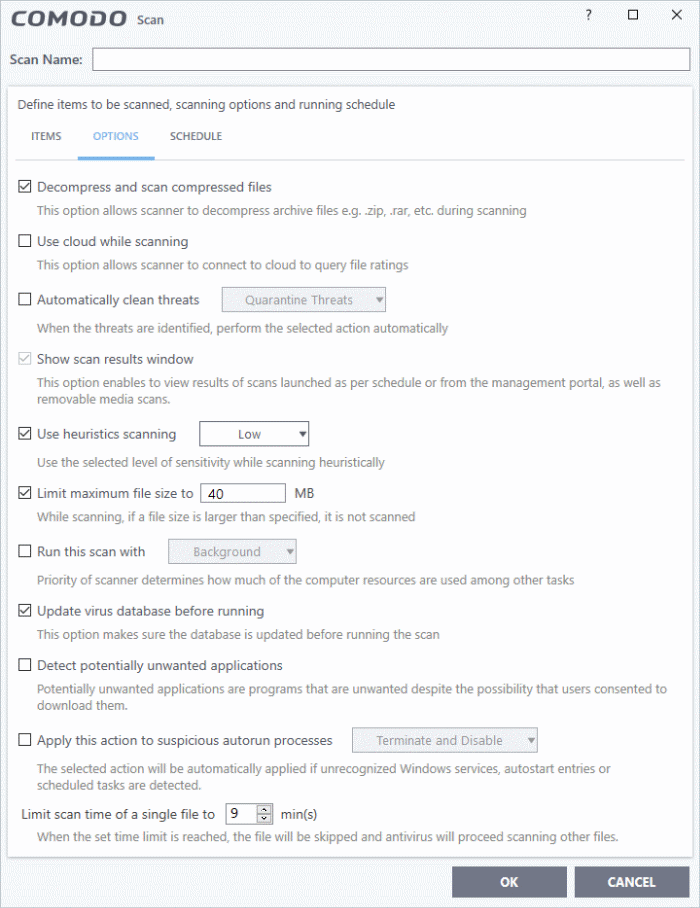
- Click 'Options' at the top of the scan interface
Decompress and scan compressed files - The scan will include archive files such as .ZIP and .RAR files. Supported formats include RAR, WinRAR, ZIP, WinZIP ARJ, WinARJ and CAB archives (Default = Enabled).
Use cloud while scanning - Improves accuracy by augmenting the local scan with an online look-up of Xcitium's latest virus database. This means CCS can detect the latest malware even if your virus database is out-dated. (Default = Disabled).
Automatically clean threats - Select whether or not CCS should automatically remove any malware found by the scan. (Default = Enabled).
- Disabled = Results are shown at the end of the scan with a list of any identified threats. You can manually deal with each threat in the results screen. See Process Infected Files for guidance on manually handling detected threats.
- Enabled = Threats are handled automatically. Choose the action that CCS should automatically take:
- Quarantine Threats - Malicious items will be moved to quarantine. You can review quarantined items and delete them permanently or restore them. See 'Manage Quarantined Items' for more details.
- Disinfect Threats - If a disinfection routine exists, CCS will remove the virus and keep the original file. If not, the file will be quarantined. (Default)
- Quarantine Threats - Malicious items will be moved to quarantine. You can review quarantined items and delete them permanently or restore them. See 'Manage Quarantined Items' for more details.
Show scan results window - You will see a summary of results at the end of the scan. This includes the number of objects scanned and the number of threats found.
Use heuristic scanning - Select whether or not heuristic techniques should be used in scans on this profile. You can also set the heuristic sensitivity level. (Default = Enabled)
Background. Heuristics is a technology that analyzes a file to see if it contains code typical of a virus. It is about detecting 'virus-like' attributes rather than looking for a signature which exactly matches a signature on the blacklist. This means CCS can detect brand new threats that are not even in the virus database.
If enabled, please select a sensitivity level. The sensitivity level determines how likely it is that heuristics will decide a file is malware:
- Low - Least likely to decide that an unknown file is malware. Generates the fewest alerts. Despite the name, this setting combines a very high level of protection with a low rate of false positives. Xcitium recommends this setting for most users. (Default)
- Medium - Detects unknown threats with greater sensitivity than the low setting, but with a corresponding rise in possible false positives.
- High - Highest sensitivity to detecting unknown threats. This also raises the possibility of more alerts and false positives.
Limit maximum file size to - Specify the largest file size that the antivirus should scan. CCS will not scan files bigger than the size specified here. (Default = 40 MB).
Run this scan with - If enabled, you can set the priority of scans on this profile The available options are:
- High
- Normal
- Low
- Background
If you disable this option then the scan runs in the background (Default)
Update virus database before running - CCS checks for and downloads the latest virus signatures before starting a scan. (Default = Enabled).
Detect potentially unwanted applications - The antivirus also scans for applications that (i) a user may or may not be aware is installed on their computer and (ii) may contain functionality and objectives that are not clear to the user. Example PUA's include adware and browser toolbars. PUA's are often bundled as an additional utility when installing another piece of software. Unlike malware, many PUA's are legitimate pieces of software with their own EULA agreements. However, the true functionality of the utility might not have been made clear to the end-user at the time of installation. For example, a browser toolbar may also contain code that tracks your activity on the internet. (Default = Enabled).
Apply this action to suspicious autorun processes - Specify how CCS should handle unrecognized auto-run items, Windows services, and scheduled tasks.
- Ignore - The item is allowed to run (Default)
- Terminate - CCS stops the process / service
- Terminate and Disable - Auto-run processes are stopped and the corresponding auto-run entry removed. In the case of a service, CCS disables the service.
- Quarantine and Disable - Auto-run processes are quarantined and the corresponding auto-run entry removed. In the case of a service, CCS disables the service.
Note 1 - This setting only protects the registry during the on-demand scan itself. To monitor the registry at all times, go to 'Advanced Settings' > 'Advanced Protection' > 'Miscellaneous'.
Note 2 - CCS runs script analysis on certain applications to protect their registry records.You can manage these applications in 'Advanced Settings' >'Advanced Protection' >'Script Analysis' >'Autorun Scans'.
Limit scan time of a single file to - Set the maximum time allowed to scan an individual file. CCS will skip files that take longer to scan than the specified time. Omitted files are shown in the 'Skipped Files' tab in the results screen.
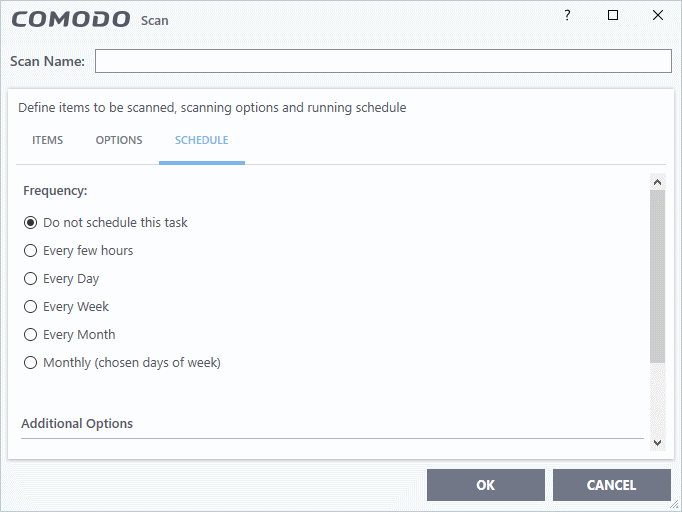
- Click 'Schedule' at the top of the 'Scan' interface
Do not schedule this task - The scan profile is created but not run automatically. The profile will be available for on-demand scans.
Every few hours - Run the scan at the frequency set in 'Repeat scan every NN hour(s)'
Every Day - Run the scan every day at the time specified in the 'Start Time' field.
Every Week - Run the scan on the days specified in 'Days of the Week', at the time specified in the 'Start Time' field. You can select the days of the week by clicking on them.
Every Month - Run the scan on the dates specified in 'Days of the month', at the time specified in the 'Start Time' field. You can select the dates of the month by clicking on them.
Monthly (chosen days of the week) – Run the scan on a specific week, or weeks, in a month. Select the weeks in from the menus.
Additional Options
- Run only when computer is not running on battery - The scan only runs when the computer is plugged into the power supply. This is useful when you are using a laptop or other mobile device.
- Run only when computer is IDLE - The scan only runs if the computer is in an idle state at the scheduled time. Select this option if you do not want the scan to disturb you while you are using your computer.
- Turn off computer if no threats are found at the end of the scan - Will turn off your computer if no threats are found during the scan. This is useful when you are scheduling scans to run at nights.
- Run during Windows Automatic Maintenance - Only available for Windows 8 and later. Select this option if you want the scan to run when Windows enters into automatic maintenance mode. The scan will run at maintenance time in addition to the configured schedule.
- The option 'Run during Windows Maintenance' will be available only if 'Automatically Clean Threats' is enabled for the scan profile under the 'Options' tab. See Automatically Clean Threats.
Note: Scheduled scans will only run if the profile is enabled. Use the switch in the 'Status' column to turn the profile on or off.
Click 'OK' to save the profile.
The profile is available for deployment in future.
- Click 'Tasks' > 'General Tasks' > 'Scan'
- Click 'Custom Scan' from the 'Scans' interface
- Click 'More Scan Options' from the 'Custom Scan' pane
- The 'Advanced Settings' interface will open at the 'Scans' panel.
- Click 'Scan' beside the required scan profile.
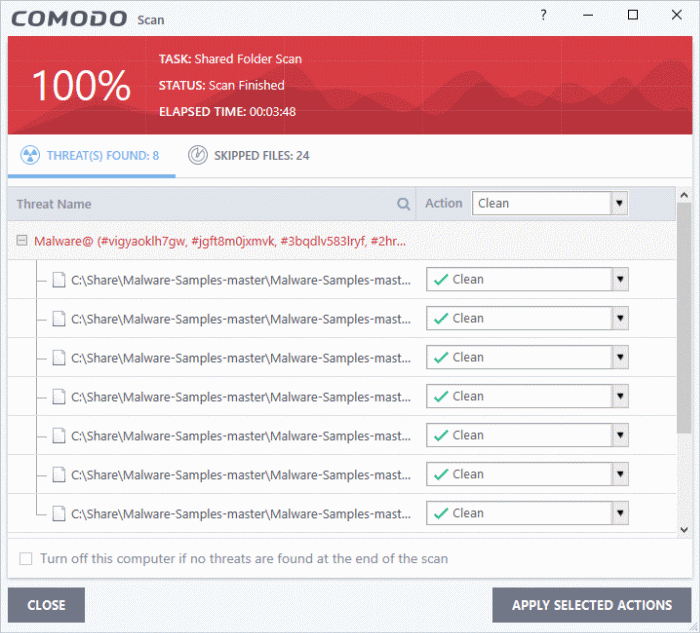
The scan starts immediately. Results are displayed afterwards:
The results window contains two tabs:
- Threats Found: The number of files scanned and the number of viruses found.
- Use the drop-down to choose whether to clean, quarantine or ignore the threat.
- See 'Process infected files' if you need help with these options.
- Use the drop-down to choose whether to clean, quarantine or ignore the threat.
Note: You will only see the drop-down menus if 'Automatically clean threats' is disabled for the selected scan profile. See the description above.
- Skipped Files: Files that were not checked for viruses. The scanner skipped these files as they took longer than the scan time limit (default = 9 mins).
The results screen at the end of a scan lets you clean, quarantine or ignore any detected threats. The screen contains two tabs:
- Threats Found: Number of malicious items discovered by the scan. You can clean, quarantine or ignore the threats.
- Skipped Files: Files that were omitted because they took longer to scan than the time limit.
View identified threats and take actions
- Click the 'Threats Found' tab (if it is not already open)
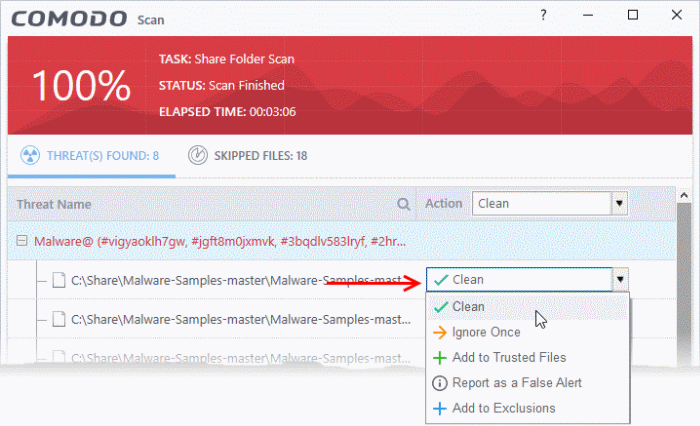
- Use the drop-down menus to apply actions to individual files:
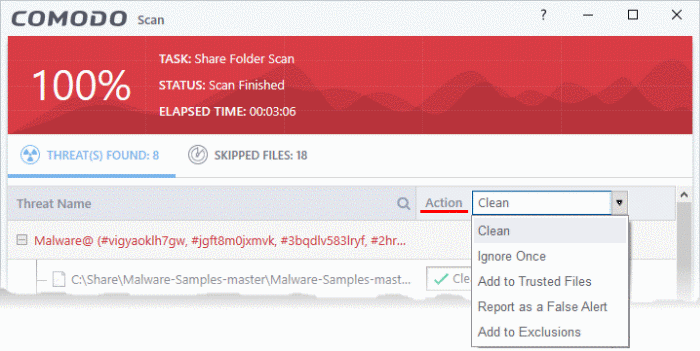
- Or use the 'Action' drop-down at top-right to apply your choice to all threats at once.
Available actions are:
- Clean - The virus is removed from the file if a disinfection routine is available. The cleaned file is left in its original location. If no routine exists, the file is quarantined. Click 'Tasks' > 'Advanced Tasks' > 'View Quarantine' to view this area. You can restore or permanently delete files from quarantine as required. See Manage Quarantined Items for more details.
- Ignore Once - Allows the file to run this time only. The file will still get flagged as a threat by future antivirus scans.
- Add to Trusted Files - Creates an exception for the file by giving it a 'Trusted' rating in the local CCS File List ('Settings' > 'File Rating' > 'File List'). The AV scanner will not detect the file as a threat in future scans. Only select this option if you are sure the file is trustworthy.
- Report as a False Alert - Sends the file to Xcitium for further analysis. Submitting a false positive will also add the item to trusted files, so it won't get flagged by future scans. The file will be added to the global whitelist if Xcitium confirms the false-positive
- Add to Exclusions - Creates an exception for the file so it won't get flagged by future virus scans. You can review exclusions at 'Settings > 'Advanced Protection' > 'Scan Exclusions'. The file's trust rating does not change.
- Click 'Apply Selected Actions'. The result is shown in the 'Actions' column:
- Click the 'Skipped Files' tab
The 'Skipped Files' tab shows files that were omitted from the scan. These files took longer than the max. time allowed to scan a single file. The max. time allowed depends on the profile used for the scan.
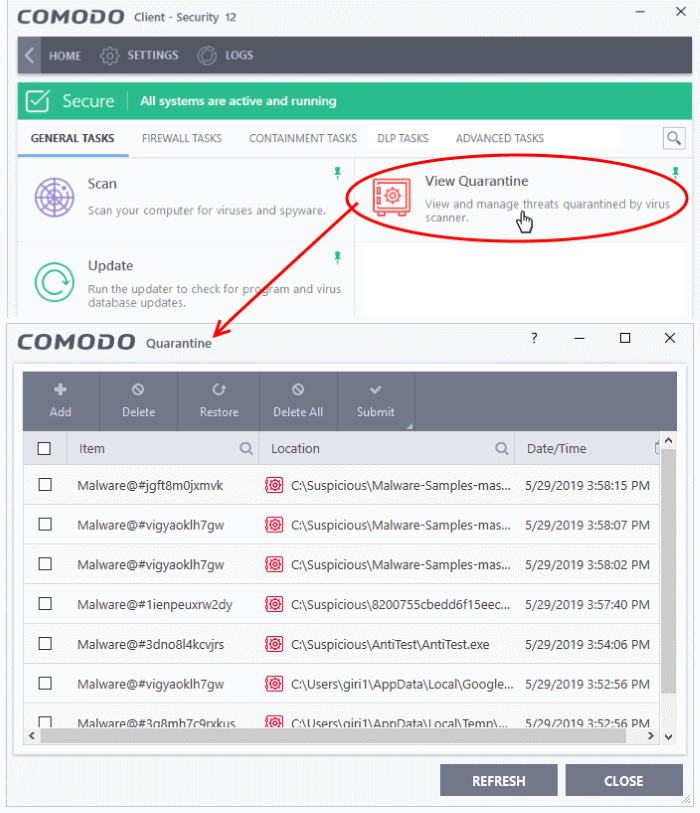
Click 'Tasks' > 'General Tasks' > 'View Quarantine'
- CCS moves the items identified as infected or malicious by its realtime, on-demand and scheduled scans to quarantine in order to prevent them from infecting your system.
- All files in quarantine are encrypted so they cannot run or cause harm.
- You can analyze the trustworthiness of these items and take actions like permanently remove them from your computer or restore them to their original location.
Open the 'Quarantine' interface
- Click 'Tasks' on the CCS home screen
- Click 'General Tasks' > 'View Quarantine'
- Item - The name of the malicious component
- Location - The file path of the item
- Date/Time - When the item was moved to quarantine.
The interface lets you review quarantined files and take the following main actions:
- Permanently delete the file
- Restore the file to its original location
- Submit the file to Xcitium Valkyrie for analysis
- Click 'Tasks' on the CCS home screen
- Click 'General Tasks' > 'View Quarantine'
- Select the items in the quarantine interface and click the 'Delete' button at the top.
- Click the 'Delete All' button if you want to permanently remove all quarantined items.
- The files will be deleted from your computer
- Click 'Tasks' on the CCS home screen
- Click 'General Tasks' > 'View Quarantine'
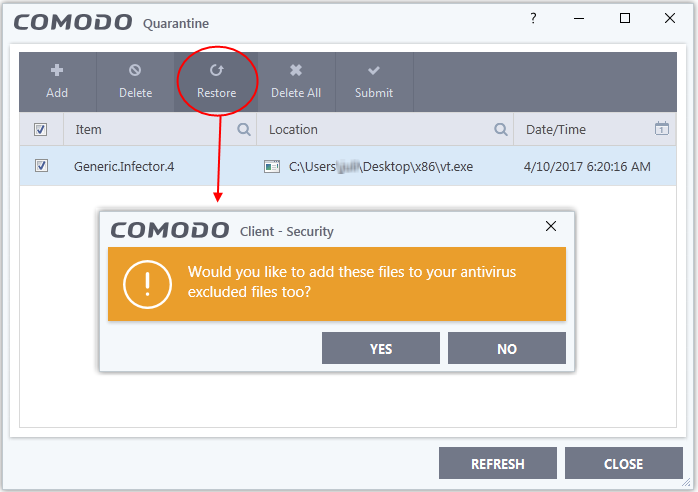
- Select the items to be moved back to their original locations and click the 'Restore' button at the top.
You will be asked if you want to add the item to the Scan Exclusions list:
- 'Yes' - The file is restored to its original location. It is not flagged as dangerous nor quarantined by future antivirus scans.
- 'No' - The file is restored to its original location. If the file contains malware it will be re-quarantined by the next antivirus scan.
Submit selected quarantined items to Valkyrie for analysis
Valkyrie is Xcitium's file testing and verdicting system. After submitting your files, Valkyrie will analyze them with a range of static and dynamic tests to determine the file's trust rating.
- Click 'Tasks' on the CCS home screen
- Click 'General Tasks' > 'View Quarantine'
- Select the items you want to submit. You can send several files at once.
- Click 'Submit' > 'Submit to Valkyrie' in the top-menu. The files will be immediately sent to Valkyrie for analysis.
- All submitted files are analyzed at Valkyrie. If they are found to be trustworthy, they will be added to the Xcitium safe list (white-listed). Conversely, if they are found to be malicious then they will be added to the database of virus signatures (blacklisted).
