How to save bandwidth by locally distributing updates
- This article explains how to configure Endpoint Manager (EM) clients so managed devices receive commands and updates through a proxy on your network.
- Using a proxy can reduce bandwidth consumption and accelerate the distribution of updates in large networks.
Use the following links to learn more:
Scenario 1 - Manage and update endpoints not connected to the internet
Scenario 2 - Configure endpoints to fetch database updates from a local caching server
Scenario 3 - Configure endpoints to fetch updates from another managed endpoint
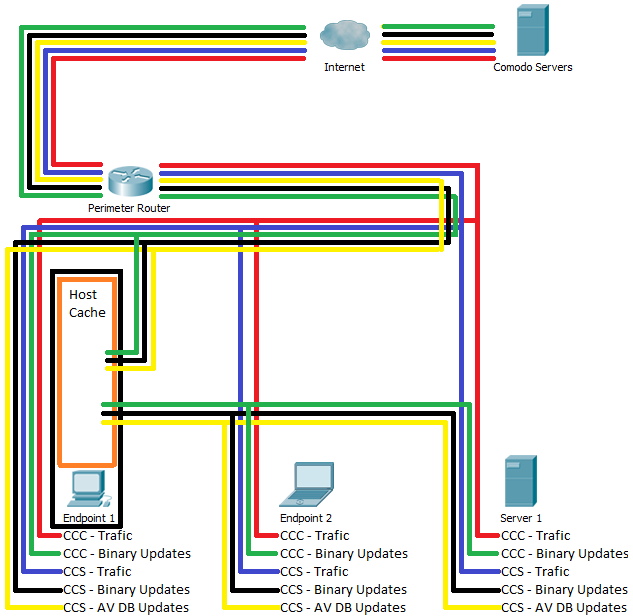
Endpoint Manager (EM) uses two types of clients installed on Windows devices:
- Communication Client (CC) - Connects the device to EM for central management. It receives commands and tasks from EM and implements them on the device. The client also informs EM of the endpoint's status.
- Comodo Client - Security (CCS) - This is the security software. CCS includes antivirus, firewall, threat-containment, web-filtering, and more.
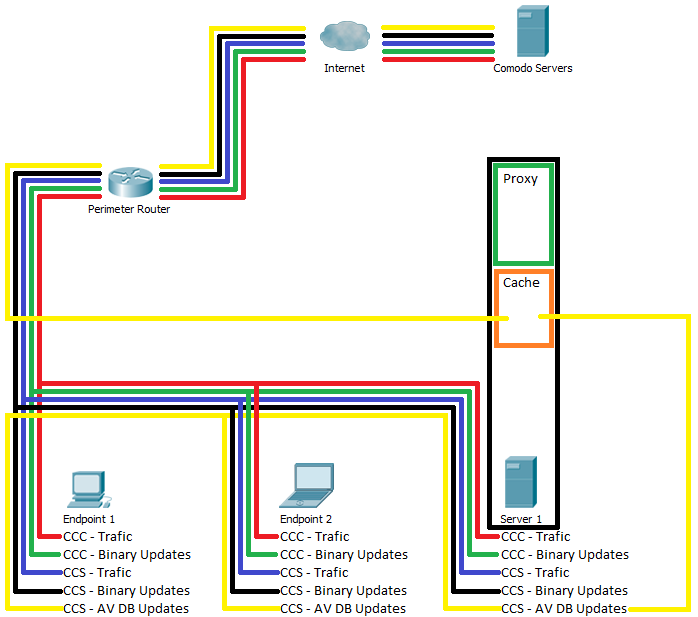
By default, CC and CCS connect directly to Comodo servers to receive commands and product/database updates:

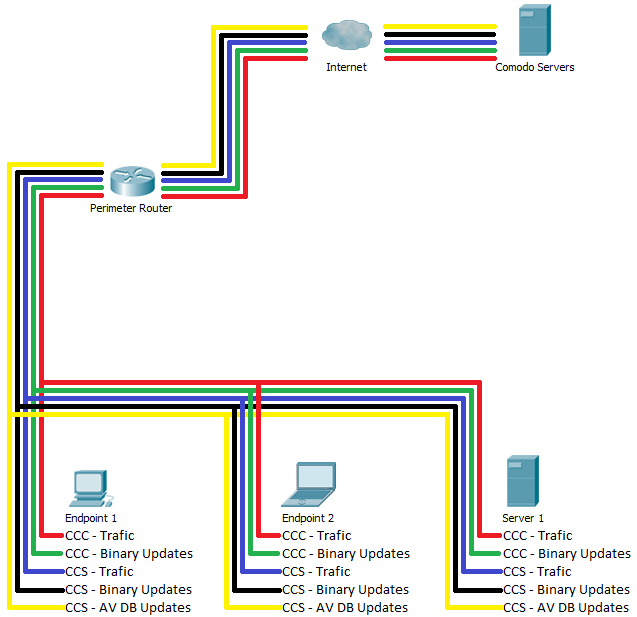
You may have to make changes to your firewall in order for endpoints to connect services.
The following links show the FQDN's, IP addresses, and ports you may need to allow/open. The addresses vary slightly depending on your location:
- EU instance:
https://help.comodo.com/topic-399-1-786-11019-Appendix-1a---ITSM-Services---IP-Nos,-Host-Names-and-Port-Details---EU-Customer.html
- US Instance:
https://help.comodo.com/topic-399-1-786-12452-Appendix-1b---ITSM-Services---IP-Nos,-Host-Names-and-Port-Details---US-Customer.html
- This section explains how to deploy CC and CCS onto managed endpoints.
- If you have already deployed the clients then you can skip to the use-case best suited for your needs.
There are different ways to install CC and CCS on managed endpoints:
- Create a group policy object (GPO) on your Active Directory (AD) server
See https://help.comodo.com/topic-459-1-994-14747-EM---Bulk-Enrollment-via-Active-Directory.html
- Use the Auto-Discovery and Deployment Tool (ADDT):
See https://help.comodo.com/topic-399-1-786-11230-Enroll-Windows-Devices-using-Auto-Discovery-and-Deployment-Tool.html
- Manually enroll devices by sending the installation link via email:
https://help.comodo.com/topic-399-1-787-10251-Step-4---Enroll-Users-Devices.html
Once CC is installed on an endpoint, you can install CCS from the console:
- Alternatively, you can download CC to a shared folder then deploy CC and CCS with the initial database by running a VB script on your server. If you use this script in GPO, for example, you can minimize bandwidth consumption when installing CC, CCS and the initial AV DB.
The VBS template is available at:
https://scripts.comodo.com/frontend/web/topic/vbscript-to-install-ccc-ccs-and-the-initial-antivirus-database-on-desktopsservers-using-different-options
- Another option is to install CC using any of the options described above, but replace the default CCS installation with a procedure or a monitor. See the following pages for help to do this:
The options above help to minimize bandwidth consumption when installing CCS and the initial AV DB.
- See https://help.comodo.com/topic-399-1-786-10971-Apply-Procedures-to-Windows-Devices.html for help to run a procedure on managed devices.
- See https://help.comodo.com/topic-399-1-786-10996-View-Procedure-Results.html for help to view procedure results.
Scenario 1 - Manage and update endpoints not connected to internet
- Setup a proxy / caching server on your network.
- The proxy relays client traffic and commands between the devices and Endpoint Manager. It also receives status updates from managed devices then forwards them to the EM server.
- The local cache downloads CC / CCS program and database updates from Comodo servers. Managed devices can then fetch the updates from the caching server.
- This reduces internet bandwidth usage by allowing individual devices to obtain updates over the local network.

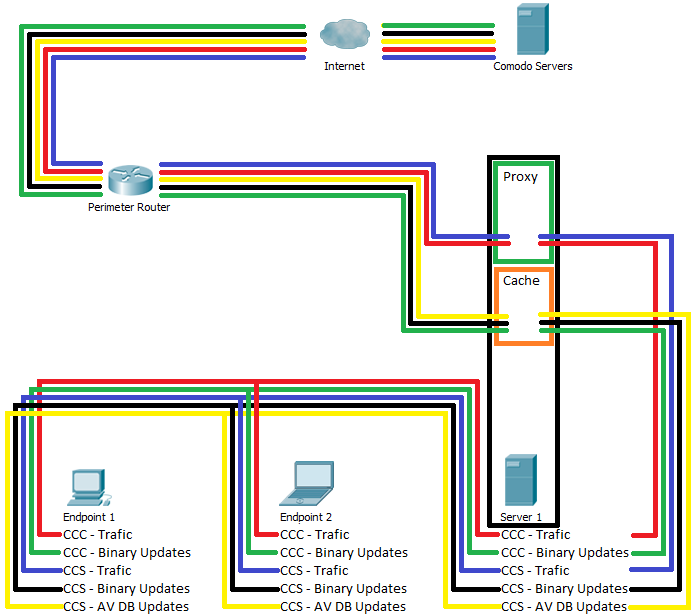
The proxy / caching server can be set up by installing the Squid proxy on a Windows server.
- Step 1 - Install Squid
- Step 2 - Configure Squid to cache updates
- Step 3 - Add a 'Client Proxy' section to the device profile so they fetch updates from the local server
- Download the installer from https://drive.google.com/open?id=1wsChfKWJvqVmUNjkpdI0-cUqwjlWKOM2
- Run the installer

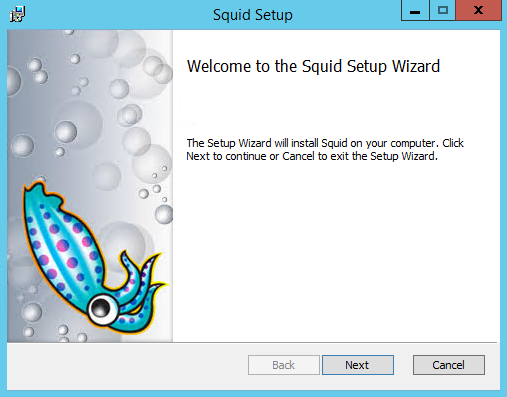
- Click 'Next'

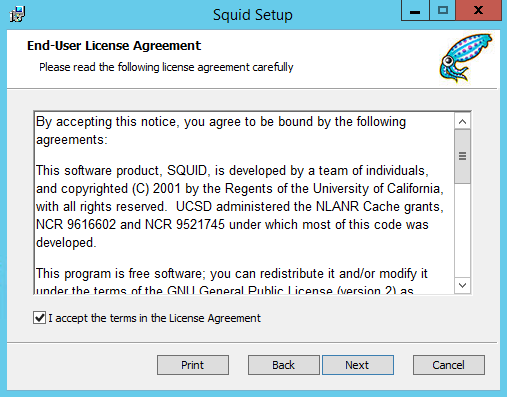
- Read and accept the license and click 'Next'


- By default, Squid is installed on the folder C:\Squid_ITarian\
- Specify the location if you want it to be installed on a different location
- Specify the location if you want it to be installed on a different location
- Click 'Next'
- Enter the network, the DNS server and the port that you want to Squid to use.

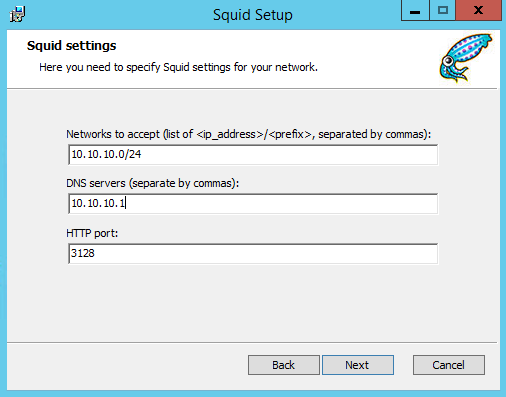
- Click 'Next' to continue.
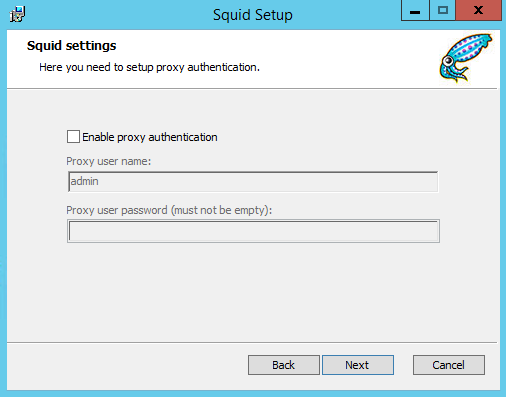
- Specify whether you want devices to authenticate themselves to the proxy:
- If enabled, enter a user-name and password then click 'Next'
- If enabled, enter a user-name and password then click 'Next'
- Click 'Install'


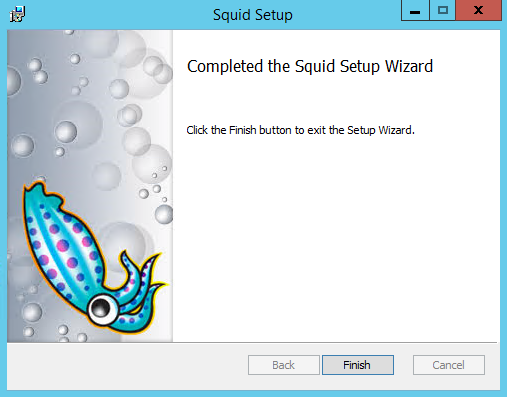
- Click Finish to complete the wizard. You will see the Squid icon in the system tray.

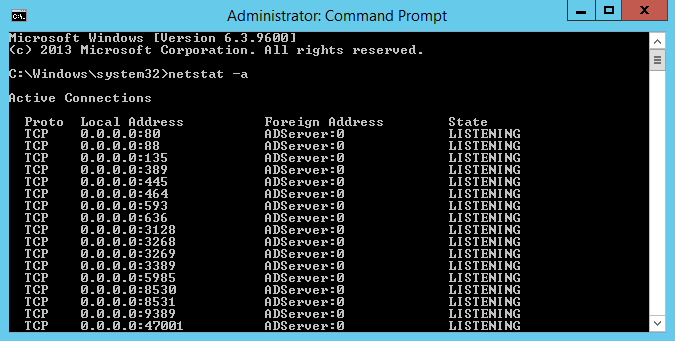
Confirm whether Squid is using the specified port:
- Open the command prompt and type 'netstat -a'
Step 2 - Configure Squid to cache updates

- Right-click on the Squid system tray icon then choose 'Stop Squid Service':


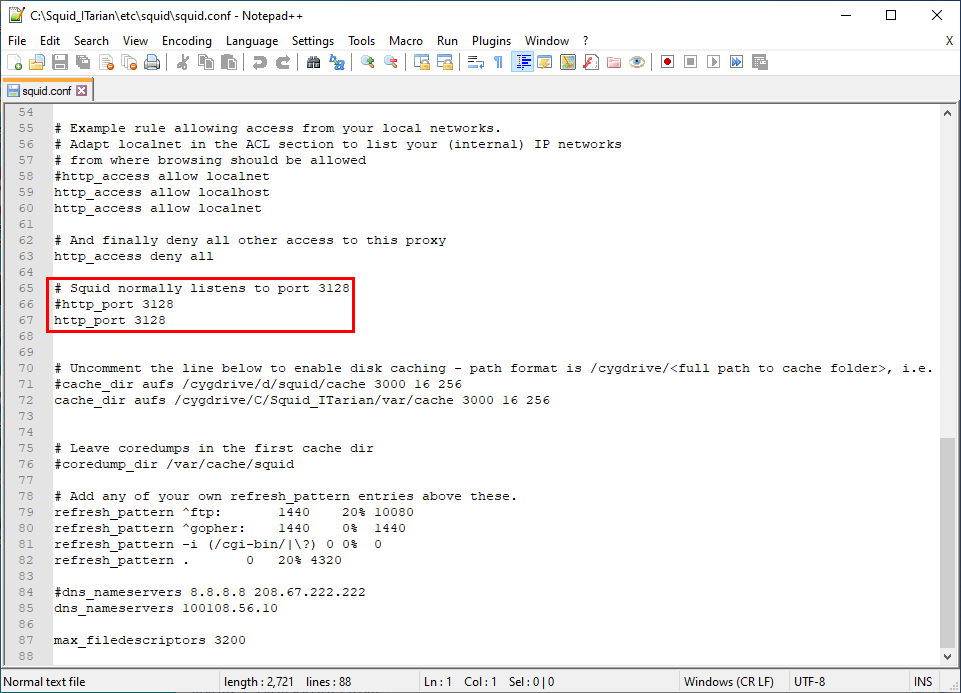
- From the same menu, choose 'Open Squid Configuration'.
- Please replace this section:
“
# Uncomment the line below to enable disk caching - path format is /cygdrive/<full path to cache folder>, i.e.
#cache_dir aufs /cygdrive/d/squid/cache 3000 16 256
cache_dir aufs /cygdrive/C/Squid_ITarian/var/cache 3000 16 256
# Leave coredumps in the first cache dir
#coredump_dir /var/cache/squid
# Add any of your own refresh_pattern entries above these.
refresh_pattern ^ftp: 1440 20% 10080
refresh_pattern ^gopher: 1440 0% 1440
refresh_pattern -i (/cgi-bin/|\?) 0 0% 0
refresh_pattern . 0 20% 4320
”
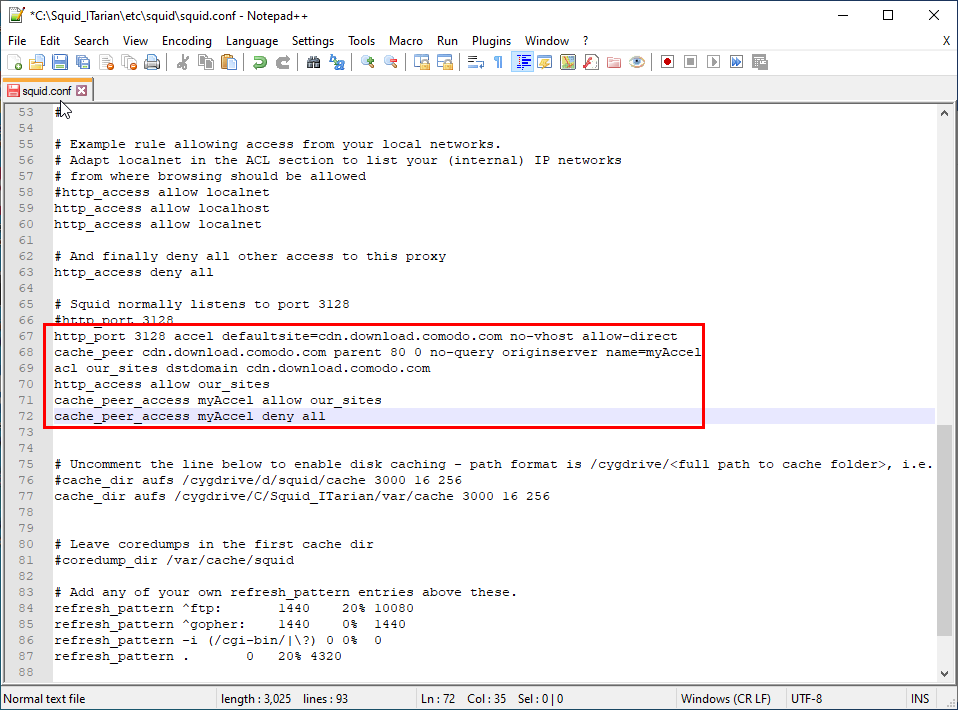
With:
“
# Uncomment the line below to enable disk caching - path format is /cygdrive/<full path to cache folder>, i.e.
#cache_dir aufs /cygdrive/d/squid/cache 3000 16 256
maximum_object_size 700 MB
cache_dir aufs /cygdrive/C/Squid_ITarian/var/cache 3000 16 256
# Add any of your own refresh_pattern entries above these.
refresh_pattern -i download.comodo.com/.* 129600 100% 129600
refresh_pattern -i cdn.download.comodo.com/.* 129600 100% 129600
”
- Save the file.
- Right-click on the Squid system tray icon then choose 'Start Squid Service'
Step 3 - Configure the devices to fetch updates from the caching server
You next need to configure the clients to contact your proxy for updates and commands. For this you need to:
- Add a 'Client Proxy' section to the profile active on the devices, specifying your new Squid proxy as the proxy server
- See https://help.comodo.com/topic-399-1-786-11195-Client-Proxy-Settings.html for help to do this.
Note:
You can enroll new devices via the proxy by downloading the bulk installation package as an MST file. You need to specify the same proxy in both the profile applied to the devices and in the bulk installation package. See https://help.comodo.com/topic-399-1-786-10851-Enroll-Windows,-Mac-OS-and-Linux-Devices-by-Installing-the-Communication-Client.html for help to download and deploy the bulk installation package.
Scenario 2 - Configure endpoints to fetch database updates from a local caching server
- Setup a caching server on your network
- The local cache downloads database updates from Comodo servers. Managed devices can then fetch the updates from the caching server.
- This reduces internet bandwidth usage by allowing individual devices to obtain updates over the local network.

- Step 1 - Setup a local cache
- Step 2 - Add an 'Updates' section to the device profile so they fetch updates from the local server
There are two ways you can setup a local cache:
- Install Squid on server and set it to 'Accelerator' mode
- Install ESM Update Mirror tool on a Windows device
Install Squid on server and configure it to 'Accelerator' mode
- Install Squid and configure it to cache updates as explained above.
- Enable accelerator mode in Squid by following the steps below:
- Right-click on the Squid system tray icon then choose 'Stop Squid Service'
- From the same menu, choose 'Open Squid Configuration'.
- Alternatively, navigate to 'C:\Squid_ITarian\etc\squid\folder' and open the 'squid.conf' file using Notepad++
- Alternatively, navigate to 'C:\Squid_ITarian\etc\squid\folder' and open the 'squid.conf' file using Notepad++
3. Find string 'Squid normally listens to' as shown in the screenshot below:

4.Replace string “http_port 3128” with the following content:
http_port 3128 accel defaultsite=cdn.download.comodo.com no-vhost allow-direct
cache_peer cdn.download.comodo.com parent 80 0 no-query originserver name=myAccel
acl our_sites dstdomain cdn.download.comodo.com
http_access allow our_sites
cache_peer_access myAccel allow our_sites
cache_peer_access myAccel deny all

5. Save the file
6. Right-click on the Squid system tray icon then choose 'Start Squid Service'
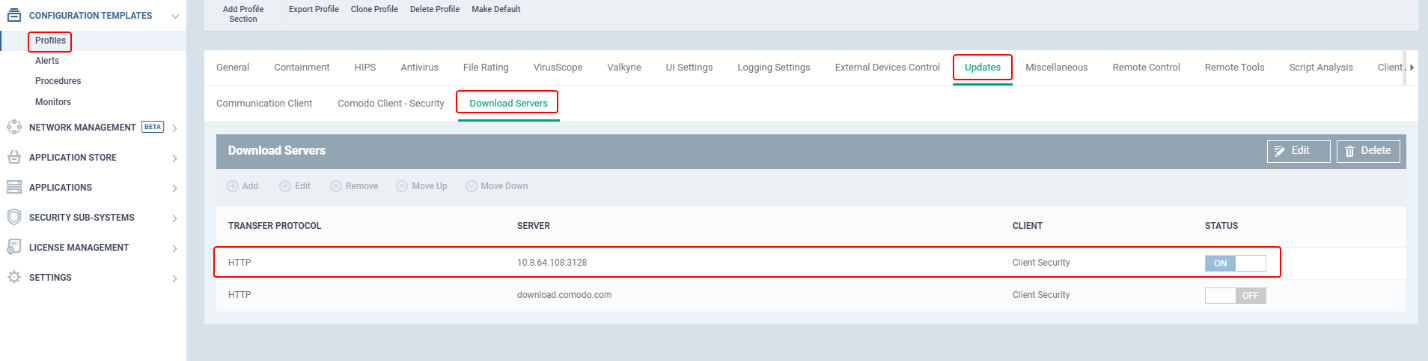
Next: Add 'Updates' section to the device profile and add the caching server as a download server.
Install ESM Update Mirror tool on a Windows device
- Download the 'ESM Update Mirror' installer from https://drive.google.com/file/d/0B4qKr5xfENWBS0FOUHM2VDFQMnc/view
- Run the installer

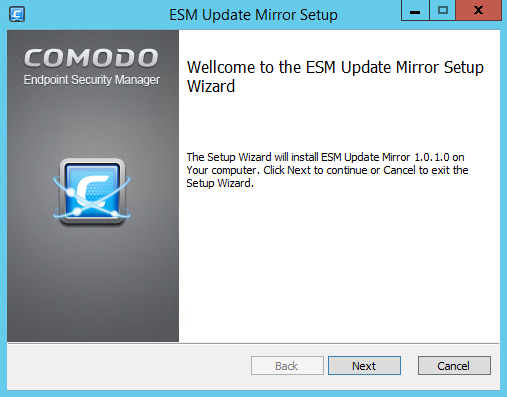
- Click 'Next'

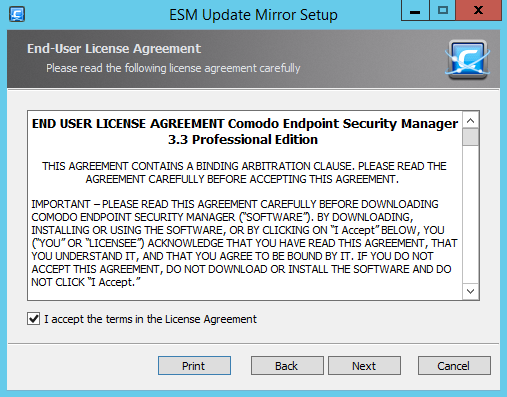
- Read and accept the license and click 'Next'

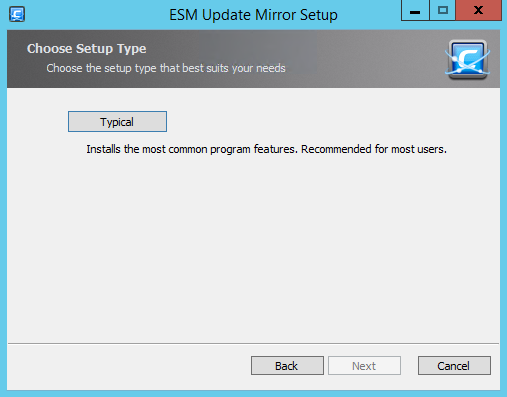
- Click 'Typical' for full installation

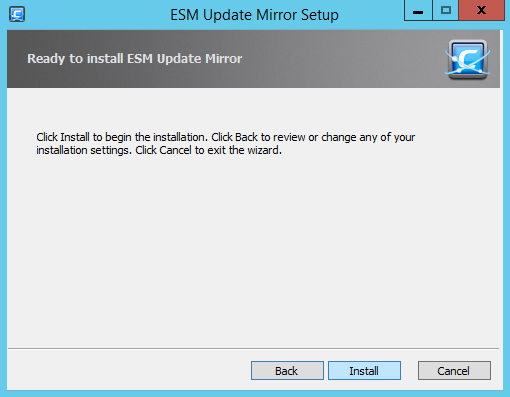
- Click 'Install'

- Click 'Finish' to complete the wizard.
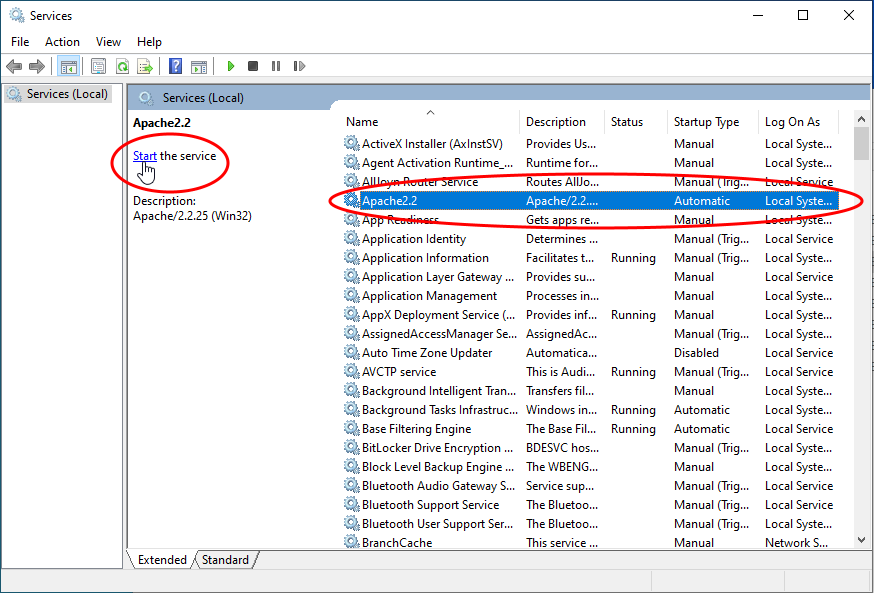
- Ensure that the service has started:
- 'Run' > Enter 'services.msc' > locate 'Apache2.2'.
- Click the 'Start' link on the left if the service is not running.
- 'Run' > Enter 'services.msc' > locate 'Apache2.2'.

Step 2 - Configure the devices to fetch updates from the caching server
You next need to configure the clients to contact your caching server for database updates. For this you need to:
- Add an 'Updates' section to the profile active on the devices, then add your new caching server as the download server
- See https://help.comodo.com/topic-399-1-786-11193-Communication-Client-and-Comodo-Client---Security-Application-Update-Settings.html for help to do this.

Scenario 3 - Configure endpoints to fetch updates from another managed endpoint
- Configure managed endpoints share updates with other devices through the local network
- The device which first downloads the CC / CCS program updates and database updates as configured in the 'Updates' section acts as a source
- Other devices fetch the updates from the source device through the local network
- This reduces internet bandwidth usage by allowing individual devices to obtain updates over the local network.

- Configure 'Updates' section of the profile active on the devices to collect updates and distribute updates to other endpoints in the local network.
- Ensure that 'Enable Communication Client to distribute updates to clients in the same network' is selected in the 'Updates' section > 'Communication Client' tab of the profile applied to the source device
- See https://help.comodo.com/topic-399-1-786-11193-Communication-Client-and-Comodo-Client---Security-Application-Update-Settings.html for help to configure the 'Updates' section.
- Ensure that 'Enable Communication Client to distribute updates to clients in the same network' is selected in the 'Updates' section > 'Communication Client' tab of the profile applied to the source device
- Once done:
- The endpoint first checks other endpoints to see if the update is installed on them
- If available, the client fetches the update from the local endpoint
- If not available, the client downloads the update from the server set in the 'Download Servers' tab of the 'Updates' section
- This endpoint then becomes the source from which other endpoints collect their updates.
- The endpoint first checks other endpoints to see if the update is installed on them
Test this scenario:
Step 1:
- Get two endpoints for testing:
- Endpoint 1 - Configure this as source
- Endpoint 2 - Configure this as the recipient
- Endpoint 1 - Configure this as source
- Clone a profile to have two similar profiles:
- Profile 1 - Apply to Endpoint 1
- Profile 2 - Apply to Endpoint 2
- Profile 1 - Apply to Endpoint 1
- Edit the profiles as shown below:
Profile 1 - 'Updates' section
'Communication Client' tab
- Select 'Enable Communication Client to distribute update packages among the clients in the same network to reduce network inbound traffic'
- Select 'Communication Client packages'
- Select 'Comodo Client - Security packages'
- Select 'Comodo Client - Security Antivirus Database packages'
- Select 'Select specific devices to be proxy for distributing packages' and add 'Endpoint 1'
- Optional. Select 'Enable Network traffic limitation' and enter the maximum % of network bandwidth that can be used to share updates. (Default = 30%)
- Optional. Select 'Enable device count limitation' and enter the maximum number of devices with which the client is allowed to simultaneously share updates. (Default = 10, Maximum = 20).
- Select 'Use download servers directly in case of any communication issue'
- Select 'Communication Client packages'
- Click 'Save' for your settings to take effect
Profile 2 - 'Updates' section
'Communication Client' tab
- Select 'Enable Communication Client to distribute update packages among the clients in the same network to reduce network inbound traffic'
- Select 'Communication Client packages'
- Select 'Comodo Client - Security packages'
- Select 'Comodo Client - Security Antivirus Database packages'
- Select 'Select specific devices to be proxy for distributing packages' and add 'Endpoint 1'
- Optional. Select 'Enable Network traffic limitation' and enter the maximum % of network bandwidth that can be used to share updates. (Default = 30%)
- Optional. Select 'Enable device count limitation' and enter the maximum number of devices with which the client is allowed to simultaneously share updates. (Default = 10, Maximum = 20).
- Disable 'Use download servers directly in case of any communication issue' so that the device will receive updates only from a local device
- Select 'Communication Client packages'
'Comodo Client - Security' tab
- Disable "Check for database update every"
- Click 'Save' for your settings to take effect
Step 2:
- Install CCS on the endpoints
Endpoints save all updates in the path C:\ProgramData\Comodo\Comodo ITSM\distribution
- Browse to the location on Endpoint 1 - the files are saved for distribution after the update of local installation of CC and CCS
- Browse to the location on Endpoint 2 - the files are deleted after the update of local installation of CC and CCS


---