How to set up Remote Control for End-User
Introduction
MSP customers can configure Endpoint Manager settings to allow end-user to access their computer remotely while working from home. This wiki helps you to achieve it.
Process In Detail
-
Login to the Comodo One/ Dragon Portal
-
Create a profile and configure it
-
Set the profile as “default” so that newly enrolled devices get the profile automatically
-
Create a separate device group for each user
-
Create a separate role for each user
-
Configure the role permission
-
Create user accounts with an associated role for end-user
-
Instructions for end-user
Create a profile and configure it
-
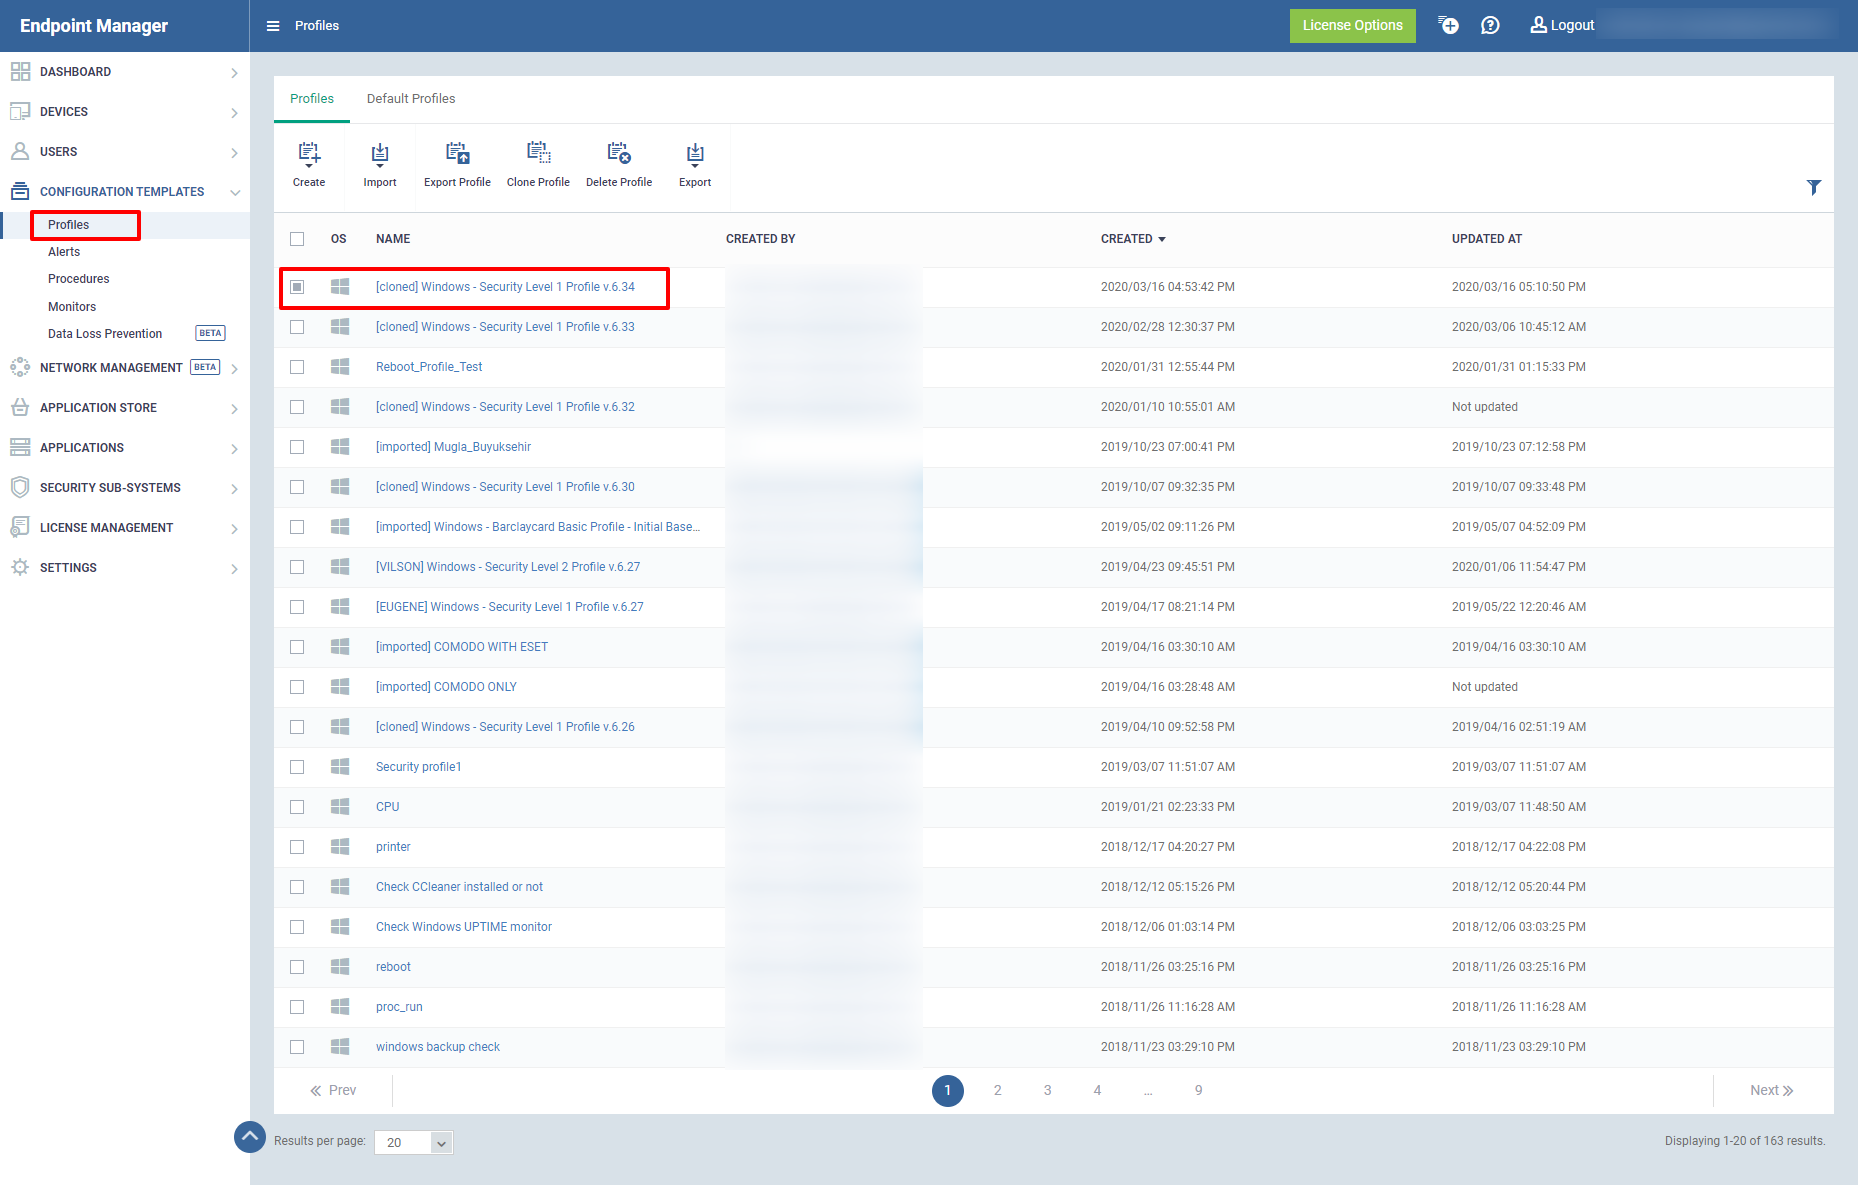
Go to Configuration Templates - > Profiles
-
Click the name of the Windows or MAC profile that you want to work on
-
Select the Profile you want to apply changes
Select a profile…
-
Click Edit and check Is default to set the profile as the default
-
Click Save.
-
Click Remote Control tab (or click Add Profile Section > Remote Control)
-
Click Edit
-
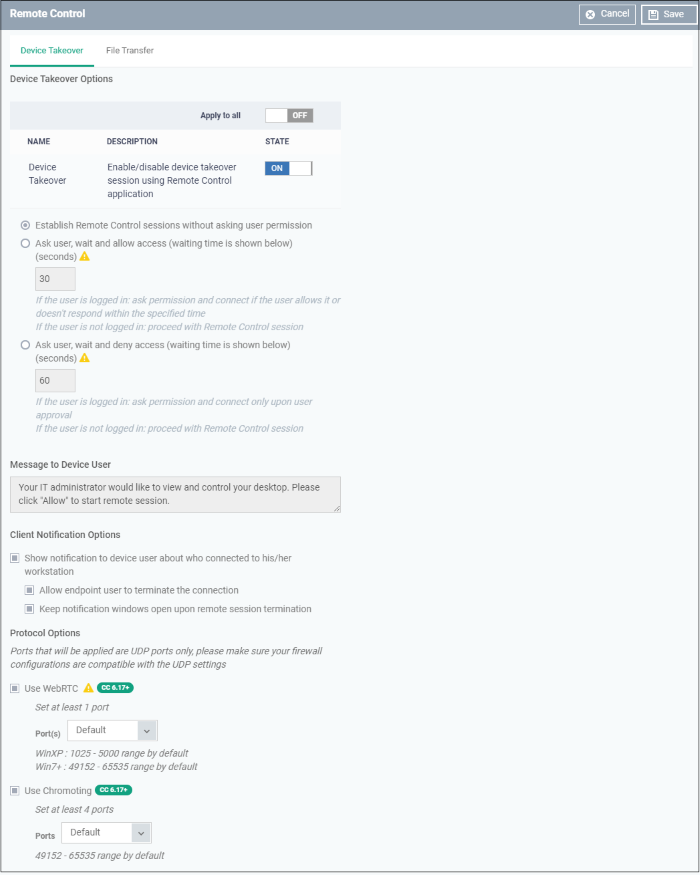
Enable Device Takeover gives you full control of the remote device'. Use the On/Off button to enable the device to take over the session
-
Select ' Establish Remote Control sessions without asking user permission ' option.
'Establish Remote Control sessions without asking user permission'…
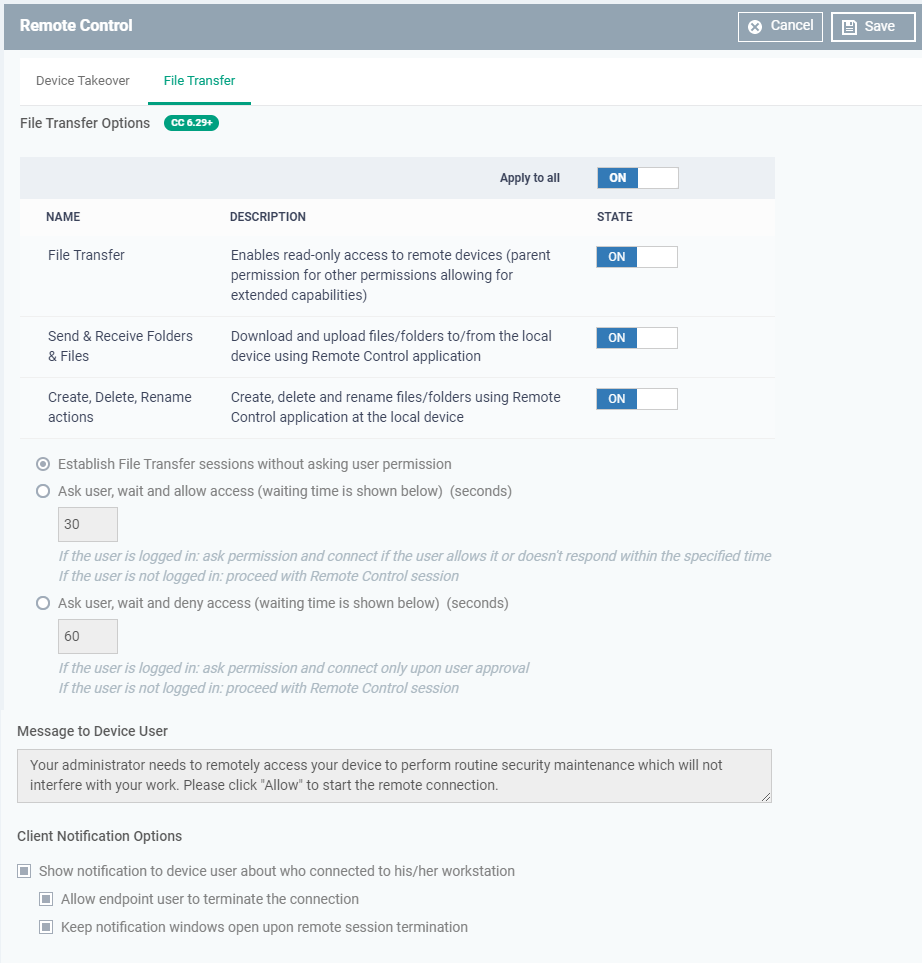
- Go to 'File Transfer' Tab
- Use the On/Off button to enable the permissions
- Establish File Transfer sessions without asking user permission - Connects without the user permission
- Select the Ask user, wait and allow access (waiting time is shown below) (seconds)- If the user is logged in they ask permission and connect if the user allows it or doesn't respond within the specified given time
- Ask user, wait and deny access (waiting time is shown below) (seconds) - If the user is logged in ask permission and connect only upon user approval, If the user is not logged in it will proceed with Remote Control session
'Establish File Transfer sessions without asking user permission '…
-
Click Save
Create Separate Device Groups for Each Employee
-
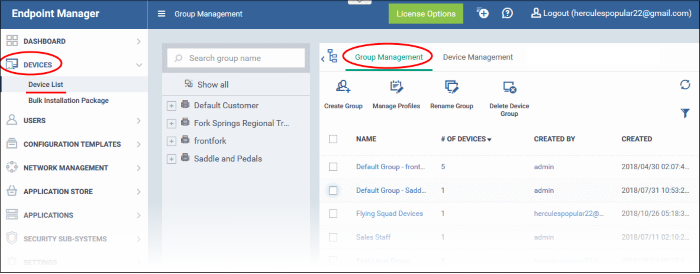
Click Devices > Device List > Group Management
Create Separate Device Groups…
-
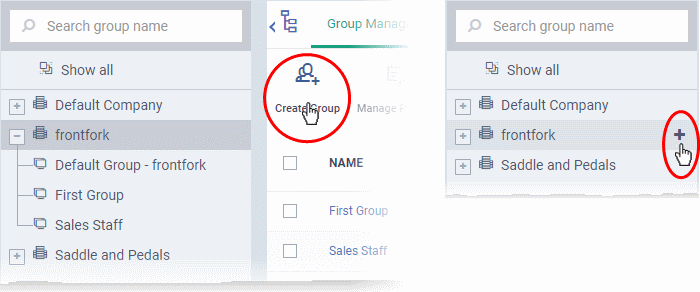
Click the Create Group button
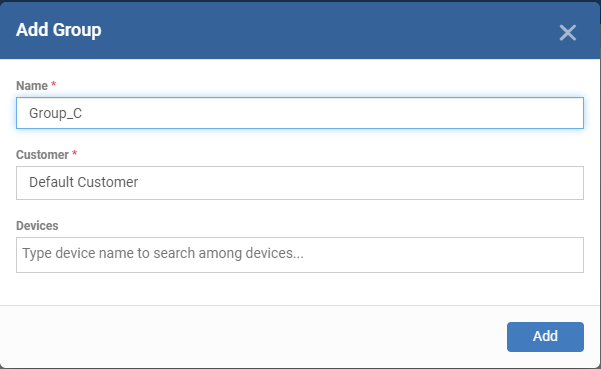
The Add Group interface will open…
-
Fill Name and Company sections and click Add.
-
Repeat the process to add separate groups for each employee.
Create Separate User Roles for Each Employee
-
Click Users > Role Management
-
Create a role by clicking Add Role
-
Create a name for the role for example employee_device_management
-
Add a description to the role
-
The created new role will be displayed in the Roles section
-
Click the created role to assign the role and permission for that.
-
Role Permissions - Explains the access rights and privileges to the users
Assign Users - Select the users to assign a role
Access Scope - Select which companies or groups can be accessed by the members
Role permissions
- Click the Role permission tab
Each item in the list lets you choose permissions for a specific area.
-
Click the down arrow next to a module name to view its permissions
OR
-
Click 'Expand' at the top to view all permissions
-
Use the switches on the right to enable or disable specific permissions
-
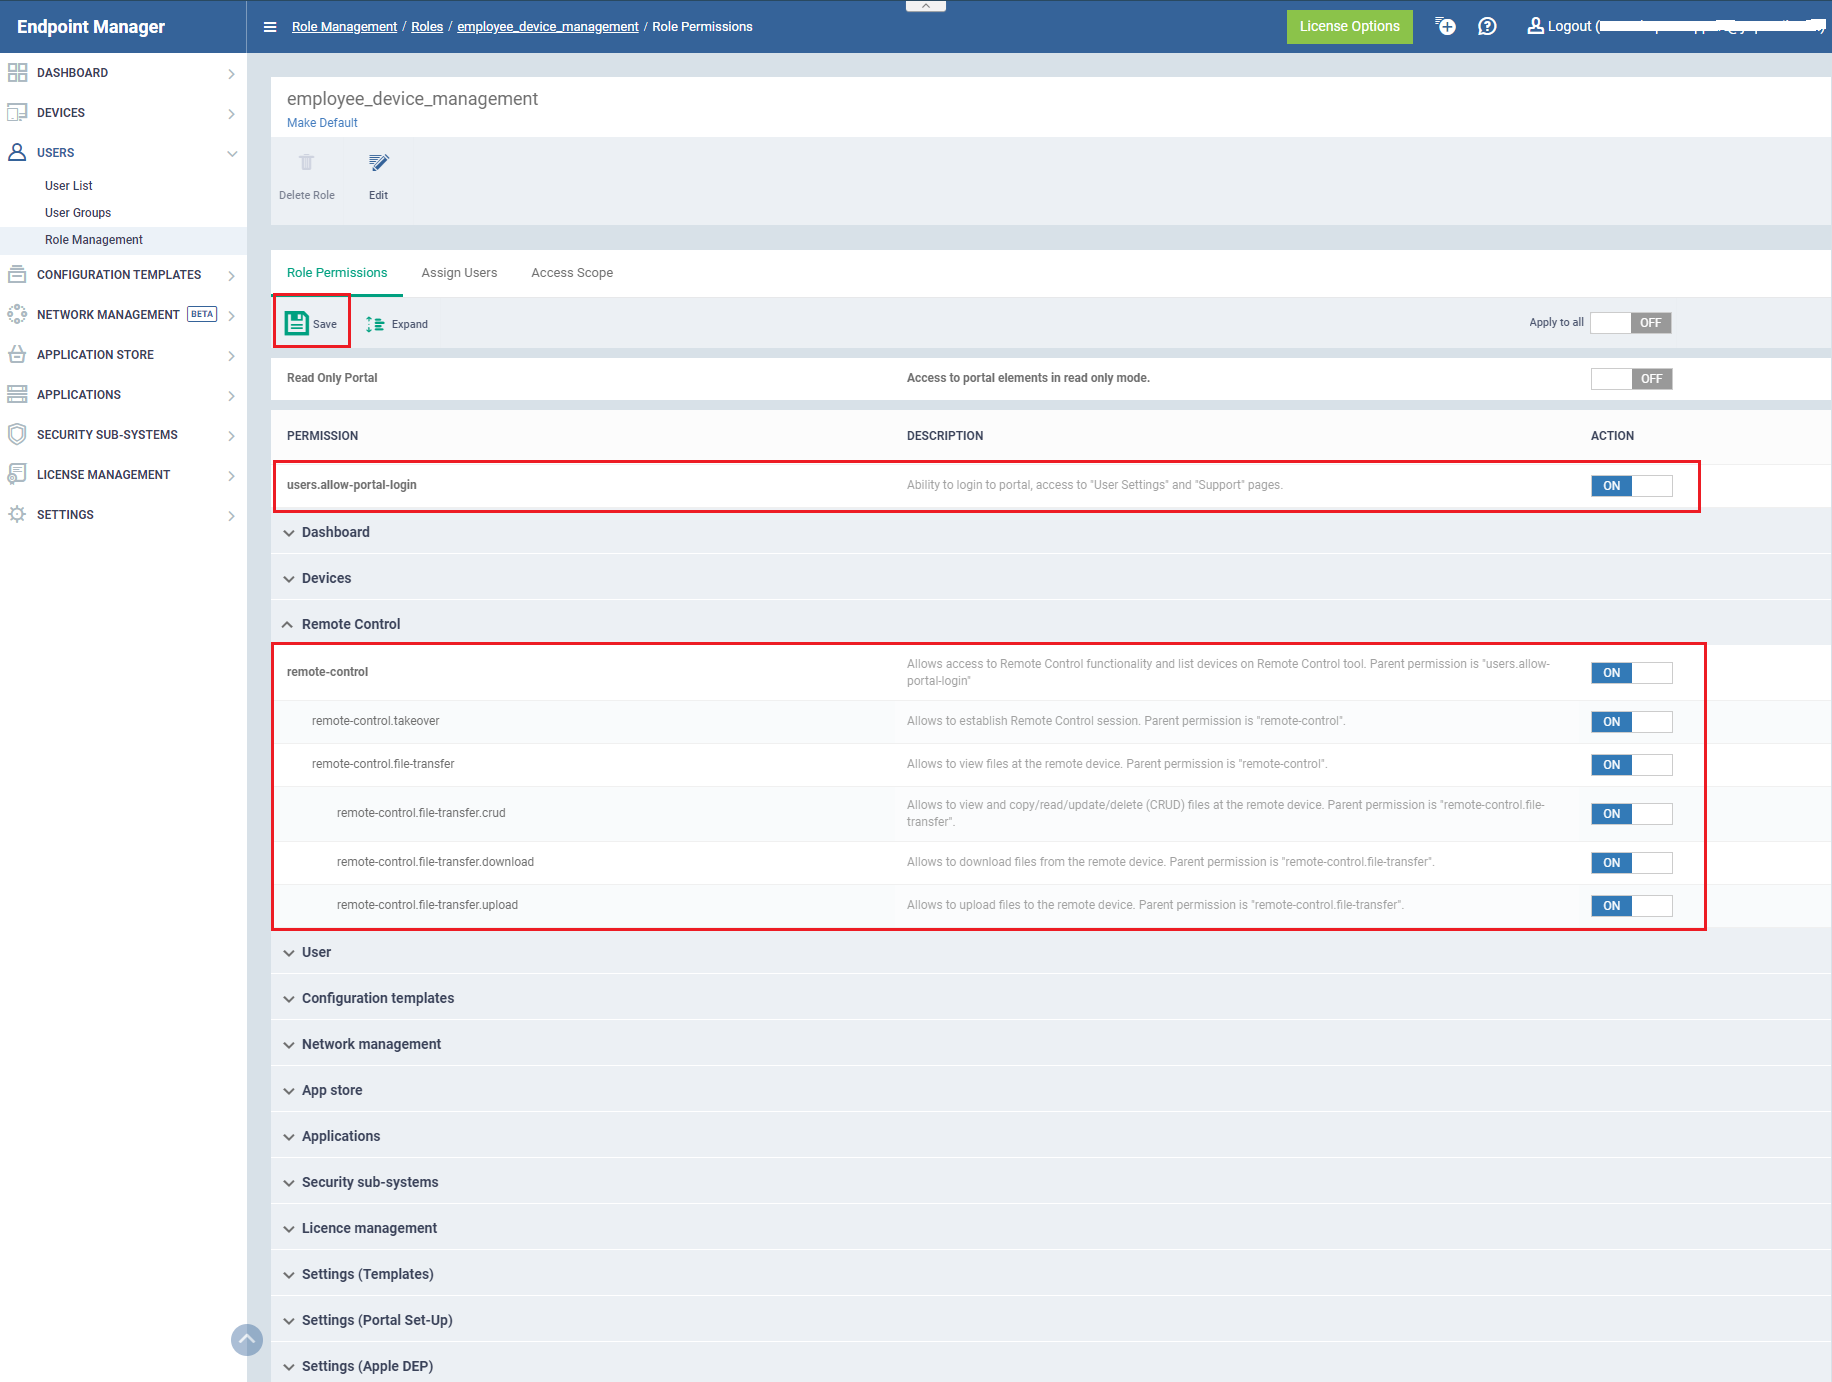
Enable “users.allow-portal-login” permission for the user to be able to login to Remote Control Application.
-
Enable the Remote Control tab to access the device for remote
-
Click 'Save' for your settings to take effect
Set up the Role Permissions…
Access Scope
-
Click the 'Access Scope' tab
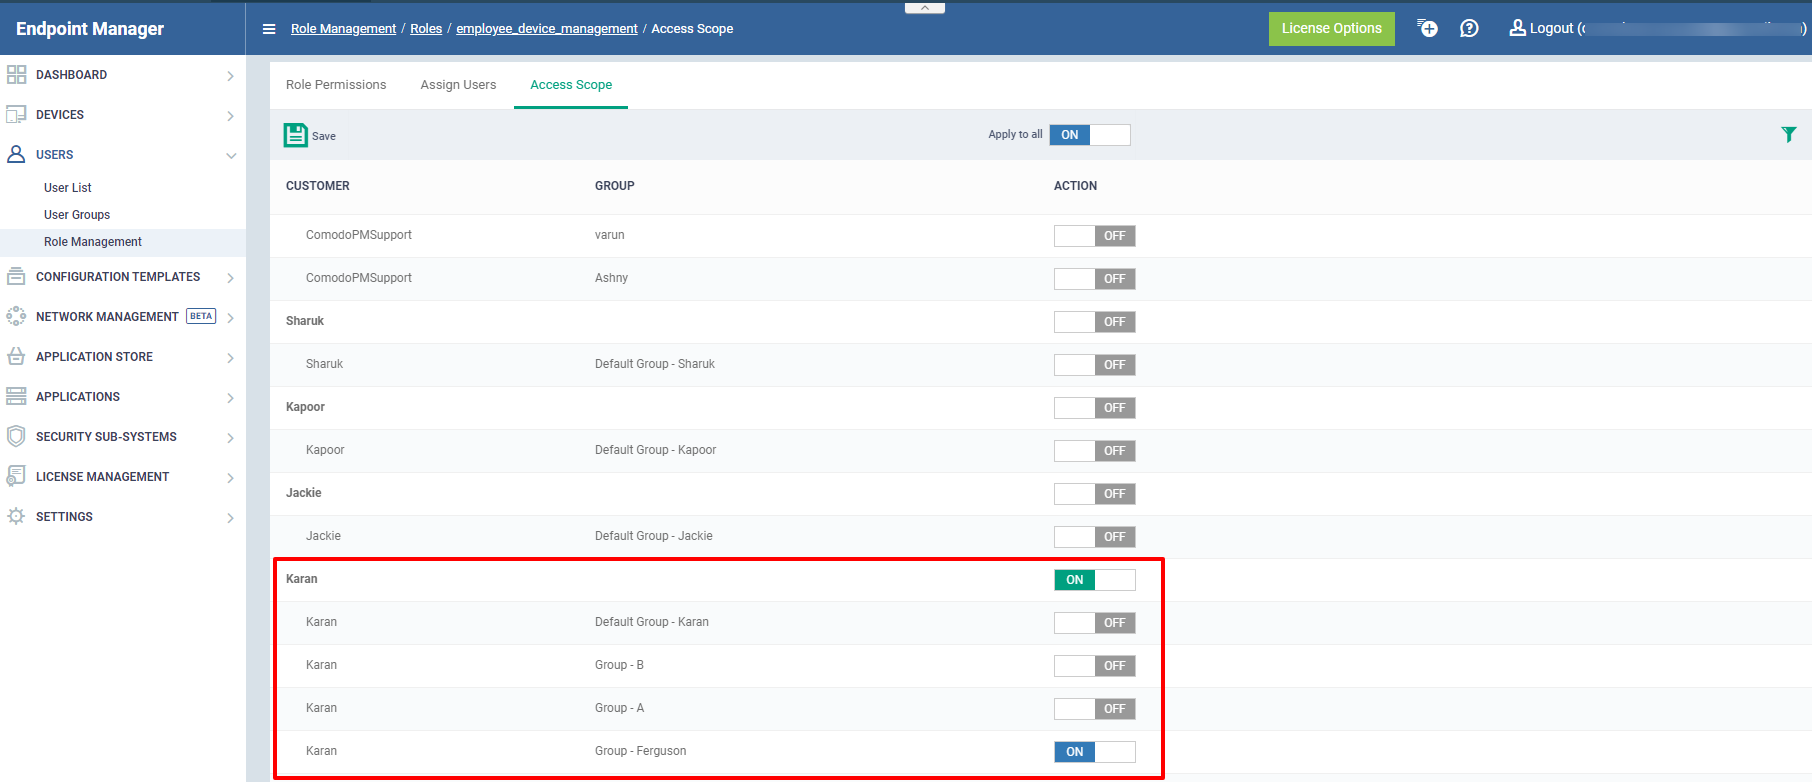
This shows the list of which companies or groups can be accessed by the members of the Endpoint manager
You can configure the company by clicking the enable/disable button under the company name.
- Choose related Company and Device Group
- Click 'Apply To All' to access all the companies and groups
- Click the Save button to make the changes take effect.
Create Users
-
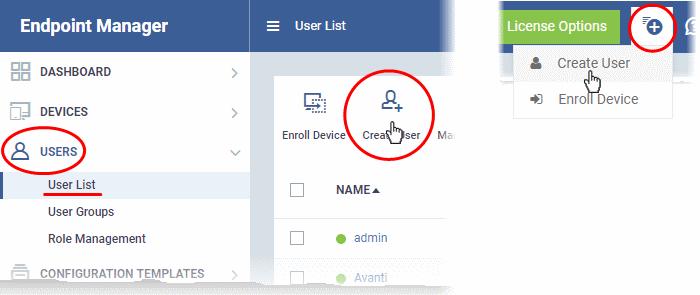
Click 'Users' > 'User List'
-
Click the 'Create User' button or Click the “Add” button
at the menu bar and choose 'Create User'.
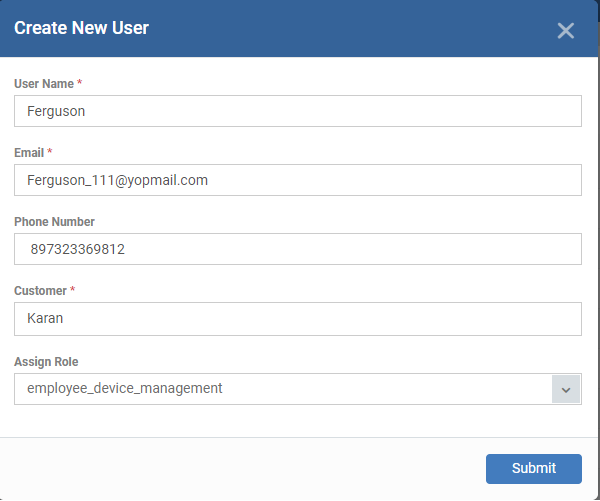
The 'Create New User' appears:
-
Enter the details, select the role for the new user and click the 'Submit' button.
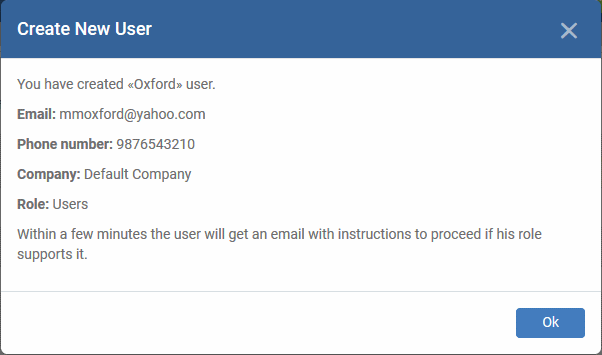
A confirmation will be displayed:
-
Repeat the process to add more users.
Successfully added users will be listed in the 'Users' interface. The user's devices can now be enrolled to EM.
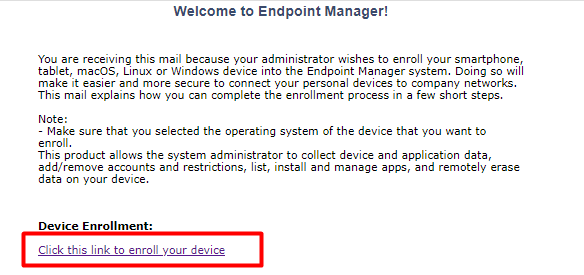
Endpoint Manager will send account activation mails to the newly added users. They can activate their account and set their login password by clicking the link in the email. An example of mail is shown below:
-
User clicks the link and activates his EM account
-
Upon activation, the user will be able to login to EM with his user-name and password. Log in at: https://[your company name]-msp.cmdm.comodo.com/ as shown in the mail link
-
Users added via EM can log in to EM console only and cannot log in to Dragon / C1 portal
-
If the portal administrator has configured two-factor authentication, then the user has to follow the on-screen instructions to set up this during login.
Endpoint Manager will send device enrollment link to the user email. They can click to the link on the email to enrol their devices.
Move Devices to Related Device Groups after Enrollment is Complete
-
Click 'Devices' > 'Device List'
-
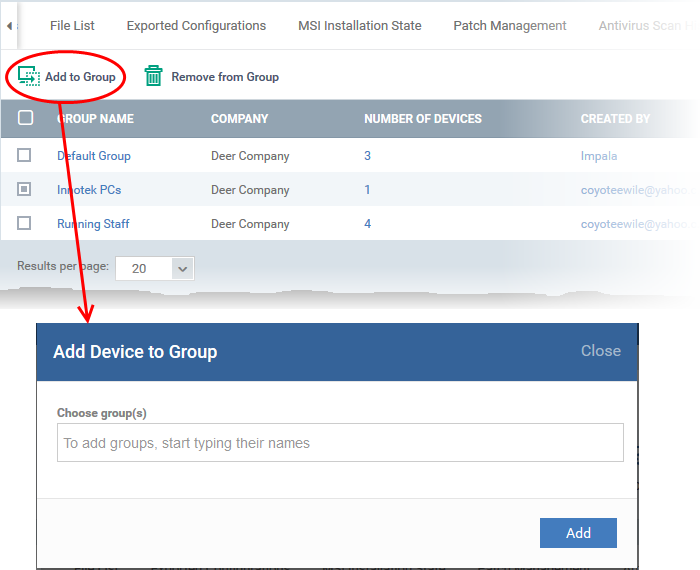
Click the name of a device then select the 'Groups' tab:
Select Groups tab…
-
Click 'Add to Group'
The 'Add Device to Group' dialog will appear.
-
Start typing the name of the group which you want the endpoint to join. Select the correct group from the list of suggestions.
-
Click 'Add'.
The device will be added to the group or groups.
-
Repeat the process for all enrolled devices.
Instruction for the End-User Settings
Login into the remote Device
-
Click the invitation link that sends to your default mail id
-
Set up the Password as per the standards
-
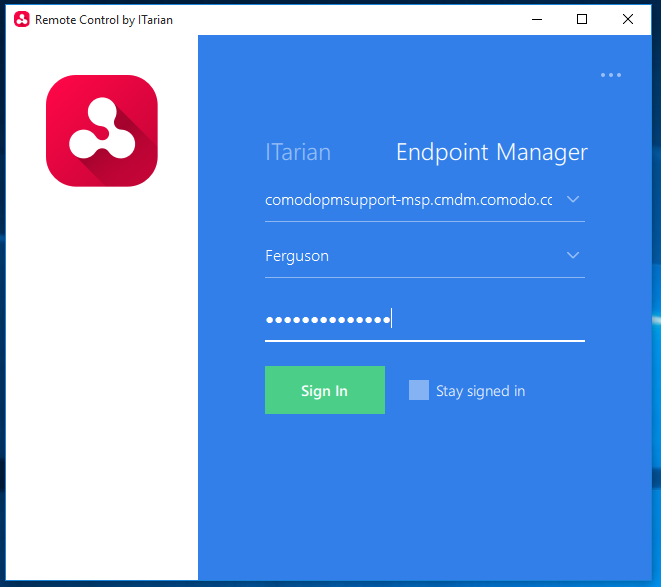
Download the Remote Control App from the Comodo One/ Dragon site
-
Log in with the Domain name, Username and password that you applied
-
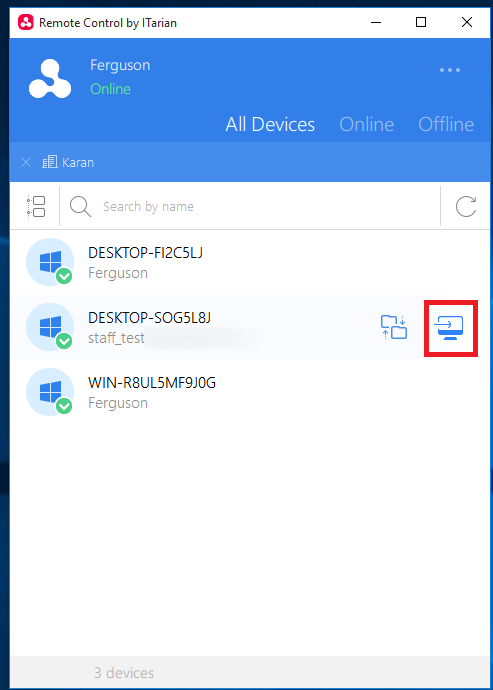
After login, you can view the applied device to your remote environment
-
You can view the enrolled devices here
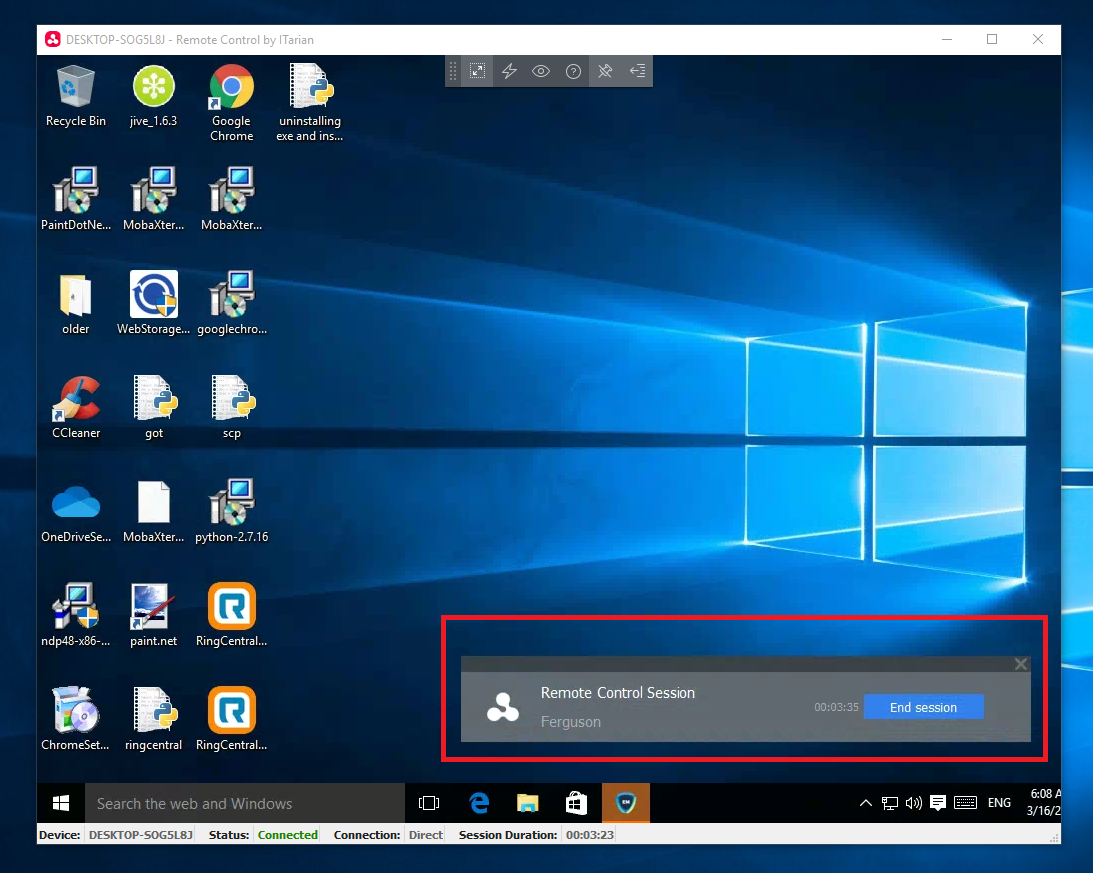
- Select the devices to start the remote control
After that, the window will open like this…

