How to setup data loss prevention (DLP) rules and run scans in Xcitium Client Security
Click 'Settings' > 'Data Loss Prevention'
- Data loss prevention (DLP) rules let you identify files containing sensitive information and prevent files being copied to external devices.
- Discovery rules let you scan Windows devices for files that contain sensitive information and to block sensitive data being leaked from your device.
- For example, the scan finds card numbers, social security numbers, bank account numbers, bank routing numbers, and more.
- You can review all files identified by DLP events from the 'Logs' interface. You can then take actions to secure that data where required.
Use the following links to jump to the task you need help with:
- Overview
- DLP monitoring rules
- DLP discovery scan rules
- Manually run a DLP scan
- View scan results and logs
Monitoring rules:
- Monitoring rules let you prevent sensitive information from being copied to external devices like USB drives. Examples include USB data devices (like pen drives, external hard disk drives), memory cards (like SD cards, micro SD cards, SDXC-SDHC cards), e-SATA removable drives, USB connected optical disk drives (CD/DVD), FireWire connected devices and devices using MTP protocol.
- Monitoring rules are configured by your Endpoint Manager admin.
- CCS allows or blocks files copied to external devices as configured in the rule
- You can view the logs of monitored events at 'Logs' > 'Data Loss Prevention Events'.
Discovery rules:
- Discovery scan rules are configured by your Endpoint Manager admin.
- You can run discovery scans from 'Tasks' > 'DLP Tasks' > 'Data Loss Prevention Scan'
- Results – you can view scan results at 'Logs' > 'Data Loss Prevention Events'.
- Click ‘Settings’ > ‘Data Loss Prevention’ > ‘DLP Monitoring’
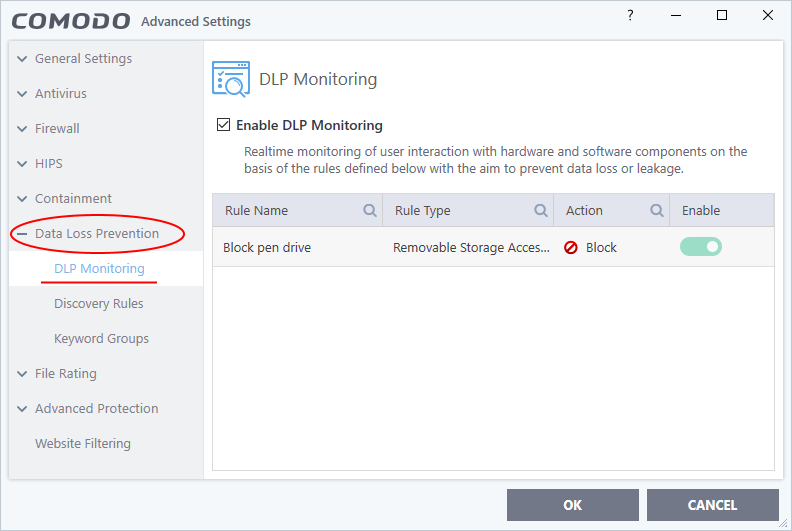
- Select 'Enable DLP Monitoring'
- DLP monitoring rules are created by your Endpoint Manager admin and added to the configuration profiles active on the device.
- The 'DLP Monitoring' interface shows the rules applied to your device by the profiles active on it
- See this wiki if you need help to create DLP monitoring rules and add them to profiles.
CCS allows or blocks the file transfer operations to external devices as per the rules. You can view the event logs in the 'Logs' > 'Data Loss Prevention Events' interface. See View scan results and logs for more details.
- Click 'Settings' > 'Data Loss Prevention' > ‘Discovery Rules’

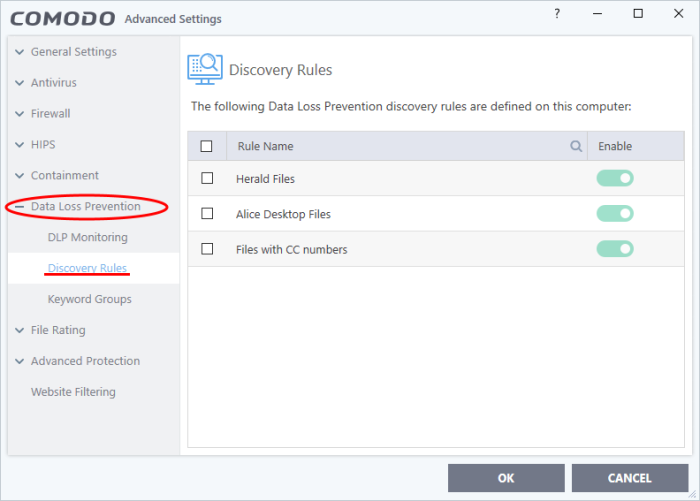
- DLP discovery rules are created by your Endpoint Manager admin and added to the configuration profiles active on the device.
- The discovery rules interface shows the rules applied to your device by the profiles active on it
- See this wiki if you need help to create DLP discovery rules and add them to profiles.
- You can run manual scans using these rules from CCS by clicking 'Tasks' > 'DLP Tasks' > 'Data Loss Prevention Scan'
- See Manually run a DLP scan for help to run an on-demand DLP scan.
You can run DLP scans on-demand from the 'DLP Tasks' interface:
- Click 'Tasks' on the CCS home screen
- Click 'DLP Tasks' > 'Data Loss Prevention Scan'
The scan interface shows all rules added to your device by the EM profile active on your device.


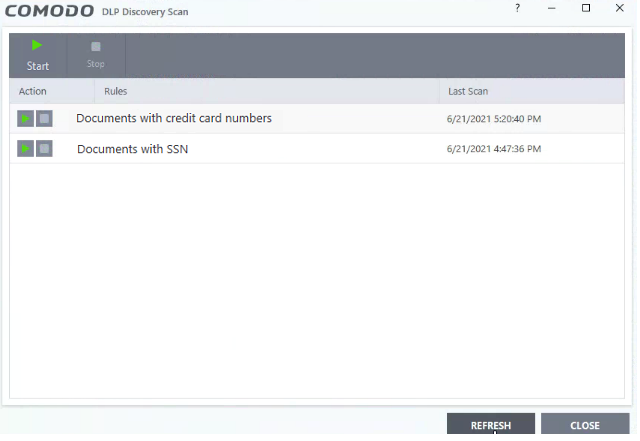
- Start button - Run a scan with all rules at once
Or
- Use the start buttons on the left to run a scan with a specific rule.
-
Use the refresh button to refresh the discovery scan list while a scan is in progress.
-
You can view the newly created discovery rules after refreshing the scan.
- Click 'Logs' in the CCS menu bar
OR
- Click ‘Tasks’ > ‘Advanced Tasks’ > ‘View Logs’
- Select 'Data Loss Prevention Events’ in the drop-down at top-left
The logs show items flagged by data loss prevention scans and monitoring events:

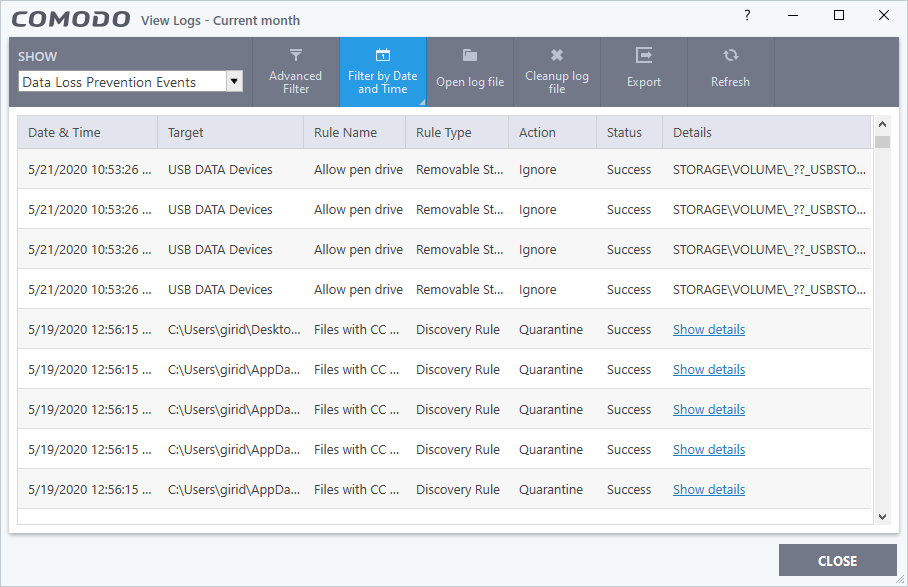
- Date & Time - When the event occurred.
- Target - The item affected by the rule.
- Rule Name - The DLP rule that found the target item. This could be a DLP discovery rule or a monitoring rule.
- Rule Type – Whether rule is a DLP discovery rule or a removable storage rule
- Action - How the file was handled in the DLP event.
- Status – Shows whether the rule executed successfully or not
- Details – The specifics of the data found.
- DLP monitoring rule – Shows the removable storage device affected by the rule.
- DLP Discovery rule - Has a ‘Show details’ link which opens the specifics of the event. See View details of a file for more details.
- DLP monitoring rule – Shows the removable storage device affected by the rule.
You can use the filter options at the top to search the logs by time, location of the file, rule or action.
- Click the 'Show details' link in the 'Details' column:

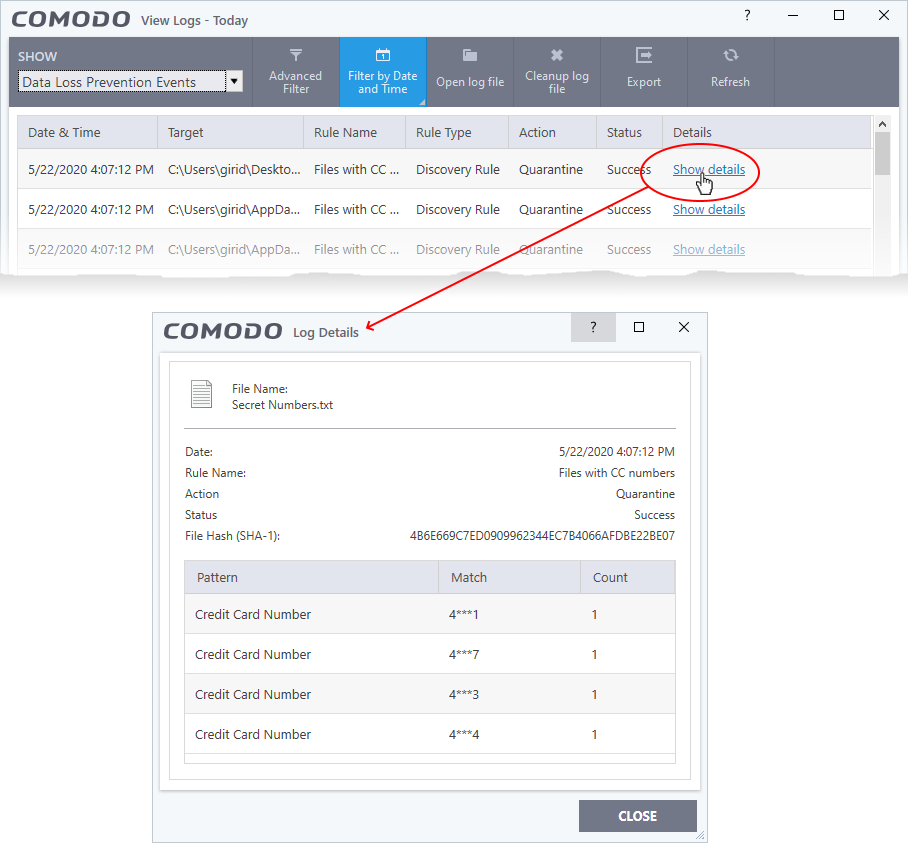
- The screen shows the name of the file, and the rule/pattern which discovered sensitive data in the file.
- The ‘match’ column shows the first and last characters of the actual discovered data. The option to show this should be enabled in the discovery rule.


---