How to specify allowed Wi-Fi networks for iOS devices
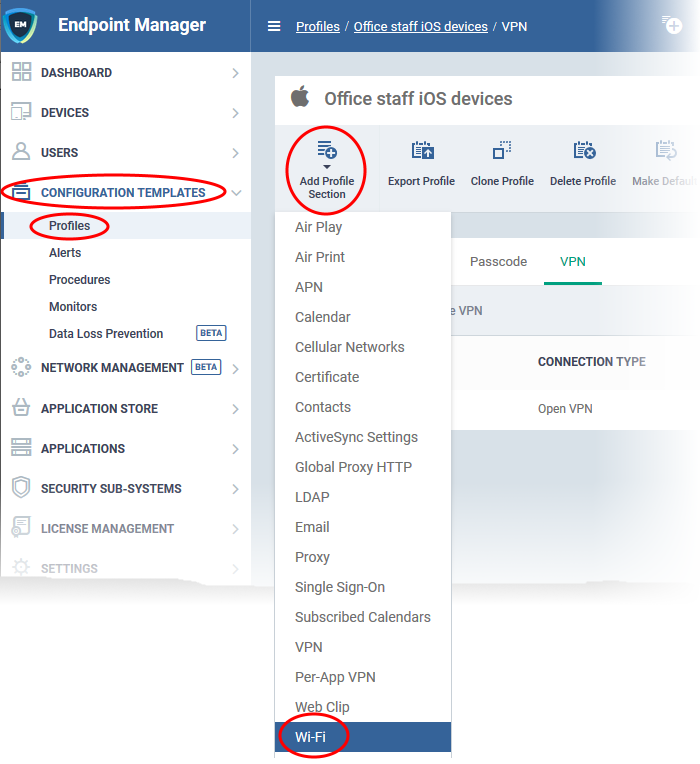
Click ‘Configuration Templates’ > ‘Profiles’ > open an iOS profile > open the ‘Wi-Fi’ section
- The Wi-Fi section of an iOS profile lets you add Wi-Fi networks to which the devices applied with the profile can connect to
- You can specify the SSID (service set identifier) or the domain name of the Wi-Fi network, the encryption type, the password to join the network and more for each network
- You can also restrict the devices to connect only to the allowed Wi-Fi networks and prohibit connection to other Wi-Fi networks.
Use the links below to jump to the task you need help with:
- Add the Wi-Fi section to an iOS profile
- Add restriction for devices to connect to only allowed Wi-Fi networks
Add the Wi-Fi section to an iOS profile
- Login to Xcitium
- Click 'Applications' > 'Endpoint Manager'
- Click ‘Configuration Templates’ > ‘Profiles’
- Open the iOS profile applied to your target devices
- Open the 'Wi-Fi' tab, if it has been added already, and click 'Edit'
Or
- Click 'Add Profile Section' > 'Wi-Fi', if it hasn't yet been added
- Open the 'Wi-Fi' tab, if it has been added already, and click 'Edit'

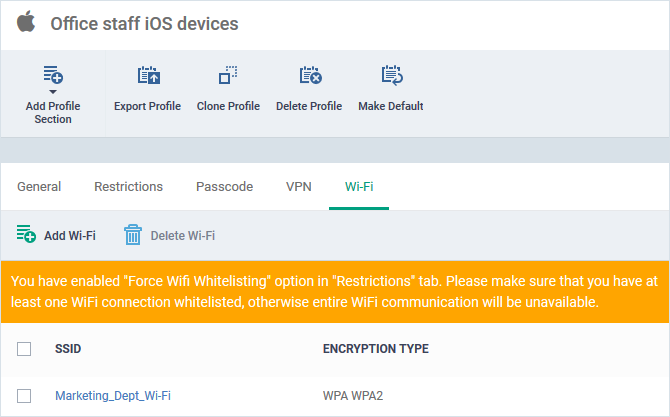
The configuration pane for the 'Wi-Fi' section opens:

SSID* - Enter a unique identifier (Service Set Identifier) of the wireless network that the device should connect to.
- Click the variables button to insert dynamic values. See this page for help to create and manage custom variables.
Note: In iOS 7 and later versions, this is optional if the 'Domain Name' value is set.
Auto join - The device will automatically connect to the configured wireless network.
- None
- WEP
- WPA / WPA2
- Any
- WEP Enterprise
- WPA / WPA2 Enterprise
- Any (Enterprise)
Hidden network - Select this option if the specified wireless network is hidden and not visible to Wi-Fi scans.
Encryption type - Select the type of encryption used by the wireless network from the drop-down. The available options are:
- The Password field will appear if any of the options, 'WEP', 'WPA / WPA2' and 'Any' are chosen.
- If any of the Enterprise encryption types is chosen, then select the supported protocols and configure authentication. The options available are: TLS, LEAP, TTLS, PEAP, EAP-FAST, Use Pac, Provision pac and Provision Pac Anonymously, PAP, CHAP, MS CHAP ans MS CHAP V2
Password - Enter the password to connect to the Wi-Fi network. If left blank, the user will be prompted to enter the password when the device attempts to connect to the network.
Proxy - The proxy servers you added to the proxy settings section of the profile are available for selection in the 'Proxy' drop-down.
- Choose the proxy to be used by the device for connecting to internet through the Wi-Fi connection.
- You can also add new proxy servers:
- Click the 'Add New' and specify the proxy server settings.
- Repeat the process to add more proxies
- See 'Proxy settings' in this online help page, if you want help to add proxy servers to a profile.
Is hotspot - If enabled, the network is treated as a hotspot.
Service provider roaming enabled - If enabled, devices can connect to roaming service providers.
Domain name - Enter the domain name of the Wi-Fi network to which the device has to connect.
- This is optional and can be provided instead of SSID.
- Click the variables button to insert dynamic values. See this page for help to create and manage custom variables.
Note: This feature applies only to iOS 7 and later versions.
Displayed operator name - Enter the name of the Wi-Fi network provider, to be shown on the device to the user.
- Click the variables button to insert dynamic values. See this page for help to create and manage custom variables.
Note: This feature applies only to iOS 7 and later versions.
Roaming consortium Ois - Enter the Roaming Consortium Organization Identifier of the Wi-Fi hotspot 2.0 service providers of the networks, to which the device can connect to.
- Click the variables button to insert dynamic values. See this page for help to create and manage custom variables.
- Click the
button to add more Roaming Consortium OIs fields.
- Click the
button to remove a field.

Note: This feature applies only to iOS 7 and later versions.
NAI Realm Names - Enter the Network Access Identifier (NAI) realm names of the Wi-Fi hotspot 2.0. service providers of the networks, to which the device can connect to.
- Click the variables button to insert dynamic values. See this page for help to create and manage custom variables.
- Click the
button to add more NAI realm names.
- Click the

Note: This feature applies only to iOS 7 and later versions.
- Click 'Save' to add the Wi-Fi network to the list of allowed networks.

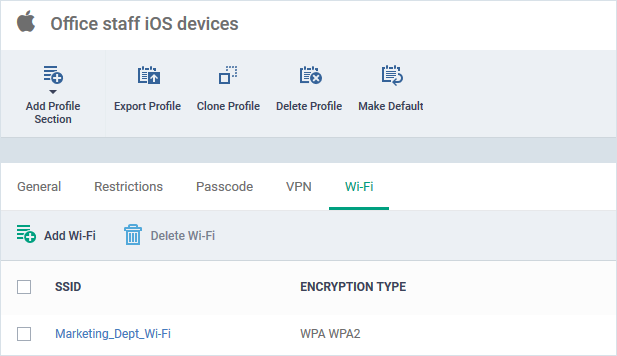
- Repeat the process to add more Wi-Fi networks
Add restriction for devices to connect to only allowed Wi-Fi networks
Click ‘Configuration Templates’ > ‘Profiles’ > open an iOS profile > open the ‘Restrictions’ section
- The 'Restrictions' section of a profile lets you impose a limitation for the iOS device to connect to only the Wi-Fi networks added to the 'Wi-Fi' section of the profile.
- Once imposed, the device will not be allowed to connect to any other Wi-Fi network.
Force iOS devices to connect to only allowed Wi-Fi networks
- Login to Xcitium
- Click 'Applications' > 'Endpoint Manager'
- Click ‘Configuration Templates’ > ‘Profiles’
- Open the iOS profile applied to your target devices
- Open the 'Restrictions' tab, if it has been added already, and click 'Edit'
Or
- Click 'Add Profile Section' > 'Restrictions', if it hasn't yet been added
- Open the 'Restrictions' tab, if it has been added already, and click 'Edit'

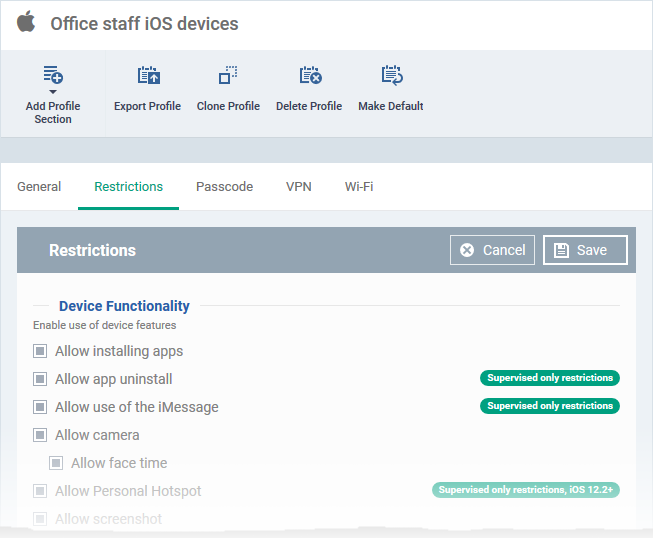
- Scroll down to 'Force Wifi Whitelisting'

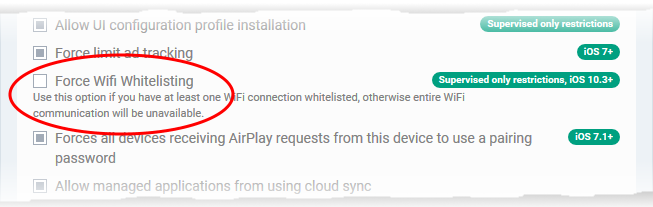
- Force Wifi Whitelisting - Select 'Force Wifi Whitelisting' to restrict the devices applied with the profile to connect only to the Wi-Fi networks added to the 'Wi-Fi' section of the profile. The devices will not be permitted to connect to any other Wi-Fi network.
- Click 'Save' for your settings to take effect.
- Please ensure at least one Wi-Fi network is added to the Wi-Fi section of the profile if 'Force Wifi Whitelisting ' is enabled for the profile. Else the device will not be able to connect to any Wi-Fi networks.
- A notification is shown in the 'Wi-Fi' section of the profile if 'Force Wifi Whitelisting ' is enabled:

Related topics:
How to setup restrictions for iOS devices via Endpoint Manager profile


---