How to add devices through Apple’s Device Enrollment Program (DEP)
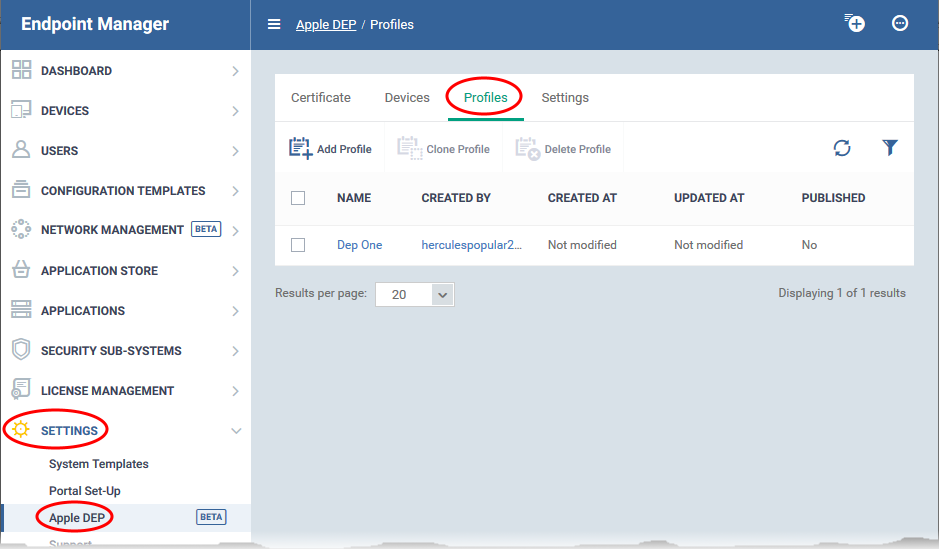
Open Endpoint Manager > Click 'Settings' > 'Apple DEP'
- Apple's Device Enrollment Program (DEP) simplifies the activation and management of iOS devices in an enterprise network. While you will continue to use Endpoint Manager (EM) for day-to-day device management, DEP makes the initial setup process far easier for both admins and users.
After integrating EM with DEP:
- Admins no longer have to manually configure each device, nor individually enroll each device with EM. All devices you register with DEP will automatically become managed by Endpoint Manager as soon as they are turned on.
- All setup tasks, including EM enrollment, are carried out over-the-air (OTA) at device start-up. You can even choose to skip the various setup wizards that usually appear when a device is first turned on.
- Devices can never become unmanaged without your consent, even if the device is factory reset. Admins have to remove them from Endpoint Manager to unmanage them.
- Endpoint Manager (EM) currently supports iOS devices only.
- See https://www.apple.com/business/docs/site/DEP_Guide.pdf for more information about Apple DEP
Use the following links to jump to the task you need help with:
- Link Endpoint Manager with Apple DEP
- Create and manage Apple DEP Profiles
- Manage Apple DEP Devices
- Configure Apple DEP Notification Settings
Link Endpoint Manager with Apple DEP
You first need to complete the following steps with Apple:
- Enroll in the Apple Device Enrollment Program (DEP) program if you haven’t done so already.
- Link Endpoint Manager (EM) to your DEP account. EM is the ‘MDM solution’ referred to in Apple’s docs (see link below).
- Assign devices to your DEP account.
Please follow the steps in Apple’s help documentation to complete the processes above.
- Completing these steps will establish a virtual Endpoint Manager server in DEP. The virtual server is synchronized with your EM account.
Next, you need to configure settings in Endpoint Manager to complete the link to DEP.
- Click 'Settings' > 'Apple DEP'
- Click the ‘Certificate’ tab:
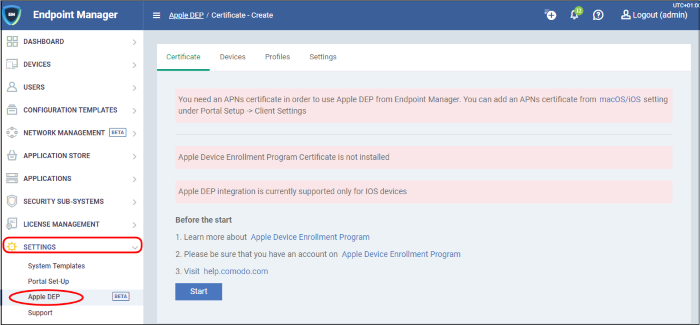
- You first need to install an Apple Push Notification (APN) certificate on Endpoint Manager. This certificate allows EM to communicate with iOS and Mac devices.
- You may already have done this if you are currently using EM to manage iOS devices. If not, then:
- Click ‘Settings’ > ‘Portal Set-up’ > ‘Client Settings’ > ‘mac OS/iOS’ > ‘Create APN certificate’
- Complete the certificate application form then click ‘Create’.
- See this wiki for help to add an APN certificate to EM.
- Click ‘Settings’ > ‘Portal Set-up’ > ‘Client Settings’ > ‘mac OS/iOS’ > ‘Create APN certificate’
- After installing the APN cert, you need to install a DEP certificate. This certificate allows Endpoint Manager to communicate with Apple’s DEP servers.
- Click ‘Settings’ > ‘Portal Set-up’ > ‘Apple DEP’
- Click the 'Start' button

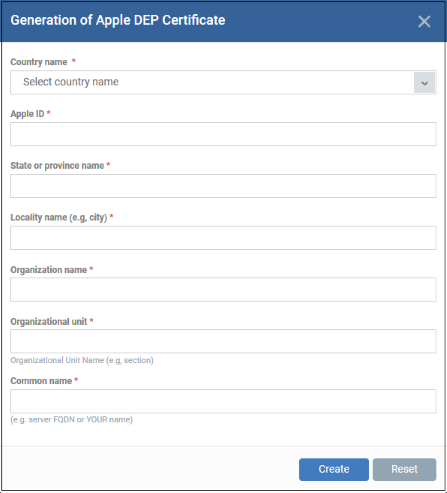
- Complete all fields on the certificate request form. Enter your Apple ID and your company details.
- Click 'Create' to submit the form, then 'Download Public Key’:

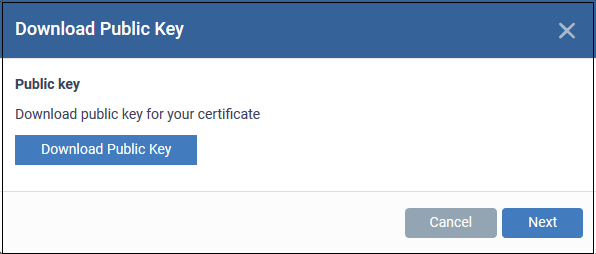
- Save the key in a safe place as you will need to upload it to the DEP server later.
- Click 'Next' after you have saved the key.

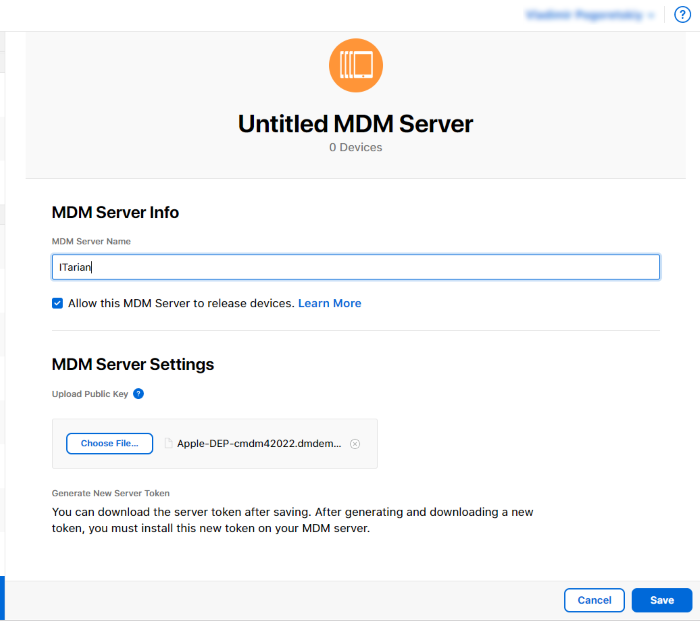
Next, you need to create a virtual EM server on Apple’s DEP server:
- Click 'Go to DEP Portal' and login to your DEP account
- Open the ‘Device Management Settings' page then click 'Add MDM Server'
- Create a name for your virtual server in the ‘MDM Server Info’ field. This can be anything you choose.
- Make sure ‘Allow this MDM server to release devices’ is enabled
- Click ‘Choose File...’ to upload the public key you saved.
- Click 'Save':
After authenticating your request, DEP will generate a token which you need to upload to Endpoint Manager:

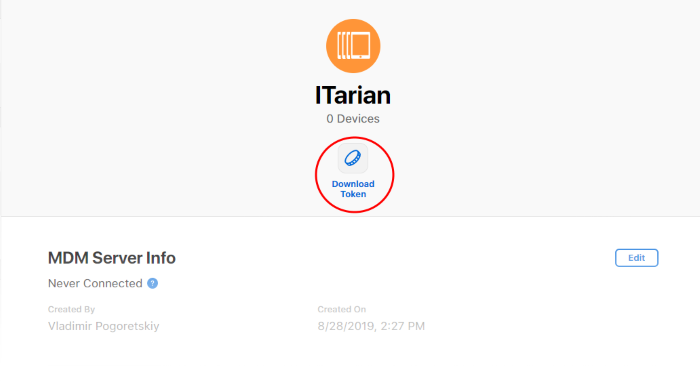
- Click 'Download Token'
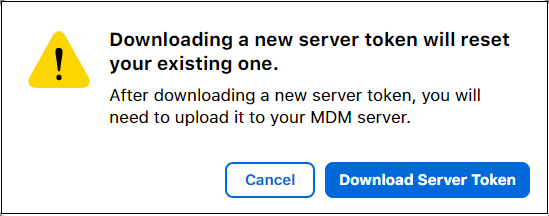
- Click 'Download Server Token' and save it.
- Go back to Endpoint Manager and upload the token
- Click ‘Settings’ > ‘Apple DEP’ > ‘Certificate’
- Click 'Browse', locate your token then click 'Open':
- Click ‘Settings’ > ‘Apple DEP’ > ‘Certificate’

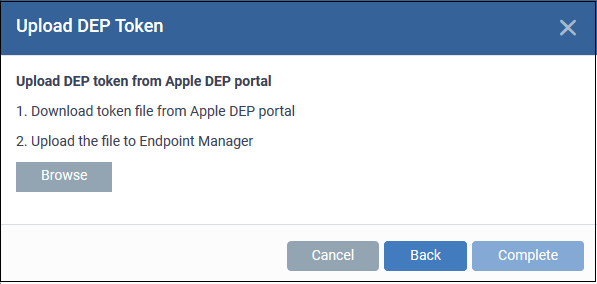
- Click 'Complete'
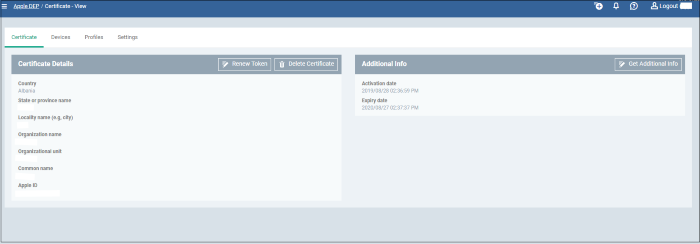
The ‘Certificates’ tab will now show your DEP certificate details:

Your Endpoint Manager and Apple DEP accounts are now synced.
Devices that were added to your DEP account are now enrolled to EM. After enrollment, the devices appear in two places:
1. 'Settings' > 'Apple DEP' > 'Devices' - Device identified by serial number.
2. 'Devices' > 'Devices List' > 'Device Management' - Device identified by name. Click a device name to view its details and serial number.
DEP enrolled devices have two profiles:
1. DEP Profile - Created during enrollment to the DEP program.
2. Endpoint Manager Profile - The default EM profile is applied once the device is enrolled in EM. You can change this as required.
You can create new DEP profiles and assign them to the devices.
Create and manage DEP profiles
- Click 'Settings' > 'Apple DEP' then the 'Profiles' tab:
- You can create or edit DEP profiles in Endpoint Manager and publish them to the DEP server. The published profiles are automatically applied to devices enrolled in DEP.
- Each profile lets you enable supervisor mode and other top-level management settings. Profiles also let you skip the setup wizards that appear when a user first activates a device.
- The profile is enabled right after the user activates the device. Activated profiles are listed as ‘Pushed’ in the ‘Devices’ tab.
The profiles interface:
- Click ‘Settings’ > ‘Apple DEP’ > ‘Profiles’

The screen lists all DEP profiles added to your account. You can add new profiles, publish profiles, edit profiles and more.
- Click ‘Settings’ > ‘Apple DEP’ > ‘Profiles’
- Click 'Add Profile':
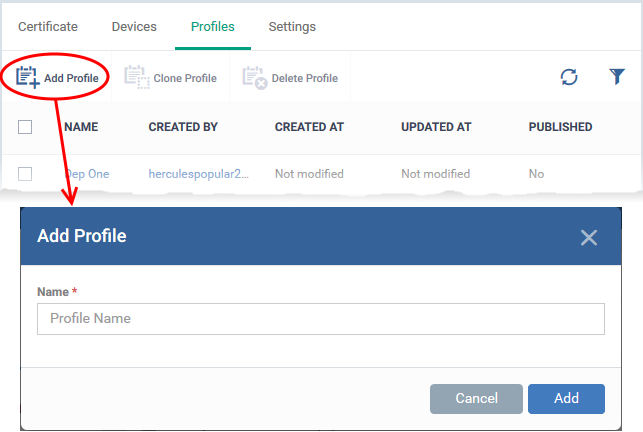
- Enter a name for the profile then click 'Add'.
- The profile configuration screen opens:

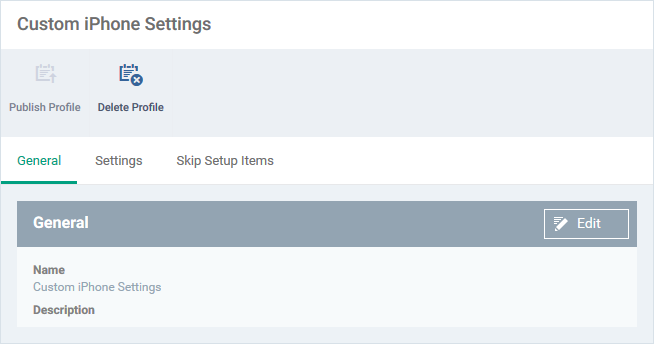
- Next, click 'Edit' on the right to configure profile settings. Click the following links if you need help with a particular tab:

- Name - This is pre-populated with the label you created in the previous step. Edit the name, if required.
- Description - Enter a short note on the profile.
- Click 'Edit' and configure top-level device management settings, contact details, and more:

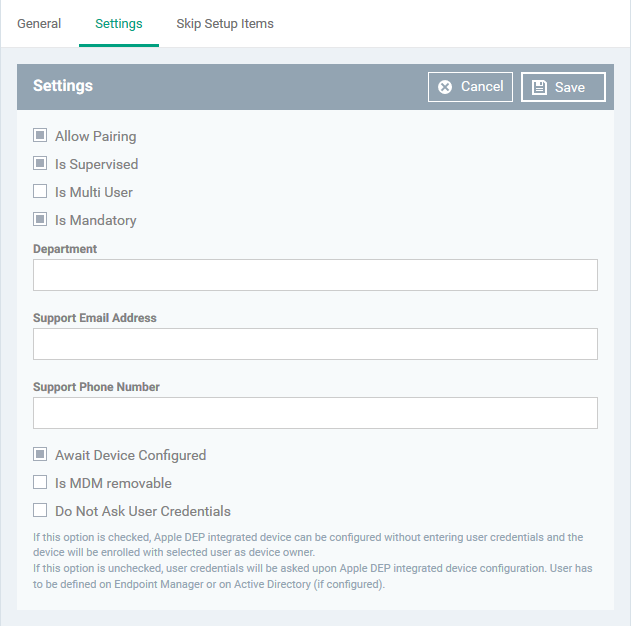
- Allow Pairing - Whether the device can pair with other devices. For example, with Apple watches, earphones and other Bluetooth devices.
- Is Supervised - Puts the target device in supervised mode. You must enable this setting to manage the device.
- Is Multi User - More than one user account can be stored on the device. This lets multiple users share a single device while maintaining the privacy of all users. This is required for education functionality such as Apple School Manager.
- Is Mandatory - If enabled, the user must enroll the device to EM at device activation. The user cannot skip the installation of the EM profile.
- Department - The department of your company that the device belongs to.
- Comodo One/ Dragon users - This is not programmatically connected to Service Desk departments. However, you can use a Service Desk department name here for the sake of identification.
- Comodo One/ Dragon users - This is not programmatically connected to Service Desk departments. However, you can use a Service Desk department name here for the sake of identification.
- Support Email Address - The address at which device users can contact your IT staff.
- Support Phone Number - The number at which device users can contact your IT staff.
- Await Device Configured - Users cannot proceed with the setup assistant until Endpoint Manager sends a command that states the device is configured. This setting only applies if the device is in supervised mode.
- Is MDM removable - The Endpoint Manager (EM) profile can be removed from the device. This removes it from EM control. Note - The EM profile cannot be removed if the device is in supervised mode.
- Do Not Ask User Credentials
- Enabled - The device can be activated without user authentication. The admin can assign the device to any user.
- Disabled - The user has to login to the device at activation. Note - The user should be already have been added to the Endpoint Manager.
- Enabled - The device can be activated without user authentication. The admin can assign the device to any user.
Click 'Save'
- Click 'Edit' and specify which setup wizards should be shown during device activation. Users can configure these items later if allowed by the Endpoint Manager profile.

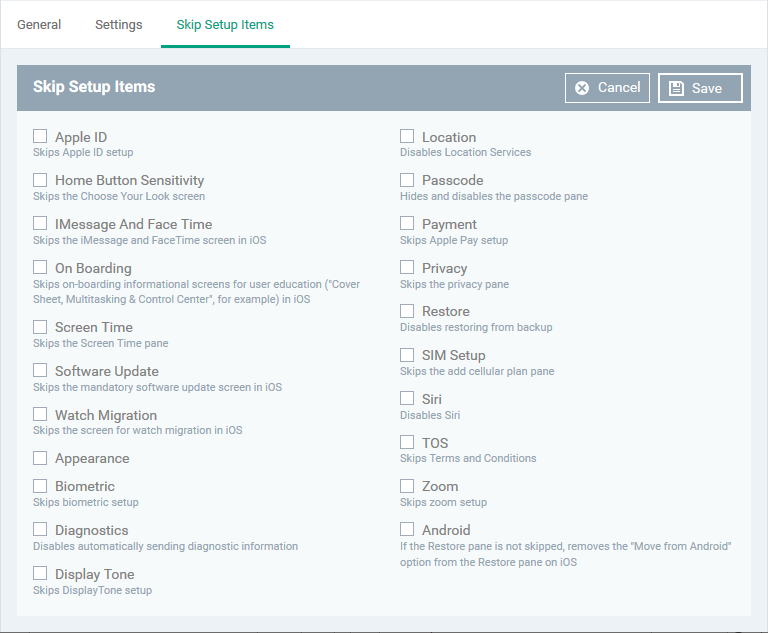
- Select your options then click 'Save' to apply your changes.
- The next step is to publish the profile to the DEP server.
You have to submit the profile to the DEP server in order to push it to devices. Note - Published profiles cannot be re-published or deleted.
- Click 'Settings' > 'Apple DEP' > 'Profiles'
- Click the name of a profile.
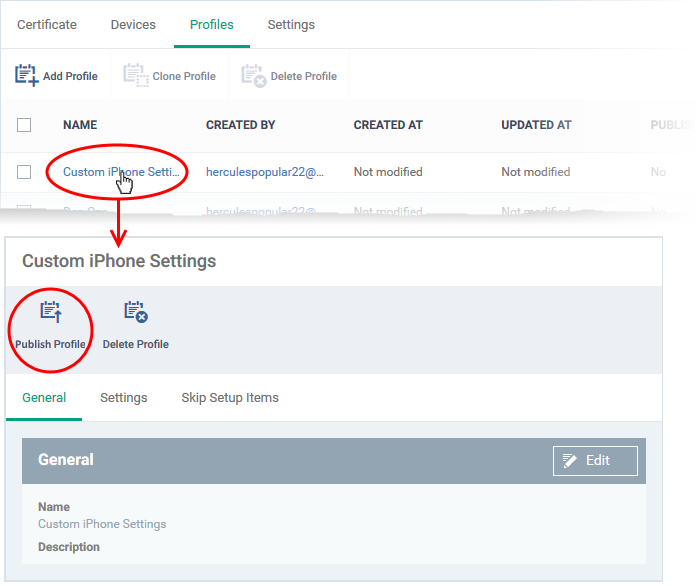
- Click 'Publish Profile' at top-left
You can now assign a published profile to devices. See Manage Apple DEP Devices.
- Click 'Settings' > 'Apple DEP' then the 'Devices' tab
- DEP registered devices are automatically synced with EM after you have linked your account.

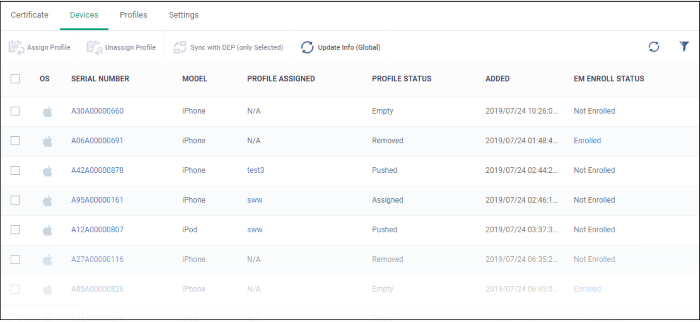
The DEP ‘devices’ area lets you:
- Assign DEP profiles to devices
- Remove profiles
- Update device information from DEP
- Update DEP information
Assign DEP Profiles to Devices
- Select target devices then click 'Assign Profile':
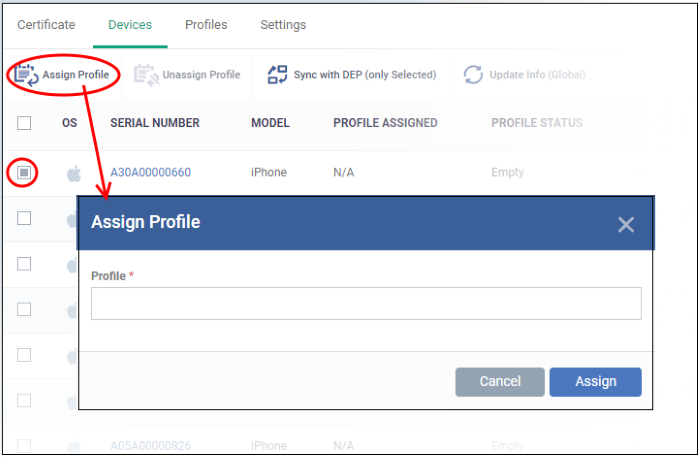
- Start typing the name of a profile and select from the suggestions
- Click 'Assign'.
Users are asked to install the profile when the device is activated:
Endpoint Manager profiles are applied as follows:
- Custom device profiles are assigned if they exist.
- The 'default' profiles are applied if no custom profiles exist.
- See this page for more info on default profiles.
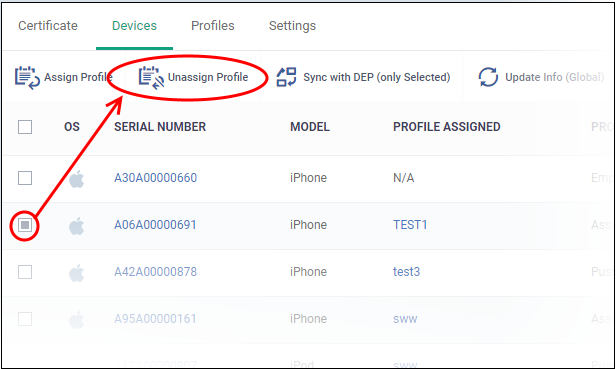
- Select target devices then click 'Unassign Profile':

All DEP profile settings active on the device are removed.
Note - The device stays enrolled to Endpoint Manager, and all EM profiles remain in place.
Update Device Information from DEP
Endpoint Manager periodically contacts the DEP server to update the status of device profiles. You can manually run this update as follows:
- Select the target devices then click 'Sync with DEP (only Selected)’
Device information from DEP is updated periodically. You can update in real-time if required.
- Click 'Update Info (Global) at the top


Configure Apple DEP Notifications
- Click ‘Settings’ > ‘Apple DEP’ > ‘Settings’
- Click 'Edit':

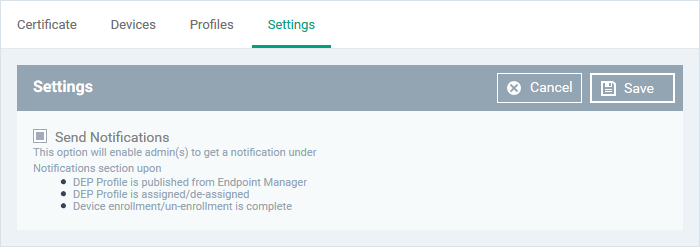
- Send Notifications - Choose whether or not you want to see alerts from DEP in the notifications area a shown below:
If enabled, you will see alerts when:

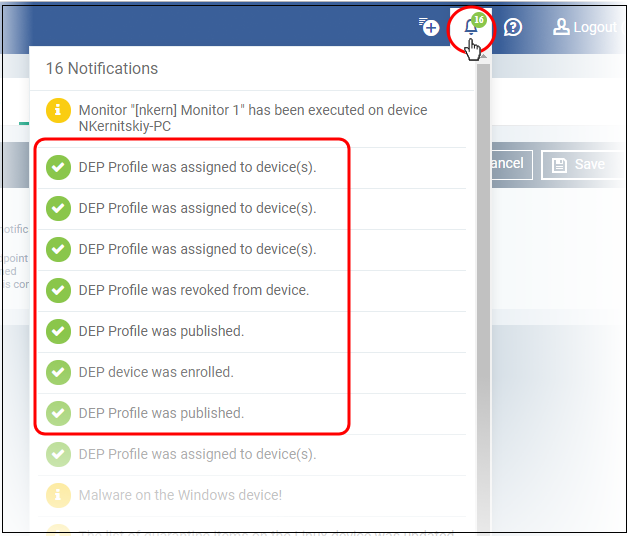
- A DEP profile is published (submitted to the DEP server)
- A DEP profile is unassigned or unassigned (‘Settings’ > ‘Apple DEP’ > ‘Devices’)
- A device is enrolled in DEP or removed from DEP.


---