How to configure antivirus scan settings in CCS for Windows
Click 'Settings' > 'Antivirus'
- CCS leverages multiple technologies, including real-time monitoring and on-demand scans, to keep endpoints totally free of malware
- The 'Antivirus' settings area lets you configure:
- The behaviour of the real-time antivirus monitor
- Scan profiles for on-demand and scheduled scans
- The behaviour of the real-time antivirus monitor
- Open Xcitium Client Security
- Click 'Settings' open the advanced settings interface
- Click 'Antivirus' on the left
The antivirus settings menu has two sub-sections:

- Realtime Scan – Configure the behaviour of on-access scanner
- Scans – Create and manage scan profiles that let you scan specific areas and time-table scheduled scans
Click 'Settings' > 'Antivirus' > 'Realtime Scan'
- The real-time scanner automatically checks for viruses whenever you open or move a file. It also monitors background activity for malicious processes.
- The real-time scanner also scans:
- System memory on system startup
- Any plugged-in removable storage devices
- System memory on system startup
- You can specify that CCS does not show you alerts when it finds a threat, but automatically deals with the threat. You can choose to automatically quarantine or delete threats if you disable alerts.
- We strongly recommend you leave the real-time scanner enabled at all times.
Configure real time scans
- Click 'Settings' at the top of the CCS home screen
- Click 'Antivirus' > 'Realtime Scan' on the left
Enable Realtime Scan - Activate or deactivate real-time scanning. The real-time scanner continually monitors your computer for malicious activity and protects you from threats as soon as they occur. Xcitium strongly recommends you keep this option enabled. (Default=Enabled)
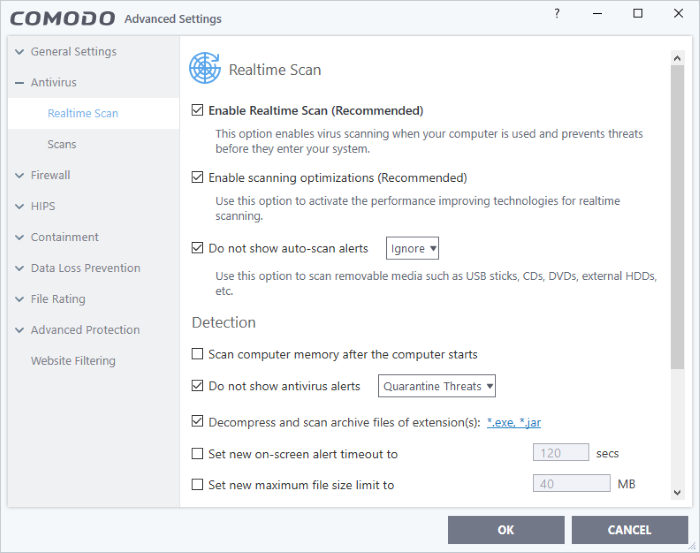
Enable scanning optimizations - Will enable various techniques during a virus scan to reduce resource usage and speed-up the scan process. For example, antivirus scans will run in the background. (Default = Enabled)
Do not show auto-scan alerts - Select whether CCS alerts you when you plug a removable device into your computer (USB stick, portable HDD etc). The alert asks you whether you want to scan the device for viruses.
Enabled = Alerts are not shown. CCS will automatically take the action shown in the drop-down box next to the setting.
Disabled = Alerts are shown when you plug a removable device into your computer. You can choose to scan the device or skip the scan. An example is shown below:

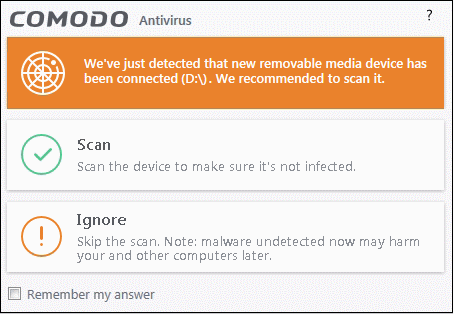
- Ignore - The device is not scanned
- Scan - The device is automatically scanned for viruses. The scan uses the settings in the 'Manual Scan' profile. If this is not available then the scan uses the settings in the 'Full Scan' profile.
Detection Settings
Scan computer memory after the computer starts - The antivirus scans system memory immediately after your computer starts up. Disable to remove the scan from the list of Windows startup processes. (Default = Disabled)
Do not show antivirus alerts - Configure whether or not alerts are shown to end-user when CCS finds malware.
'Do not show antivirus alerts' will minimize disturbance but at some loss of user awareness. If you disable alerts then please choose the default responses that CCS should take:
- Quarantine Threats - Prevents the threat from running and moves it to quarantine (Default). You can review quarantined files at 'Tasks' > 'Advanced Tasks' > 'View Quarantine'.
- Block Threats - Prevents the threat from running then deletes it from your computer.
Note: If you disable this option then alerts are shown to users when malware is detected. The alert offers users the choice to quarantine or block the threat.
Decompress and scan archive files of extension(s) - Xcitium Antivirus will scan all types of archive files. Archive file types include .jar, RAR, WinRAR, ZIP, WinZIP ARJ, WinARJ and CAB files. You will be alerted to the presence of viruses in compressed files before you even open them. (Default = Enabled)
You can manage the types of archives decompressed and scanned by Xcitium Antivirus as follows:
- Select file type (*.exe, *.jar) and click 'Edit' to set maximum file size allowed for that file type

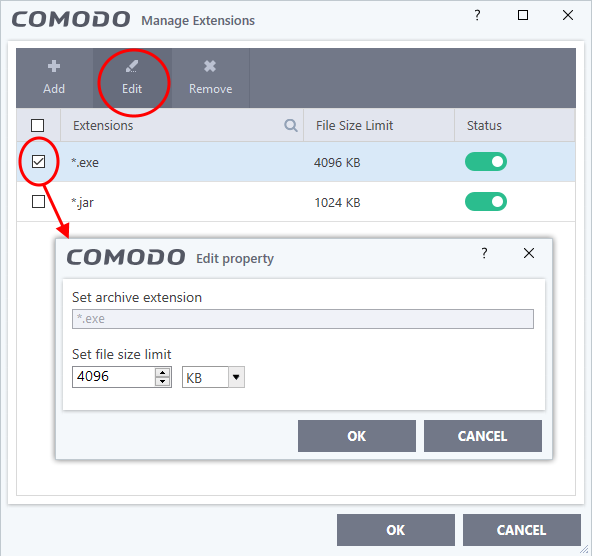
- Click 'Add' to add new file types to the list.
- Enter the extension type you wish to scan and click 'OK'.
- Example archive extensions include .zip , .rar, .msi, .7z , .jar and .cab.
- Set the max. size of this file type that CCS should scan. Files larger than this will not be scanned.
- Repeat the process to add more extensions
- Click 'OK' in the 'Manage Extensions' dialog
- Enter the extension type you wish to scan and click 'OK'.
Set new on-screen alert timeout to - Specify the length of time that virus alerts should stay on the screen. (Default = 120 seconds)
Set new maximum file size limit to - Specify the largest file size that the antivirus should scan. CCS will not scan files bigger than the size specified here. (Default = 40 MB)
Set new maximum script size to - Specify the largest script size that the antivirus should scan. CCS will not scan scripts bigger than the size specified here. (Default = 4 MB)
Use heuristics scanning - Enable or disable heuristic scans, and define the sensitivity of the scanner. (Default = Disabled)
Background. Heuristics is a technology that analyzes a file to see if it contains code typical of a virus. It is about detecting 'virus-like' attributes rather than looking for a signature which exactly matches a signature on the blacklist. This allows CCS to detect brand new viruses even that is not in the current virus database.
If enabled, please select a sensitivity level. The sensitivity level determines how likely it is that heuristics will decide a file is a malware:
- Low - Least likely to decide that an unknown file is a malware. Generates the fewest alerts.
Despite the name, this setting combines a very high level of protection with a low rate of false positives. Xcitium recommends this setting for most users.
- Medium - Detects unknown threats with greater sensitivity than the low setting, but with a corresponding rise in possible false positives.
- High - Highest sensitivity to detecting unknown threats. This also raises the possibility of more alerts and false positives.
Enable realtime scanning of files on network - Activate or deactivate automatic scans of files on network drives (Default = Disabled)
- If enabled, the scanner will check all files you interact with on a network drive, even if you do not copy them to your local machine.
- If disabled, network files are not checked unless you copy them to your local machine.
Use Windows Anti-malware Scan Interface (AMSI) technology - Microsoft AMSI technology allows 3rd party applications to request scans from antivirus products installed on the machine. CCS is on the AMSI provider's list. (Default = Enabled)
- Enabled - CCS will accept scan requests from AMSI enabled applications.
- Disabled - CCS removes itself from the local AMSI providers list, and will not respond to scan requests.
Use cloud services while scanning via AMSI - Available if 'Use Windows Anti-malware Scan Interface (AMSI) technology' is enabled. (Default = Disabled)
- Enabled - CCS check a file's trust rating on our cloud servers as part of the AMSI scan process.
- Note - Cloud Lookup must also be enabled in 'File Rating Settings'. ('Settings' > 'File Rating' > 'File Rating Settings' )
- Click 'OK' for your settings to take effect.
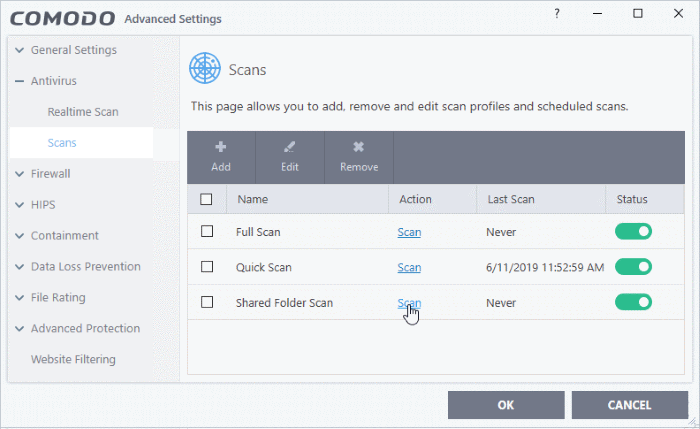
Click 'Settings' > 'Antivirus' > 'Scans'
- An antivirus scan profile is a collection of scanner settings that tell CCS:
- What to scan (which files, folders or drives)
- When to scan (you can create a scan schedule)
- How to scan (you can configure the behaviour of the scan engine)
- What to scan (which files, folders or drives)
CCS ships with two pre-defined scan profiles and allows you to create custom scan profiles.
- Full Scan - Scans every file, folder and drive on your system. External devices such as USB sticks and storage drives are also scanned if connected.
- Quick Scan – Scans critical areas of your computer which are highly prone to infection and attack. Areas scanned include system memory, auto-run entries, hidden services, boot sectors, important registry keys, and system files. These areas are of great importance to the health of your computer, so it is essential to keep them clean.
You cannot modify the areas scanned in a pre-defined profile, but you can edit the scan parameters. You can also create custom profiles and scan schedules.
Open the 'Scans' panel
- Click 'Settings' on the CCS home screen
- Click 'Antivirus' > 'Scans'

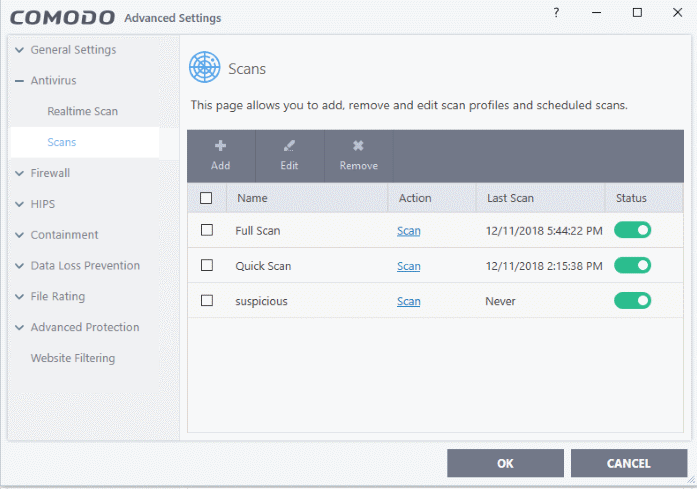
- Name - The label of the scan profile.
- Action - The activity that the profile is set to perform.
- Click this link to manually run a scan according to the profile's parameters.
- Click this link to manually run a scan according to the profile's parameters.
- Last Scan - Date and time of the most recent virus scan using this profile.
- Status - Enable or disable the profile.
'On' - Any scheduled scans configured in the profile will continue to run. In addition, you can manually run the scan at any time by clicking the 'Scan' link.
'Off' - Any scheduled scans configured in the profile will not run. You can still manually run the scan by clicking the 'Scan' link.
Click the following links to know more:
- Click 'Settings' on the top of the CCS home screen
- Click 'Antivirus' > 'Scans'
- Click 'Add' from the options at the top:

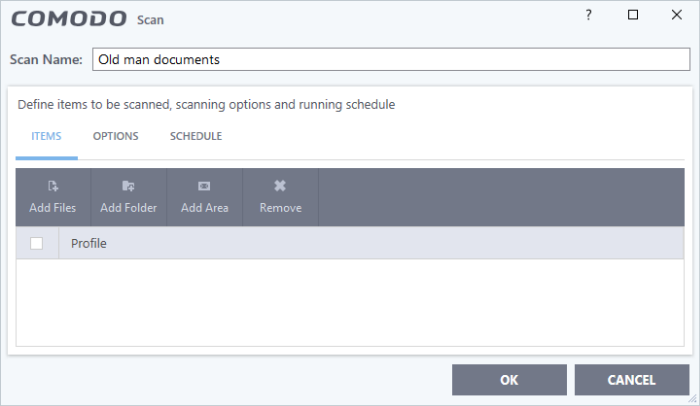
- Type a name for the profile.
The next steps are to:
- Click 'Items' at the top of the 'Scans' interface.
The buttons along the top let you add three types of item to the scan. You can add any combination of items.
- Add Files – Scan individual files. Click the 'Add Files' button and navigate to the file you want to scan. Repeat to add more files.
- Add Folder - Scan entire folders. The scan covers all files inside the target folders. Click the 'Add Folder' button and choose the folder you want to scan.
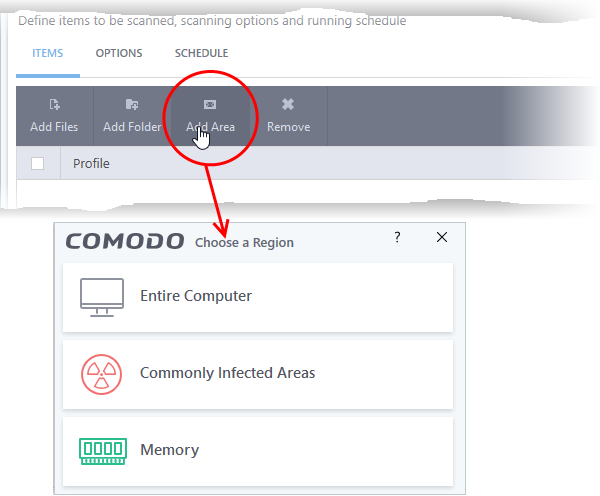
- Add Area - Scan pre-defined regions. Regions include 'Full Computer', 'Commonly Infected Areas' and 'Memory'.

- Repeat the process to add more items to the profile. You can mix-and-match files, folders and areas in your custom scan.
- Click 'Options' at the top of the scan interface
Decompress and scan compressed files - The scan will include archive files such as.ZIP and.RAR files. Supported formats include RAR, WinRAR, ZIP, WinZIP ARJ, WinARJ and CAB archives (Default = Enabled).
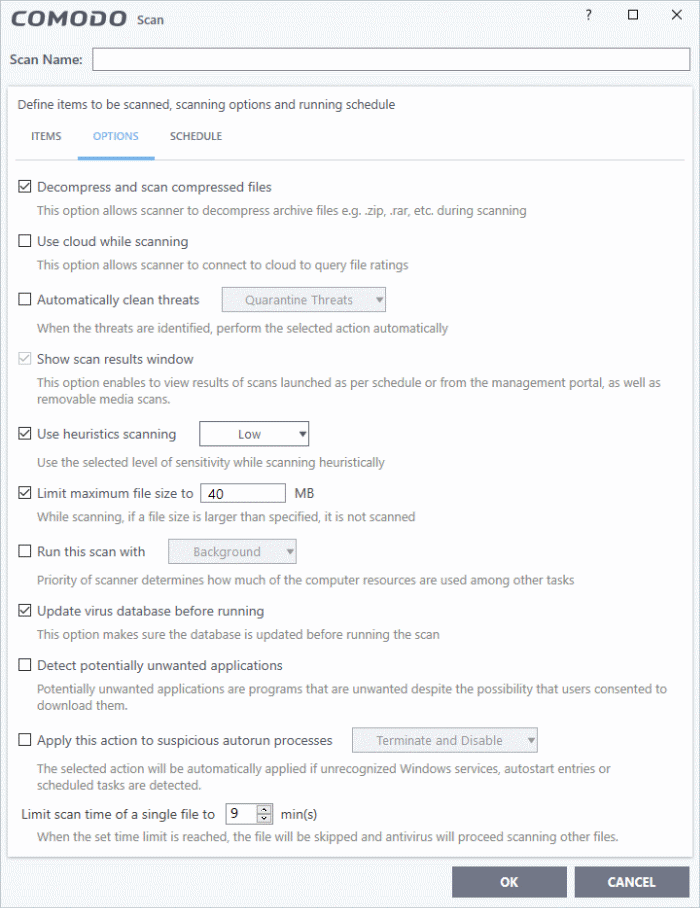
Use cloud while scanning - Improves scan accuracy by augmenting the local scan with an online look-up of Xcitium's latest signature database. Cloud Scanning means CCS can detect the latest malware even if your virus database is out-dated. (Default = Disabled).
Automatically clean threats - Whether or not CCS should automatically remove any malware found by the scan.
- Disabled = Results are shown at the end of the scan with a list of any identified threats. You can select the action to be taken on them individually or on all items at-once. See 'Process infected files' in this wiki for guidance on manually handling detected threats.
- Enabled = You can choose the automatic action taken against detected threats. The options are:
- Quarantine Threats - Infected items will be moved to Quarantine. You can review quarantined items later and remove them or restore them (in case of false positives). See 'Manage quarantined Items' in this wiki to read more about quarantine.
- Disinfect Threats - If a disinfection routine is available, the antivirus will remove the infection and keep the original, safe, file. If not, the item is moved to 'Quarantine'. (Default)
- Quarantine Threats - Infected items will be moved to Quarantine. You can review quarantined items later and remove them or restore them (in case of false positives). See 'Manage quarantined Items' in this wiki to read more about quarantine.
Show scan result window - If selected, you will see a summary of results at the end of the scan. This includes the number of objects scanned and the number of threats found.
Use heuristics scanning - Enable or disable heuristic scans, and define the sensitivity of the scanner. (Default = Enabled)
Background. Heuristics is a technology that analyzes a file to see if it contains code typical of a virus. It is about detecting 'virus-like' attributes rather than looking for a signature which exactly matches a signature on the blacklist. This allows CCS to detect brand new viruses even that are not in the current virus database.
If enabled, please select a sensitivity level. The sensitivity level determines how likely it is that heuristics will decide a file is a malware:
- Low - Least likely to decide that an unknown file is a malware. Generates the fewest alerts.
Despite the name, this setting combines a very high level of protection with a low rate of false positives. Xcitium recommends this setting for most users. (Default)
- Medium - Detects unknown threats with greater sensitivity than the low setting, but with a corresponding rise in possible false positives.
- High - Highest sensitivity to detecting unknown threats. This also raises the possibility of more alerts and false positives.
Limit maximum file size to - Specify the largest file size that the antivirus should scan. CCS will not scan files bigger than the size specified here. (Default = 40 MB)
Run this scan with - Whether you want to set a priority for the scans with this profile
- Enabled = You can set the priority. The available options are:
High
Normal
Low
Background.
- Disabled = The scan will be run at the background (Default)
Update virus database before running - CCS checks for and downloads the latest virus signatures before starting every scan with this profile (Default = Enabled).
Detect potentially unwanted applications - The antivirus also scans for applications that (i) a user may or may not be aware is installed on their computer, or (ii) may contain functionality and objectives that are not clear to the user. Example PUA's include adware and browser toolbars. PUA's are often bundled as an additional utility when installing another piece of software. Unlike malware, many PUA's are legitimate pieces of software with their own EULA agreements. However, the true functionality of the utility might not have been made clear to the end-user at the time of installation. For example, a browser toolbar that tells you the weather forecast might also track your online activity. (Default = Enabled).
Apply this action to suspicious autorun processes - Specify how CCS should handle unrecognized auto-run items, Windows services and scheduled tasks.
- Ignore - The item is allowed to run (Default)
- Terminate - CCS stops the process/service
- Terminate and Disable - Auto-run processes will be stopped and the corresponding auto-run entry removed. In the case of a service, CCS disables the service.
- Quarantine and Disable - Auto-run processes will be quarantined and the corresponding auto-run entry removed. In the case of a service, CCS disables the service.
Note 1 - This setting monitors only registry records during the on-demand scan. To monitor the registry at all times, go to 'Advanced Settings' > 'Advanced Protection' > 'Miscellaneous'.
Note 2 - CCS ships with a list of applications for which script analysis will be performed to protect the registry records. You can manage the list of applications in 'Advanced Settings' > 'Advanced Protection' > 'Script Analysis' > 'Autorun Scans'.
Limit scan time of a single file to - Set the maximum time allowed to scan an individual file. CCS will skip files that take longer to scan than the specified time. Omitted files are shown in the 'Skipped Files' tab in the results screen.
- Click 'Schedule' at the top of the 'Scan' interface.

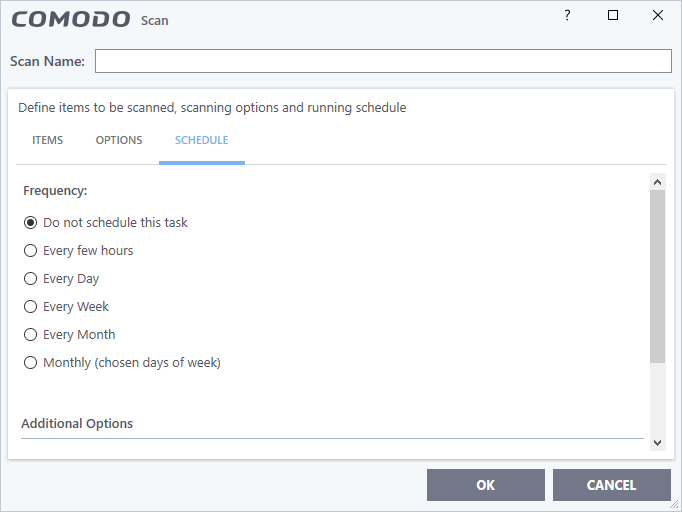
You have the following options:
Do not schedule this task - The scan profile will be created but will not run automatically. The profile will be available for on-demand scans.
Every few hours - Run the scan at the intervals of the hours specified in 'Repeat scan every NN hour(s)'
Every Day - Run the scan every day at the time specified in the 'Start Time' field.
Every Week - Run the scan on the day(s) specified in 'Days of the Week', at the time specified in the 'Start Time' field. You can select the days of the week by clicking on them.
Every Month - Run the scan on the date(s) specified in 'Days of the month', at the time specified in the 'Start Time' field. You can select the dates of the month by clicking on them.
Monthly (chosen days of the week) – Run the scan on specific weeks in a month. Select the target weeks in the menus provided.
Additional Options
Run only when computer is not running on battery - The scan only runs when the computer is plugged into the power supply. This option is useful when you are using a laptop or other mobile device.
Run only when computer is IDLE - The scan will run only if the computer is in idle state at the scheduled time. Select this option if you do not want the scan to disturb you while you are using your computer.
Turn off computer if no threats are found at the end of the scan - Will turn off your computer if no threats are found during the scan. This is useful when you are scheduling scans to run at nights.
Run during Windows Automatic Maintenance - Only available for Windows 8 and later. Select this option if you want the scan to run when Windows enters into automatic maintenance mode. The scan will run at maintenance time in addition to the configured schedule.
The option 'Run during Windows Maintenance' will be available only if 'Automatically Clean Threats' is enabled for the scan profile under the 'Options' tab.
Note: Scheduled scans will only run if the profile is enabled. Use the switch in the 'Status' column to turn the profile on or off.
- Click 'OK' to save the profile.
The profile is available for deployment in future.
Run a custom scan as per a scan profile
- Click 'General Tasks' on the CCS home screen
- Click 'Scan' > 'Custom Scan'
- Click 'More Scan Options'
The 'Advanced Settings' interface opens at the 'Scans' panel:
- Click 'Scan' beside the required scan profile.
The scan starts immediately. Results are displayed afterwards:


You can clean or ignore the files identified by the scan. See 'Process infected files' See 'Process infected files' in this wiki for guidance on manually handling detected threats.


---