North America
How to configure file rating settings in a Windows profile
Views
1188 times
Category
profiles
Tags
- Xcitium Client Security (CCS) uses a file’s trust rating to determine how it should handle the file. The rating is either obtained from the file-lookup server (FLS) during a scan, or is manually assigned to the file by a user.
- You can learn more about the specifics of file ratings in this wiki
- The wiki on this page explains how to configure the overall behavior of the file rating system.
Configure the file rating system
- Login to Xcitium
- Click 'Applications' > 'Endpoint Manager'
- Click ‘Configuration Templates’ > ‘Profiles’
- Open the Windows profile applied to your target devices
- Open the 'File Rating' tab then click 'Edit'
OR
- Click 'Add Profile Section' > 'File Rating', if the section hasn't been added yet:
- Open the 'File Rating' tab then click 'Edit'
- File Rating - Enable file rating and configure overall behavior.
- Local Verdict Server Settings - Local verdicts are those set by a user in CCS on an endpoint. This is as opposed to the ‘official’ rating which is stored on the Xcitium FLS server. This tab lets you whether CCS should ignore or obey any local verdicts.
- Enabled – CCS will obey local trust ratings set by the user/admin
- Disabled – CCS will ignore local ratings, and obey the ‘official’ rating held on Xcitium's file-lookup server.
- Enabled – CCS will obey local trust ratings set by the user/admin
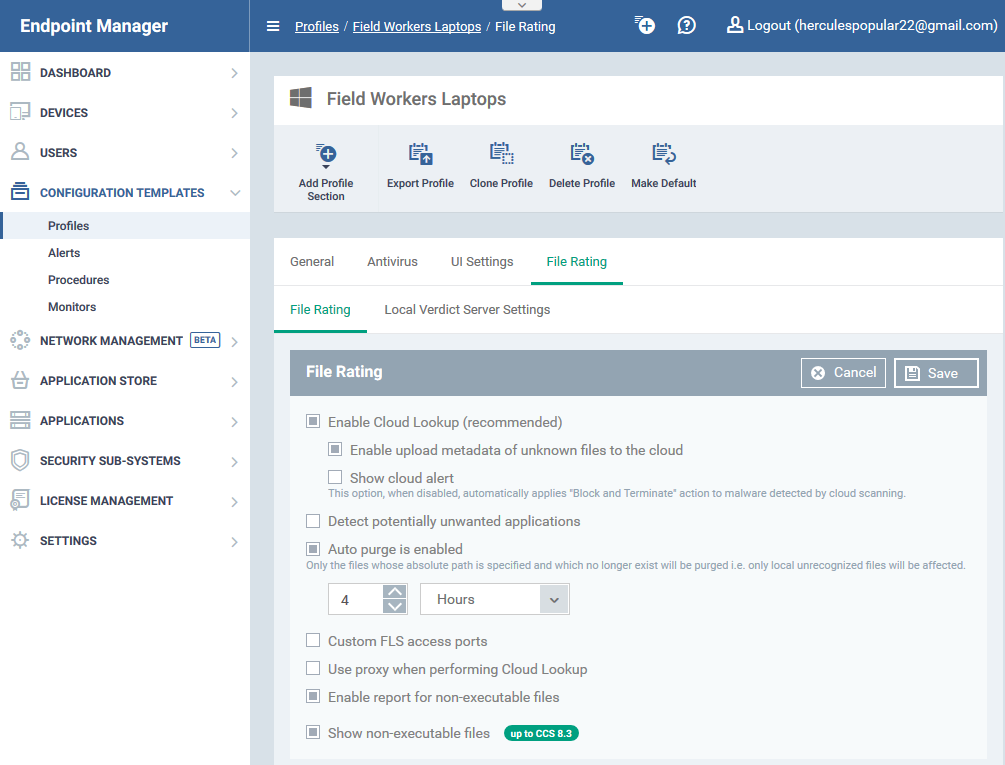
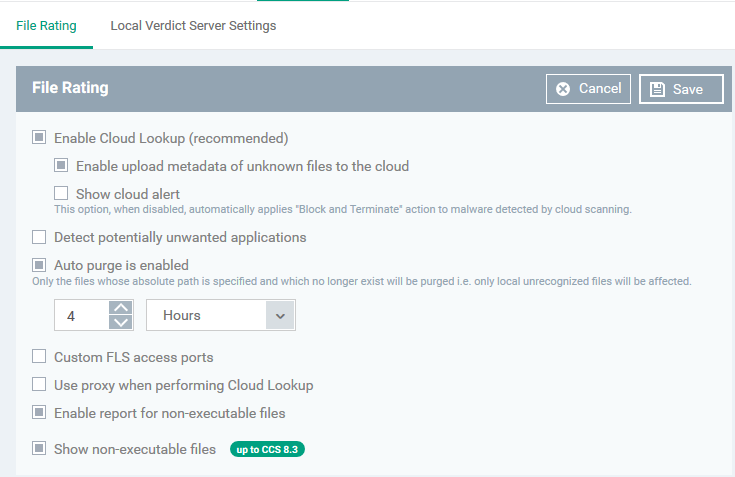
- Click the 'File Rating' tab and select your preferences
- Enable Cloud Lookup - CCS automatically checks the reputation of files on Xcitium's file lookup service (FLS). Default = Enabled
- Enable upload metadata of unknown files to the cloud - CCS uploads anonymized information about unknown files to Xcitium servers. This allows us to analyze and classify unknown files more effectively. Default = Enabled
- Show Cloud Alert - CCS can show an alert on the device when malware is found during a file rating scan. An example is shown below:
Users can block or allow the malware from the alert. (Default = Disabled)
- Enable upload metadata of unknown files to the cloud - CCS uploads anonymized information about unknown files to Xcitium servers. This allows us to analyze and classify unknown files more effectively. Default = Enabled
- Detect potentially unwanted applications - A potentially unwanted application (PUA) is an app that:
- A user may not be aware of is installed on their computer.
- May have functionality that wasn’t made clear to the user.
- A user may not be aware of is installed on their computer.


Background - PUAs are often installed as an extra when the user is installing an unrelated piece of software. Unlike malware, many PUA's are legitimate pieces of software with their own EULA agreements. However, the true functionality of the software may not have been made clear at the time of installation. For example, a browser toolbar may also contain code that tracks your activity on the internet.
CCS will show an alert on the endpoint if it detects a PUA. A log entry is also created. Default = Disabled.
- Auto-Purge is enabled - CCS checks the file list and removes invalid and obsolete entries. You can specify the interval at which the check should take place. Default = Enabled.
- Auto Purge Period - The time interval between each auto-purge operation.
- Enter the interval in hours. Default = Four hours.
- Enter the interval in hours. Default = Four hours.
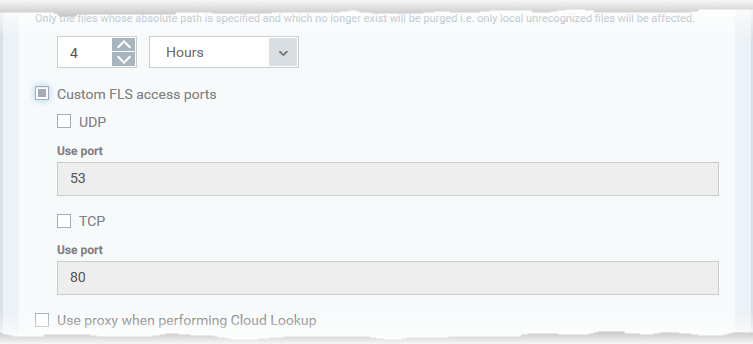
- Custom FLS access ports - Specify endpoint ports through which the file lookup service should connect.
- If enabled, choose the target protocol then enter the custom port number:
- If enabled, choose the target protocol then enter the custom port number:
- Enable report for non-executable files - CCS will include non-executable files in the report it sends to Endpoint Manager.
- Background – An executable file is a compiled program or script that is opened directly by the CPU. Example extensions include .exe, .bat and .bin files. An example executable is ‘word.exe’.
Non-executable files are NOT directly opened by the CPU. Instead, they are opened by an executable as described above. Example extensions include .doc, .jpg and .dll files.
- Background – An executable file is a compiled program or script that is opened directly by the CPU. Example extensions include .exe, .bat and .bin files. An example executable is ‘word.exe’.
- Show non-executable files - Include non-executable files in the CCS ‘File List’. This is in addition to executable files, which are always shown.
- Open CCS > Click 'Tasks' > 'Advanced Tasks' > 'Advanced settings' > 'Security settings' > 'File Rating' > 'File list'.
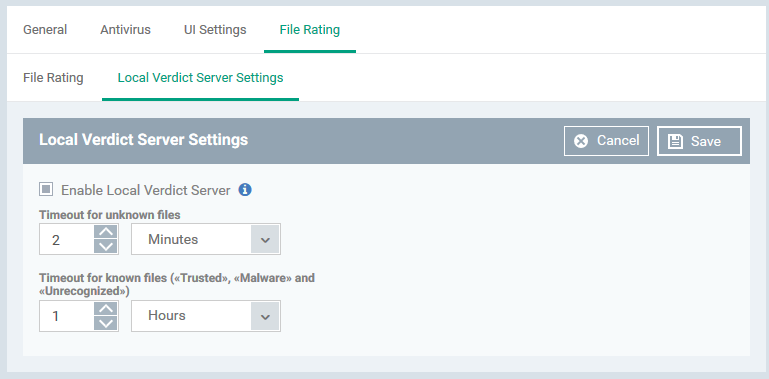
- Click the 'Local Verdict Server Settings' tab and select your preferences
- Enable Local Verdict Server - Local trust verdicts are those stored in CCS on an endpoint.
For example, a user can assign a trust level to a file when answering an alert.
- Enabled - CCS will obey the local trust verdict on a file in the event of a conflict with the cloud (FLS) verdict.
- Disabled - CCS will ignore local verdicts and only use cloud (FLS) verdicts to determine the trust level of a file
(Default = Enabled)
- Enabled - CCS will obey the local trust verdict on a file in the event of a conflict with the cloud (FLS) verdict.
- Timeout for Unknown Files - Validity period of local ratings for unknown files. Unknown files are those that do not have a Xcitium or admin rating.
- CCS will re-check the local rating when the timeout expires.
(Default = 2 Minutes)
- CCS will re-check the local rating when the timeout expires.
- Timeout for known files (Trusted, malware and Unrecognized) - Validity period of local ratings for all types of file - malware, trusted or unrecognized.
- CCS will re-check the local rating when the timeout expires.
(Default = 1 Hour)
- CCS will re-check the local rating when the timeout expires.
- Enable Local Verdict Server - Local trust verdicts are those stored in CCS on an endpoint.
- Click 'Save' to apply your changes.


CONTACT US
Call now!  (973) 859 4000 ext 3025
---