How to enroll devices using the on-boarding wizard
Click 'Users' > 'User List' > select users > click 'Enroll Device'.
- You need to enroll users' devices to Endpoint Manager in order to manage those devices going forward.
- Complete the wizard to send device enrollment mail to your users. Users must open the mail on the device itself. See the tutorial below.
- The mail contains an enrollment token. Multiple devices can be enrolled with the same token by the user simply responding to the mail from each device. Each token is valid for 90 days.
- Each license covers one device per user. You will need additional licenses for each device you add for a user. See this wiki if you need help with adding and managing licenses.
- You can also bulk enroll users and Windows endpoints by creating a software installation policy in Active Directory (AD). See this wiki if you want help with this.
- You can also enroll iOS devices using your Apple DEP account. See this wiki if you want help with this.
- This article explains how to enroll devices for multiple users
- Login to Xcitium
- Click 'Applications' > 'Endpoint Manager'
- Select the users for whom you want to add devices
OR
- Click the 'Add' button
on the menu bar then 'Enroll Device'.

This starts step 1 of the device enrollment wizard:
Step 1 - Device Options
- Current device - Enrolls the device you are currently using. You may disregard this option at this stage as we are adding multiple devices with the 'Other device' option.
- Other device - Add devices owned by the users you selected previously. Those users should already be listed in the 'Specify User' box:
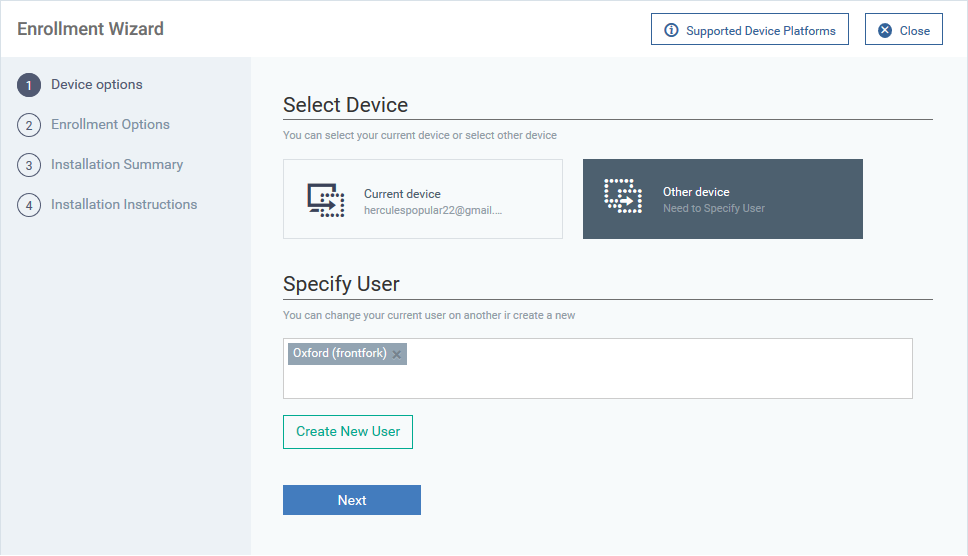

- You can add additional, existing users by simply typing their email address in the box. Endpoint Manager will auto-suggest users that have already been created.
- Create New User - Click if you want to add a new user to Endpoint Manager. You cannot add devices unless you have first added the users that own them.
- Click 'Next' to proceed to step 2.
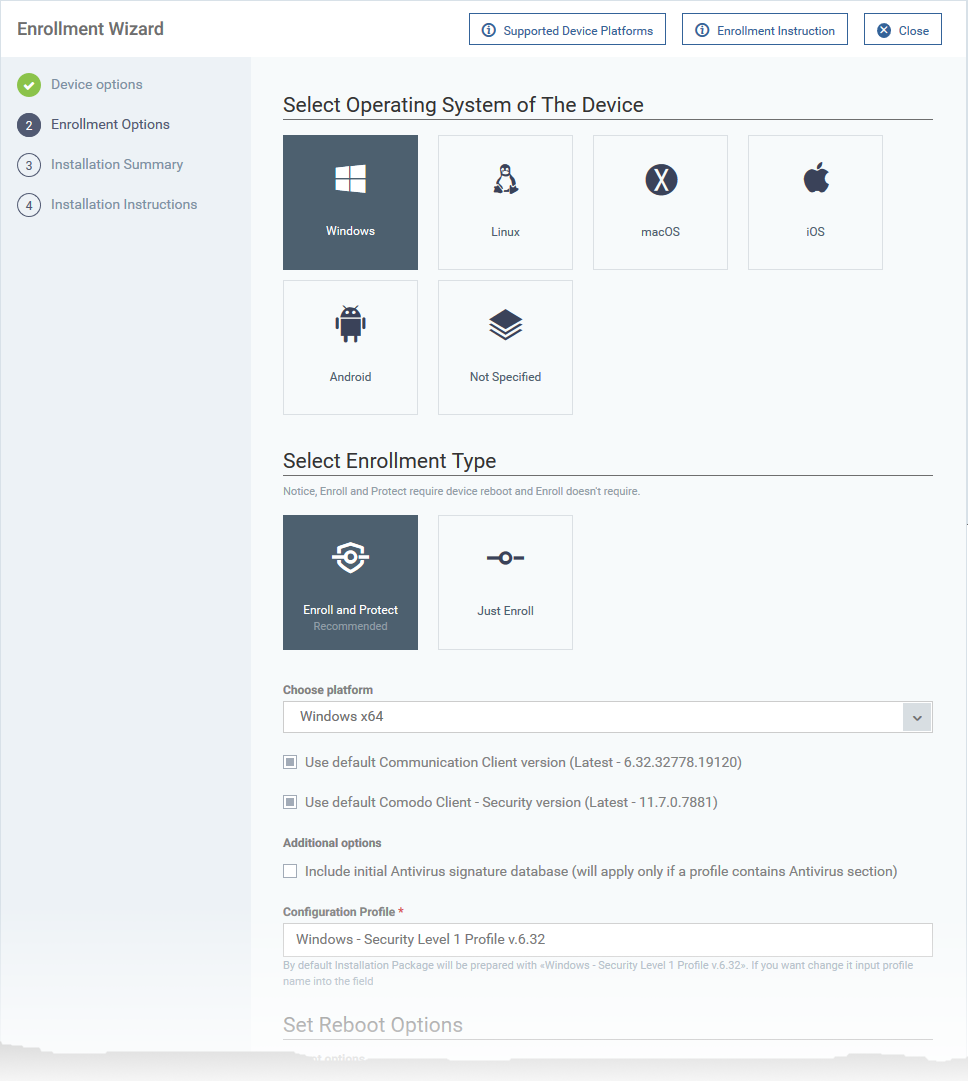
Step 2 - Enrollment Options
TLDR -

- Click ‘Not Specified’ if you only want to install the communication client on target devices. The wizard will detect the target operating system and send the appropriate client to the device user.
- Click one of the operating system tiles if you also want to install the security client. Make sure the target devices use the operating system you selected.
There are two broad ways you can enroll devices:
Option 1 - Enroll + Protect - Single Operating System
- Click one of the operating system boxes to enroll devices of that type. Please make sure all your target devices use this operating system.
- The wizard will send enrollment mails that only provision the OS you choose. For example - If you select the ‘Windows’ box, then the wizard will send enrollment mails which only contain download links for the Windows clients.
- Once you have chosen the OS, you can customize enrollment options as required. You can configure items such as enrollment type, reboot policy, client version, configuration profile, and device name.
Option 2 - Enroll Only - Multiple Operating Systems
- Click the ‘Not Specified’ box. This option installs only the communication client and doesn’t install the security client.
- Your target devices can be a mix of operating systems rather than a single OS. This option auto-detects the OS of the device and emails the appropriate client link to the user.
- The latest version of the communication client is installed on each device. The MDM profile is installed on MAC devices
- Note - You can use this option to quickly connect devices to Endpoint Manager, then go back later and install the security client if required.
Enrollment Type
Applies to Windows, Mac and Linux devices.
- Enroll and Protect - Installs both the communication client and the security client.
- Just Enroll - Installs only the communication client
Background. There are two types of client:
- Communication Client - Connects the device to Endpoint Manager for central management. It is mandatory to install this client.
- Security Client - This is the security software. Depending on the operating system, it includes antivirus, firewall, threat-containment, web-filtering, and more. It is optional to install this client.
Click 'Next' to skip to step 3 if you are happy with your choices on this page.
OR
Use the following links to read more about the various settings per OS:
- Choose platform - Select Windows OS version. 64 bit, 32 bit, or hybrid. The hybrid package will auto-detect and install the correct version.
- Use default Communication Client version - This client enrolls the endpoint for central management.
- You can only change the CCC version if enabled in portal settings.
- If the option is not enabled then the 'Default version' is deployed.
- You can only change the CCC version if enabled in portal settings.
- Use default Communication Client Security version - This client installs security software such as antivirus, firewall, and auto-containment.
- You can only change the CCS version if enabled in portal settings.
- If the option is not enabled then the 'Default version' is deployed.
- You can only change the CCS version if enabled in portal settings.
- Additional options:
- AV Database - Choose whether to include the latest virus database with the installation package. This increases the size of the package.
- If disabled, the client will download the latest database anyway when you run the first virus scan.
- AV Database - Choose whether to include the latest virus database with the installation package. This increases the size of the package.
- Configuration Profile - A configuration profile is a collection of settings that specify a device's network access rights, security settings, antivirus scan schedule, and more.
- The default is 'Windows - Security Level 1' profile. Choose a different profile if required.
- The default profile is recommended for most users and can always be changed later if required.
- If you want to change it, type the first few characters of a profile name and choose from the suggestions that appear.
- You can view the settings in a profile at ‘Configuration Templates’ > ‘Profiles’.
- The default is 'Windows - Security Level 1' profile. Choose a different profile if required.
- Set Reboot Options - Endpoints need to be restarted to complete CCS installation. You have the following restart options:
- Force the reboot in... - Restart the endpoint a certain length of time after installation. Select the delay period from the drop-down. A warning message is shown to the user prior to the restart.
- Suppress reboot - Endpoint is not auto-restarted. The installation is finalized when the user next restarts the endpoint.
- Warn about reboot and let users postpone it - Shows a message to the user which tells them that the endpoint needs to be restarted. The user can choose when the restart happens.
- Force the reboot in... - Restart the endpoint a certain length of time after installation. Select the delay period from the drop-down. A warning message is shown to the user prior to the restart.
Optional. Type a custom message in the 'Reboot Message' field.
- Device Name Options:
- Do Not Change - The device’s existing name is used to identify the device in Endpoint Manager.
- Change - Enter a new device name. Note - You can restore the original name from the device list screen if required.
- Do Not Change - The device’s existing name is used to identify the device in Endpoint Manager.
Click 'Next' to proceed to step 3
- Choose platform - Select Linux OS version:
- Ubuntu / Debian (Hybrid Package)
- RHEL / CentOS (Hybrid Package)
- ‘Hybrid’ just means the package is suitable for both types of OS.
- Ubuntu / Debian (Hybrid Package)
- Device Name Options:
- Do Not Change - The device’s existing name is used to identify the device in Endpoint Manager.
- Change - Enter a new device name. Note - You can restore the original name from the device list screen if required.
- Do Not Change - The device’s existing name is used to identify the device in Endpoint Manager.
Click 'Next' to proceed to step 3
- Select Method:
- With MDM profile (recommended) - Installs both the communication client and the Endpoint manager configuration profile. You can use the full suite of Endpoint Manager tools on your devices
- Without MDM profile - Installs only the communication client for connection to EM. 'Profile-less' enrollment lets you use Endpoint Manager to manage security while using another platform for general Mac management.
- With MDM profile (recommended) - Installs both the communication client and the Endpoint manager configuration profile. You can use the full suite of Endpoint Manager tools on your devices
- Device Name Options:
- Do Not Change - The device’s existing name is used to identify the device in Endpoint Manager.
- Change - Enter a new device name. Note - You can restore the original name from the device list screen if required.
- Do Not Change - The device’s existing name is used to identify the device in Endpoint Manager.
Click 'Next' to proceed to step 3.
- Device Name Options
- Do Not Change - The device’s existing name is used to identify the device in Endpoint Manager.
- Change - Enter a new device name. Note - You can restore the original name from the device list screen if required.
- Do Not Change - The device’s existing name is used to identify the device in Endpoint Manager.
Click 'Next' to proceed to step 3.
Review your choices so far.
The summary you see depends on the operating system and enrollment type:
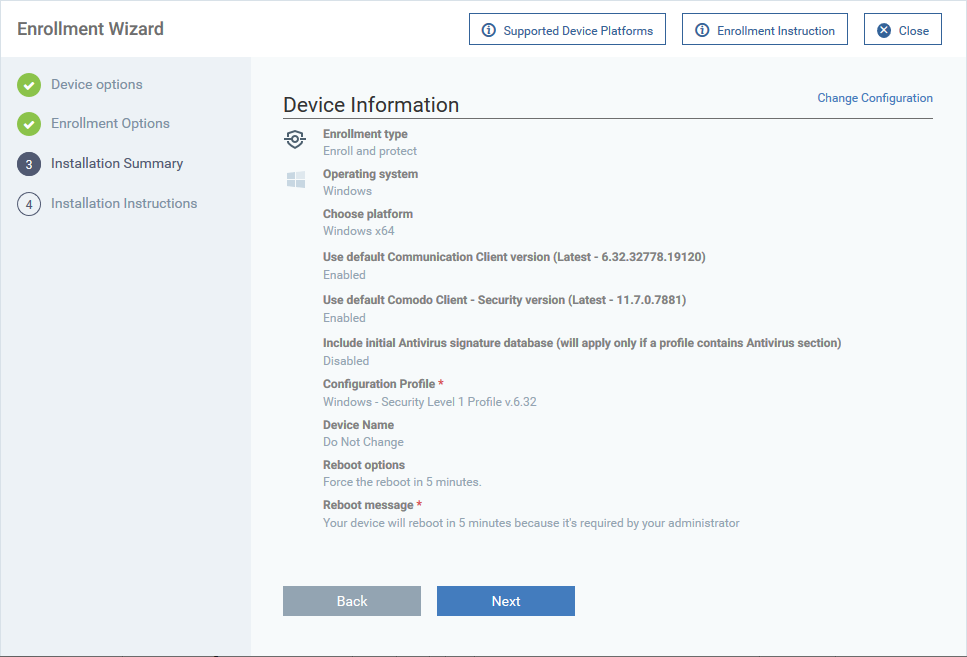

- Click ‘Back’ or 'Change Configuration' (top-right) to revise your choices.
- Click 'Next' to proceed to step 4
Step 4 - Installation Instructions
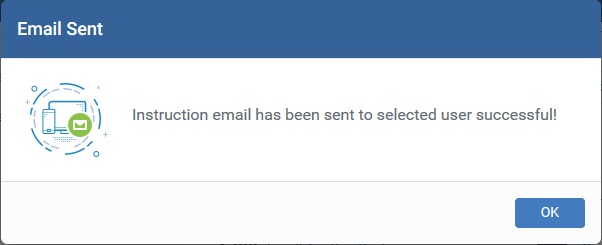
The final step is to send out the enrollment emails to the device owners:
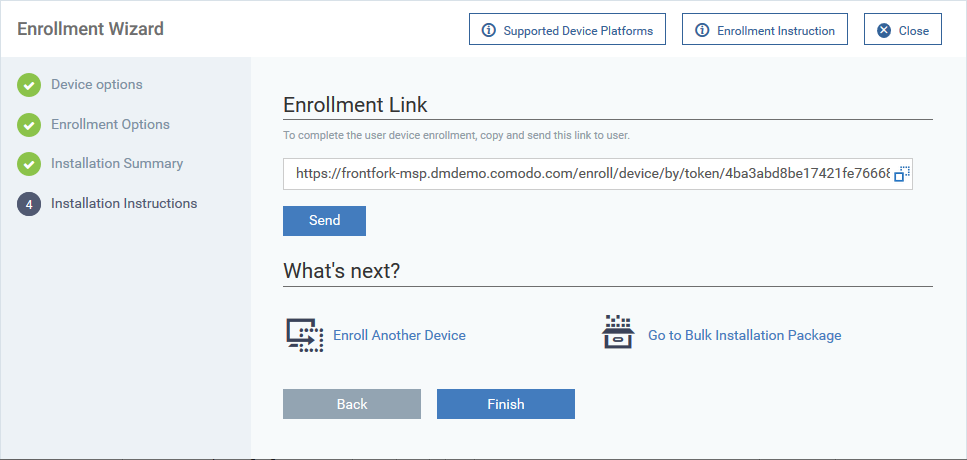

- Send - Click this to send enrollment mails to users with the settings you choose in steps 1, 2 and 3.
- Enroll Another Device - Takes you back to step 1
- Go to Bulk Installation Package - Takes you to bulk installation package screen to configure and enroll users' devices in bulk.
- Enroll Another Device - Takes you back to step 1
- Click 'Finish' to close the window.

Note - If you chose 'Current Device' in step 1, then you can enroll your device in two ways:
- Download the client in the final step. Follow the instructions and complete the enrollment procedure.
- Click 'Enrollment Instructions' at top-right, click the appropriate enrollment link to your device and complete the procedure.
An example of mail that is sent to users is shown below:

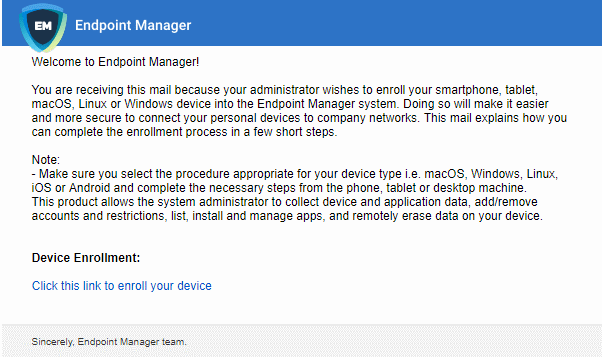
- Clicking the link will take the user to a page that lets them download the appropriate communication client/profile.
Tip: Here are two other ways you can enroll devices for users:
- Click 'Users' > 'User List' > click the name of a user to open their details screen > click 'Enroll Device'
- Click 'Devices' > 'Device List' > 'Enroll Device'.


---