How to generate reports in Service Desk
Ticket activity reports
Click 'Admin Panel' > 'Reports'
- Service Desk reports provide comprehensive data on ticket activity.
- You can generate billing reports, department reports, time-log reports, asset reports, agent reports (admin/staff members) and user reports.
- You can also schedule reports to be automatically generated at set times and sent to selected recipients.
Cost and contract reports
Click 'Admin Panel' > 'Finance' > 'Cost'
- Cost reports let you view billing details for any customer organization. The reports include per-contract fees and any charges for additional hours or material/expenses.
- You can also schedule cost reports to be automatically generated and sent to selected recipients.
Use the links below to jump to the area you need help with:
Click 'Admin Panel' > 'Reports'
- Time Log: Generate a report on tickets between specific dates.
- Tickets: Generate granular reports on ticket activity. You can filter the report by numerous criteria.
- Assets: A report on tickets that included work on a specific asset. Assets are items like printers, workstations, servers etc.
- Service Types: Generate reports by the type of support provided in the ticket. This can be 'Remote', 'Telephone’ or 'On-Site'. The report also shows the time spent and the charges applied.
- Departments: Generate a report on tickets worked on by specific departments.
- Agents: Generate a report on tickets worked on by selected staff members.
- Users: Users are the people who submit tickets to your support department. This section lets you generate reports on tickets from named users.
- Resource appointment: Appointments are activities that were added to an agent/staff member’s calendar. For example, to schedule an on-site visit. These reports show the number of hours spent on appointments by specific agents between dates that you select.
Click 'Admin Panel' > 'Finance' > 'Cost'
- Cost by customer - A report on the fees you charged to specific customers.
- Cost by contract - A report on the fees generated by a chosen contract.
Click the type of the report you want to generate from the options above.
- 'Time Log' reports provide information on ticket activities during selected periods.
- Reports include the date/time of ticket creation, ticket ID, the ticket assignee, the asset type that the ticket concerns, and the status of the ticket.
- Reports can be exported to PDF and CSV formats.
Create a time log report
- Open the admin panel (See the last link on the left)
- Click 'Reports' > 'Time Log'


Filter options
- Period: The default report period is from the first day of the current month to the current date. You can choose a different period by modifying the dates in the 'From' and 'To' fields.
- Department: Filter by the department to which the ticket is assigned.
- Category: Filter by the type of issue that was worked on.
- Agent: Filter by the staff member to whom the ticket s are assigned.
- Asset: Filter by the type of item that was worked on.
- Service Type: Filter logs by the kind of support service that was provided. Types = 'Remote', 'On-Site' and 'Telephone'.
- Click the 'Go!' button to generate the report for the selected period and filters.
If no filters are selected, the full report for all ticket activities within the period is generated and shown.
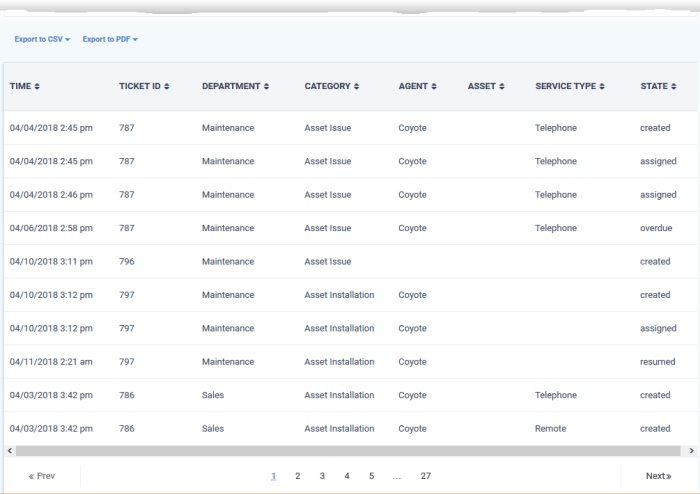

- Time - The date and time of the ticket activity.
- Ticket ID - The number assigned to the ticket.
- Department - The Service Desk department to which the ticket was assigned.
- Category - The help topic under which the ticket falls.
- Agent - Staff member to whom the ticket was assigned.
- Asset - The hardware, software or service that is the subject of the ticket. User's specify the asset type when creating the ticket.
- Service Type - The kind of service rendered during the service session. The possible values are:
- Onsite
- Remote
- Telephone
- Onsite
- State - The activity on the ticket. The possible activities are:
- Created - The ticket was added.
- Assigned - The ticket was allotted to a staff.
- Paused - The ticket activity was temporarily stopped.
- Resumed - The ticket activity was restarted.
- Closed - The ticket was closed.
- Reopened - The ticket was reopened.
- Overdue - The ticket was not closed within the stipulated time.
- Warning - Warnings flagged for the ticket per the SLA plan.
- Transferred - The ticket was transferred to another staff member.
- Created - The ticket was added.
Download the Report
- You can download reports in PDF and CSV formats.
- Click 'Export to PDF' and/or 'Export to CSV' at the top of the table to obtain reports.
Scheduled Reports
- Click the icon
beside 'Scheduled Reports' to schedule a report and configure recipients. See 'Scheduled Reports' for more details.
- The 'Tickets' report provides comprehensive information on all ticket activities for the selected period.
- Information includes ticket ID, the date and time of ticket creation, user's name and email address and the staff member assigned to the ticket.
- Reports can be exported to PDF and CSV formats.
Create a tickets report
- Open the admin panel (See the last link on the left)
- Click 'Reports' > 'Tickets'

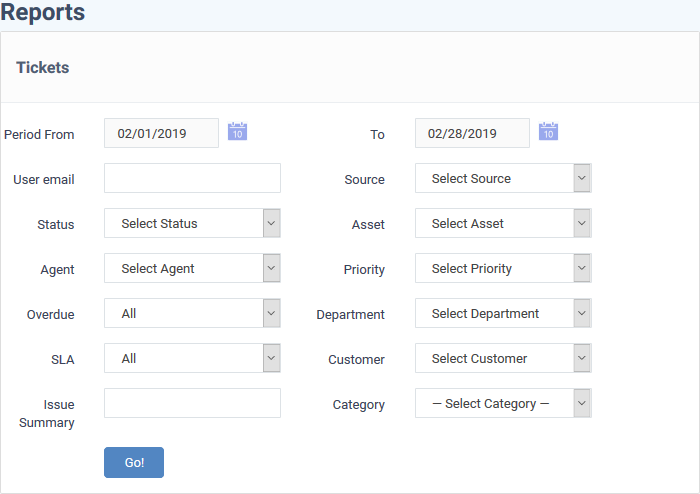
Filter options
- Period: The default report period is from the first day of the current month to the current date. You can choose a different period by modifying the dates in the 'From' and 'To' fields.
- User email: Include tickets created by a specific user. Select the user's email address.
- Source: Filter the report by channel by which tickets are received.
- Status: Include only tickets with a selected state.
- Asset: Include tickets created for a specific item type.
- Agent: Include only tickets assigned to a specific staff/agent.
- Priority: Include only tickets of a certain criticality level.
- Overdue: Include only tickets that are marked overdue.
- Department: Include only tickets assigned to a certain department.
- SLA: Include only tickets assigned with a specific service level agreement plan.
- Customer: Include only tickets created by users belonging to a specific company.
- Issue Summary: Include only tickets containing a specific brief description of the issue and enter the issue summary in part or full.
- Category: Include only tickets that fall under a specific help topic.
- Click the 'Go!' button to generate the report for the selected period and filters. If no filters are selected, then the full report for all ticket activities will be generated and displayed.
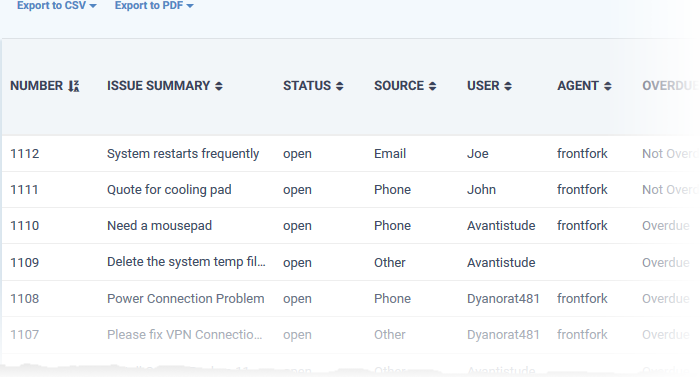
- Number: The identification number (ID) assigned to the ticket.
- Issue Summary: A brief description of the issue.
- In many cases, the issue summary will have been specified by the user or staff member who created the ticket.
- The issue summary of tickets that were created by another Comodo One / Dragon module like EM will include the condition that generated the ticket.
- In many cases, the issue summary will have been specified by the user or staff member who created the ticket.
- Status: Whether the ticket is open, paused or closed.
- Source: How the ticket was added. The possible values are phone, email, support portal and other.
- User: The name of the user with email ID, who created the ticket or on behalf of whom, the ticket was created by a staff member.
- Agent: The name of the staff member to whom the ticket is assigned.
- Overdue: Indicates whether the ticket is open beyond the stipulated closing time as per the SLA plan.
- Asset: The type of item that the ticket concerns. For example, 'Workstation', 'Server', 'Printer', 'Mobile'.
- Priority: Criticality of the ticket.
- Customer: The company to which the user belongs.
- Dept: The name of the department to which ticket was assigned.
- SLA: The service level agreement plan selected for the ticket.
- Created: The date and time the ticket was submitted.
- Closed: The date and time the ticket was closed.
- Billable Time: The time spent on resolving the issues(s) mentioned in the ticket by staff member, that is chargeable.
- Spent Time: Actual time spent by staff for resolving the ticket.
- Materials: Total cost of billable items and expenses which were used while resolving the ticket.
- Billable Time Cost: The charge calculated for the billable time, as per the service contract associated with the customer.
- Category: The help topic on which the user requested support.
Download the Report
- You can download reports in PDF and CSV formats.
- Click 'Export to PDF' and/or 'Export to CSV' at the top of the table to obtain reports.
Scheduled Reports
- Click the icon
- The 'Assets' report shows the number of tickets that are open, closed, assigned and overdue for an asset category. Asset categories include items such as 'Printers', 'Routers', 'Servers' etc.
- This can help you see which asset categories are in most demand and provide insight into where support infrastructure could be strengthened.
- Asset information also includes time spent, billable time, material cost and billable time cost.
- The 'Asset' report can be generated for all asset categories or for a single asset category.
- Reports can be exported to PDF and CSV formats.
Create an assets report
- Open the admin panel (See the last link on the left)
- Click 'Reports' > 'Assets'

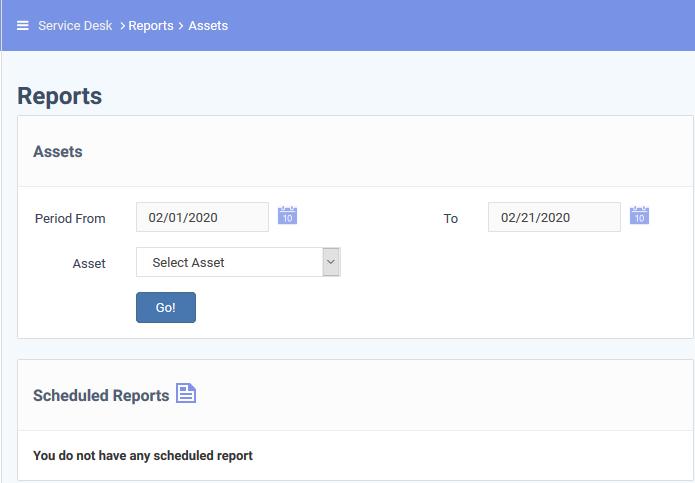
Filter options
- Period: The default report period is from the first day of the current month to the current date. You can choose a different period by modifying the dates in the 'From' and 'To' fields.
- Asset: Choose the asset category for which the report has to be generated. Leave as 'Select Asset' to include all asset categories in the report.
- Click the 'Go!' button to generate the report for the selected period and filter.
If an asset is not selected, then the full report for all asset categories will be generated for the time period and displayed.

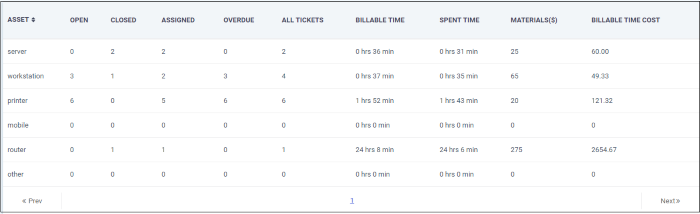
- Asset: The name of the asset category.
- Open: Number of tickets that are open for the asset category.
- Closed: Number of tickets that are closed for the asset category.
- Assigned: Number of tickets that are assigned the asset category.
- Overdue: Number of tickets that are assigned the asset category and not closed within the stipulated time.
- All tickets: Total number of tickets that are assigned the asset category, that is, the sum of open and closed tickets for it.
- Billable Time: Time spent on tickets for the asset category which can be charged to the customer.
- Spent Time: Total time spent resolving tickets for the asset category.
- Materials: The total cost of materials used in tickets for the asset category.
- Billable Time Cost: The total charge for the time listed in the 'Billable Time' column.
Download the Report
- You can download reports in PDF and CSV formats.
- Click 'Export to PDF' and/or 'Export to CSV' at the top of the table to obtain reports.
Scheduled Reports
- Click the icon
beside 'Scheduled Reports' to schedule a report and configure recipients. See 'Scheduled Reports' for more details.
- The 'Service Types' report shows the number of service sessions involving the selected service type, total time spent, billable time spent for the service type, cost calculated and so on.
- This can help you see which service types are in most demand and provide insight into where support infrastructure could be strengthened and set pricing in future.
- The 'Service Types' report can be generated for all service types or for a single service type.
- Reports can be exported to PDF and CSV formats.
Create an assets report
- Open the admin panel (See the last link on the left)
- Click 'Reports' > 'Service Types'

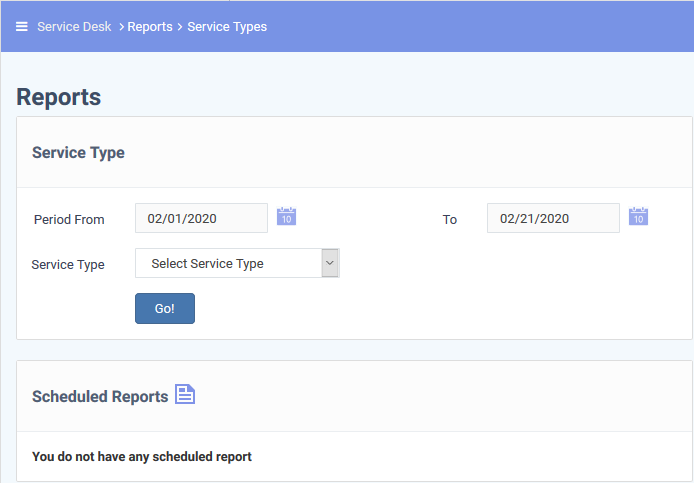
Filter options
- Period: The default report period is from the first day of the current month to the current date. You can choose a different period by modifying the dates in the 'From' and 'To' fields.
- Contract: Choose the service type for which the report has to be generated.
- Click the 'Go!' button to generate the report for the selected period and service type(s).
- If a service type is not selected, then the full report for all service types will be generated for the time period and displayed.
- Service types: The name of the service type. Possible values are:
- Remote
- Onsite
- Telephone
- Remote
- Threads: The total number of service sessions involving the service type within the report period.
- Tickets: The total number of attended tickets involving the service type within the report period.
- Total Time Spent: The cumulative time spent on the service type.
- Billable Time : The net chargeable time spent on the service type excluding the pre-paid hours defined in the service contracts bound to the customers.
- Billable Time Cost: The total charge calculated for the billable time, based on the hourly rates defined in the contracts and charging plans associated with them.
- Asset Types (Server, Workstation etc.): A breakup of time spent providing the type of service on different asset types within the report period.
Download the Report
- You can download reports in PDF and CSV formats.
- Click 'Export to PDF' and/or 'Export to CSV' at the top of the table to obtain reports.
Scheduled Reports
- Click the icon
- The 'Departments' report shows the status of all tickets assigned to a selected department.
- This includes the number of open and closed tickets per department, the number of those tickets that have been assigned to staff members and the number of overdue tickets.
- Report also includes time spent, billable time and material cost for the department.
- The 'Departments' report can be generated for all departments or for a single department.
- The generated report can also be saved as PDF and CSV formats.
Create a department report
- Open the admin panel (See the last link on the left)
- Click 'Reports' > 'Departments'

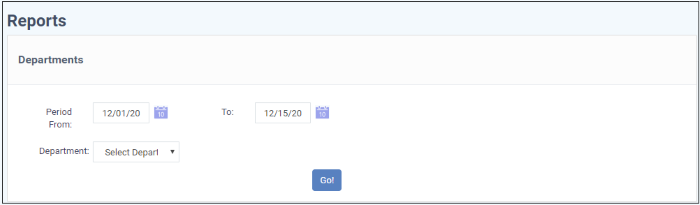
Filter options
- Period: The default report period is from the first day of the current month to the current date. You can choose a different period by modifying the dates in the 'From' and 'To' fields.
- Department: Choose the department for which the report has to be generated.
- Click the 'Go!' button to generate the report for the selected period and filter.
- If a department is not selected, then the full report for all departments will be generated for the selected period and displayed.

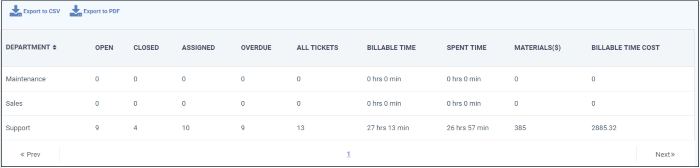
- Department: The name of the department.
- Open: Number of tickets assigned to the department and in open status.
- Closed: Number of tickets assigned to the department and have been closed.
- Assigned: Total number of tickets are assigned to the department.
- Overdue: Number of tickets assigned to the department and not closed within the stipulated time.
- All tickets: Total number of tickets that are assigned to the department (sum of open and closed tickets).
- Billable Time: Time spent on tickets which can be charged to customers.
- Spent Time: Total time spent resolving tickets for the department.
- Materials: The total cost of materials used in tickets for the department.
- Billable Time Cost: The total charge for time listed in the 'Billable Time' column.
Download the Report
- You can download reports in PDF and CSV formats.
- Click 'Export to PDF' and/or 'Export to CSV' at the top of the table to obtain reports.
Scheduled Reports
- Click the icon
- The 'Agents' report provides information on the numbers of tickets that are open, closed, assigned, paused and overdue for a selected staff member.
- Report also includes information about billable time, spent time, material cost and billable time cost which helps for better productivity analysis.
- The 'Agents' report can be generated for all staff members or for a single member.
- Reports can be exported to PDF and CSV formats.
Create an agents report
- Open the admin panel (See the last link on the left)
- Click 'Reports' > 'Agents'

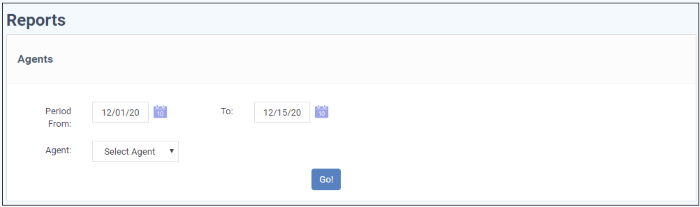
Filter options
- Period: The default report period is from the first day of the current month to the current date. You can choose a different period by modifying the dates in the 'From' and 'To' fields.
- Agent: Choose the staff member for whom the report has to be generated. Leave as 'Select Agent' to generate report for all staff members.
- Click the 'Go!' button to generate the report for the selected period and filter.

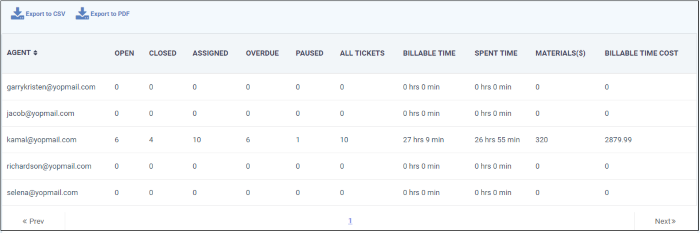
- Agent: The name of the staff member.
- Open: Number of tickets assigned to a staff member and in open state.
- Closed: Number of tickets assigned to the staff member that have been closed.
- Assigned: Total number of tickets assigned to the staff member.
- Overdue: Number of tickets assigned to the staff member and not closed within the stipulated time.
- Paused: Number of tickets temporarily stopped by the staff member.
- All tickets: Total number of tickets worked on by the staff member (sum of open and closed tickets).
- Billable Time: Time spent on tickets by the staff member which can be charged to the customer
- Spent Time: The cumulative time spent resolving tickets by the staff member.
- Materials: The total cost of materials used in tickets worked on by staff members.
- Billable Time Cost: The total charge for the time listed in the 'Billable Time' column.
Download the Report
- You can download reports in PDF and CSV formats.
- Click 'Export to PDF' and/or 'Export to CSV' at the top of the table to obtain reports.
Scheduled Reports
- Click the icon
- The 'Users' report provides information on tickets created by/created on behalf of registered and guest users.
- The report also includes details about the billable time, spent time, material cost and billable time cost for the users' tickets.
- The 'Users' report can be generated for all users or for a single user.
- Reports can be exported to PDF and CSV formats.
Create a user report
- Open the admin panel (See the last link on the left)
- Click 'Reports' > 'Users'

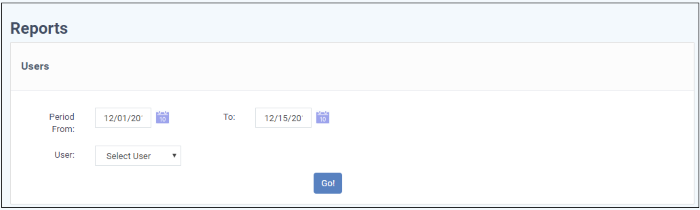
Filter options
- Period: The default report period is from the first day of the current month to the current date. You can choose a different period by modifying the dates in the 'From' and 'To' fields.
- User: Choose the user for whom the report has t be generated. If the no user is selected, all users are included in the report.
- Click the 'Go!' button to generate the report for the selected period and filter.

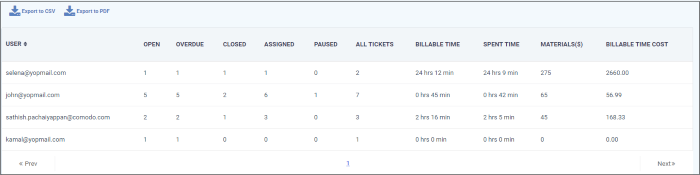
- User: The name of the registered or guest user.
- Open: Number of tickets created by the user and yet to be resolved.
- Overdue: Number of tickets created by/for the user that have not been closed within the stipulated time.
- Closed: Number of tickets that are created by/for the user and closed by the assigned staff member.
- Assigned: Total number of tickets created by/for the user that are assigned to a staff member.
- Paused: Number of tickets that are paused temporarily by the assigned staff member.
- All tickets: Total number of tickets that were created by/for the user (sum of open and closed tickets).
- Billable Time: Cumulative time spent on tickets for the selected users which can be charged to the customer.
- Spent Time: Cumulative time spent resolving tickets for the selected user.
- Materials: The total cost of materials used in tickets for the selected user.
- Billable Time Cost: The total charge for time listed in the 'Billable Time' column.
Download the Report
- You can download reports in PDF and CSV formats.
- Click 'Export to PDF' and/or 'Export to CSV' at the top of the table to obtain reports.
Scheduled Reports
- Click the icon
- The 'Resource appointment' report provides information about staff appointments added to a service desk calendar.
- See this wiki to read more about Service Desk calendar.
- See this wiki to read more about Service Desk calendar.
- The report shows an overview of scheduled tasks and meetings by staff.
Create a resource appointment report
- Open the admin panel (See the last link on the left)
- Click 'Reports' > 'Resource Appointment'

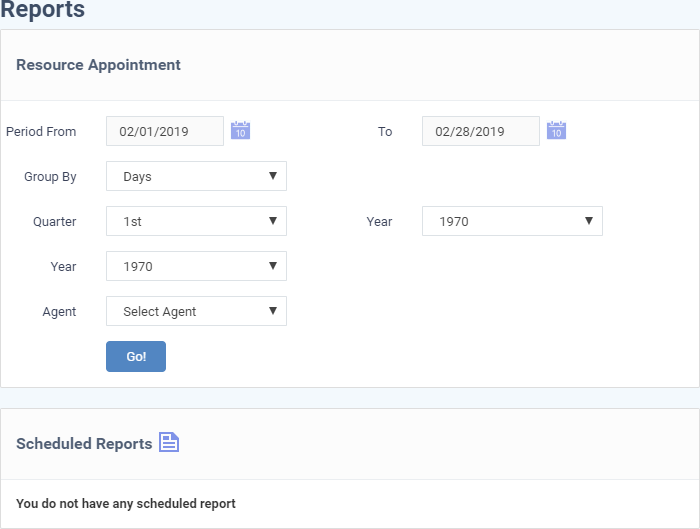
Filter options
- Period: The default report period is from the first day of the current month to the current date. You can choose a different period by modifying the dates in the 'From' and 'To' fields.
- Group By: Select how the entries should be sorted in the report, that is, by days, weeks, months, quarters or by years.
- Quarter - Generate a report which covers a selected quarter (three months) of a year, regardless of the time you chose in the 'Period' filter.
- Select the year and the quarter from the respective drop-downs to generate a report for a quarter
- Leave at default to generate report for the period covered by dates in the 'From' and 'To' fields
- Select the year and the quarter from the respective drop-downs to generate a report for a quarter
- Year - Generate a report which covers the selected year, regardless of the time you chose in the 'Period' filter.
- Select the year from the drop-downs to generate a report covering a specific year
- Leave at default to generate report for the period covered by dates in the 'From' and 'To' fields
- Select the year from the drop-downs to generate a report covering a specific year
- Agent: Select the staff member to filter the report to contain only the appointments of that staff. Leave as 'Select Agent' to include all staff members in the report.
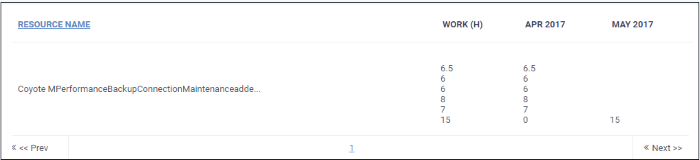
- Click the 'Go!' button to generate the report for the selected period and filter. The following example shows report by months.

Download the Report
- You can download reports in PDF and CSV formats.
- Click 'Export to PDF' and/or 'Export to CSV' at the top of the table to obtain reports.
Scheduled Reports
- Click the icon
beside 'Scheduled Reports' to schedule a report and configure recipients. See 'Scheduled Reports' for more details.
- The customer cost report can be generated for all customers enrolled in the Service Desk or for an individual customer.
- Reports can be exported to PDF and CSV formats.
Create a cost report
- Click 'Admin Panel' > 'Finance' > 'Cost'
- Select 'Cost by Customer' in the 'Report Type' drop-down

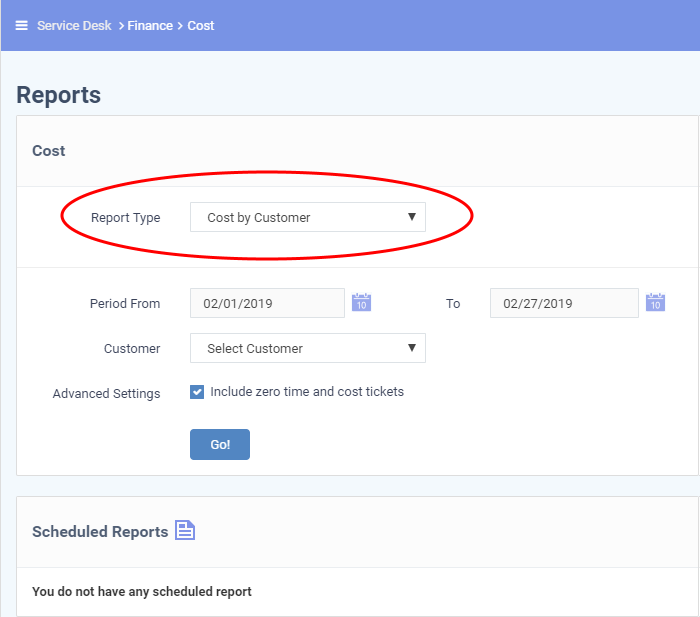
- Period - Enter the start and end date of the report period.
- Customer - Select the customer for which the report should be generated. Leave this at 'Select Customer' to generate a report for all customers.
- Include zero time and cost tickets - Include tickets which did not involve any costs nor time.
See the following sections for more details on
Cost report for a specific customer
- Select the time period for the report
- Select the customer from the 'Customer' drop-down
- Click the 'GO!' button
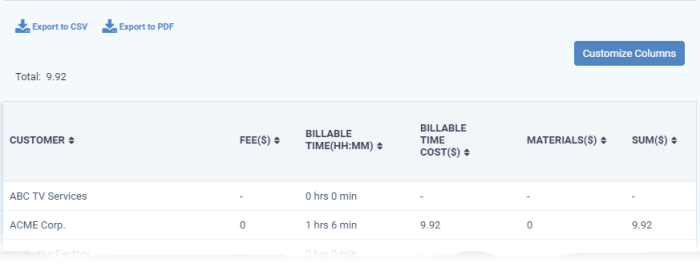
- The report will contain the details of tickets attended for that customer with asset information, billable time, billable cost, material cost and the sum.
- A typical report for a selected customer looks as follows:

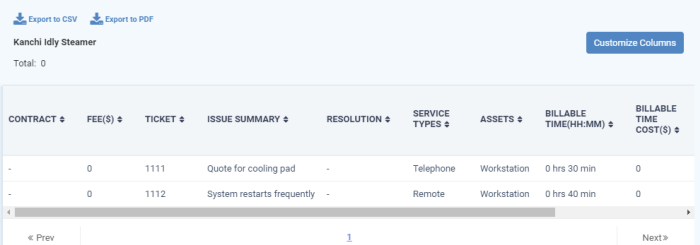
The grand total of costs for the customer is shown at the top of the table. You can change the columns shown by clicking the 'Customize Columns' button. The following is a list of all possible columns:
- Contract - The service contract associated with the customer at the time of attending to the ticket.
- Fee - The subscription fee as per the service contract.
- The contract fees include any fixed weekly/bi-weekly/monthly/annual subscription fees agreed with the customer.
- If no contract is associated with the customer at the time of attending to the ticket, the fee is shown as '0.00'.
- The contract fees include any fixed weekly/bi-weekly/monthly/annual subscription fees agreed with the customer.
- Ticket - The ID number of the ticket.
- Issue Summary - A brief description of the issue.
- In many cases, the issue summary will have been specified by the user or staff member who created the ticket.
- The issue summary of tickets that were created by another Comodo One / Dragon module like EM will include the condition that generated the ticket.
- In many cases, the issue summary will have been specified by the user or staff member who created the ticket.
- Resolution - A description of the fix/solution. This is set by the staff member attending to the ticket.
- Service Types - The kind of services rendered during the service sessions, accounted for billing. The possible values are:
- Onsite
- Remote
- Telephone
- Onsite
- Assets - The type of item that the ticket concerns. For example, 'Workstation', 'Server', 'Printer', 'Mobile'.
- Billable Time - Time spent by staff members on resolving each closed ticket.
- Billable Time Cost - Charges calculated for billable time (in default currency set for your Service Desk).
- No charges will be applied here until billable time exceeds the pre-paid hours covered by the contract.
- Only Charges for additional hours will be shown here.
- Charges are calculated based the asset rates defined in the contract.
- If the asset rates are not defined in the contract, then the global rates will be applied.
- No charges will be applied here until billable time exceeds the pre-paid hours covered by the contract.
- Materials - Total cost of billable items and expenses which were used while resolving the ticket.
- Sum - The amount chargeable for the ticket.
Download the Report
- You can download reports in PDF and CSV formats.
- Click 'Export to PDF' and/or 'Export to CSV' at the top of the table to obtain reports.
Scheduled Reports
- Click the icon
- Select the time period for the report
- Leave 'Select Customer' in the 'Customer' drop-down
- Click the 'GO!' button
- The report will contain the total billable time, billable costs, and material costs for each customer.
- A typical report for all customers looks as follows:

You can change the columns shown by clicking the 'Customize Columns' button. The following is a list of all possible columns:
- Customer - The organization or company.
- Fee - The subscription fee as per the service contract associated with the customer.
- The contract fees include any fixed weekly/bi-weekly/monthly/annual subscription fees agreed with the customer.
- If no contract is associated with the customer, the fee is shown as '0.00'.
- The contract fees include any fixed weekly/bi-weekly/monthly/annual subscription fees agreed with the customer.
- Billable Time - Time spent by staff members on resolving the tickets from the users in the customer company.
- Billable Time Cost - Charges calculated for billable time for the customer (in default currency set for your Service Desk).
- No charges will be applied here until billable time exceeds the pre-paid hours covered by the contract.
- Only Charges for additional hours will be shown here.
- Charges are calculated based on the asset rates defined in the contract.
- If the asset rates are not defined in the contract, then the global rates will be applied.
- No charges will be applied here until billable time exceeds the pre-paid hours covered by the contract.
- Materials - Total cost of billable items and expenses which were used while resolving the tickets from the users of the customer company.
- Sum - The amount chargeable to the customer.
Download the Report
- You can download reports in PDF and CSV formats.
- Click 'Export to PDF' and/or 'Export to CSV' at the top of the table to obtain reports.
Scheduled Reports
- Click the icon
- A contract report shows the charges generated by a specific contract. The report also shows the number of tickets and support sessions for customers on the contract.
- Reports can be generated for all contracts or specific contracts.
- Reports can be generated for a selected period of time, or for the entire contract duration.
- Reports can be exported to PDF and CSV formats.
Create a contract report
- Click 'Admin Panel' > 'Finance' > 'Cost'
- Select 'Cost by Contracts' in the 'Report Type' drop-down


Filters:
- Period: The default report period is from the first day of the current month to the current date. You can choose a different period by modifying the dates in the 'From' and 'To' fields.
- Contract: Select a specific contract for the report. Leave this at 'Select Contract' to generate a report on every contract.
- Get detailed report:
Enabled - Generate a report which covers the whole period, regardless of the time you chose in the 'Period' filter.
Disabled - Generate a report for the selected period.
- Click the 'Go!' button to generate the report.
The example shown below is a report for all contracts:

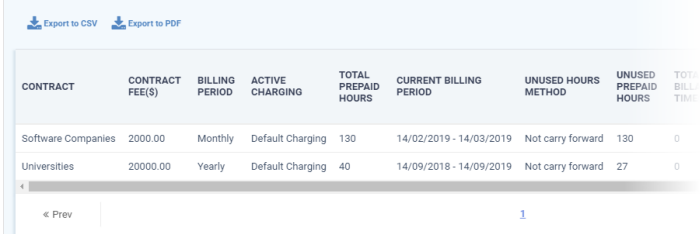
- Contract - The label of the service contract.
- Contract Fee - The subscription fee for the billing cycle as set out in the contract.
- Billing Period - Billing cycle defined in the contract.
- Active Charging - The charging plan applied to the contract.
- Click 'Admin Panel' > 'Manage' > 'Charging' to view and manage charging plans.
- See this wiki to read more about charging plans
- Click 'Admin Panel' > 'Manage' > 'Charging' to view and manage charging plans.
- Total Pre-paid Hours - The total service time across all service types, covered by the subscription fee.
- Current Billing Period - The period for which the current fee is calculated
- Ununsed Hours Method - Whether or not the contract states unused pre-paid hours should be carried forward to the next billing period.
- Unused Prepaid Hours - The amount of 'pre-paid' time which is still remaining in the current billing cycle.
- Total Billable Time - Time which is chargeable to the customer for working on their tickets.
- Time becomes billable after all 'pre-paid' hours are used up. If you have assigned a charging plan to the contract, then they will be charged at the default/variable rates set out in the plan. If no plan is assigned to the contract then work will be charged at the global asset rates.
- Click 'Admin Panel' > 'Manage' > 'Charging' to view and manage charging rates.
- Click 'Admin Panel' > 'Manage' > 'Assets' to view and manage global asset rates.
- Time becomes billable after all 'pre-paid' hours are used up. If you have assigned a charging plan to the contract, then they will be charged at the default/variable rates set out in the plan. If no plan is assigned to the contract then work will be charged at the global asset rates.
- Total Billable Cost - The total cost calculated for the billable time
- Current Fee - The contract fee calculated for the reporting period.
- # Threads - The total number of service sessions for the customers to which the contract is bound.
- # Tickets - The number of tickets attended for the customers within the reporting period.
- Sum - The total of 'Total Billable Cost' and 'Current Fee'.
Download the Report
- You can download reports in PDF and CSV formats.
- Click 'Export to PDF' and/or 'Export to CSV' at the top of the table to obtain reports.
Scheduled Reports
- Click the icon
- You can configure Service Desk to automatically generate and send reports to specific staff members at regular time-intervals.
- Reports that can be scheduled include Time Log, Tickets, Assets, Service Types, Departments, Agents, Users Resource appointments, Cost and Contracts .
- The scheduling process is explained below. Filters for specific report types may vary.
Schedule report generation
- Click 'Admin Panel' > 'Reports' and select the type of ticket activity report you want to schedule
Or
- Click 'Admin Panel' > 'Finance' > 'Cost' 'and select the type of cost report you want to schedule
The screenshot below is the 'Tickets' report:

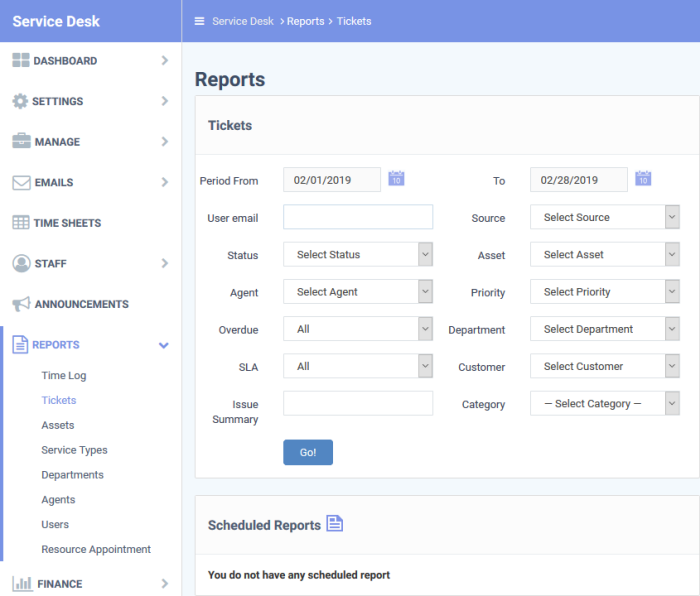
- Click the
- The first step is to configure the report filters. Please note the filters will vary depending on the type of report:


- Configure each filter according to the data you wish to see in the final report. For details about the filters in each type of report, see Generate Reports.
- Leave the filters at default values to generate a full, unfiltered report.
- Click Next' to configure report send time, frequency, time-period and recipients:

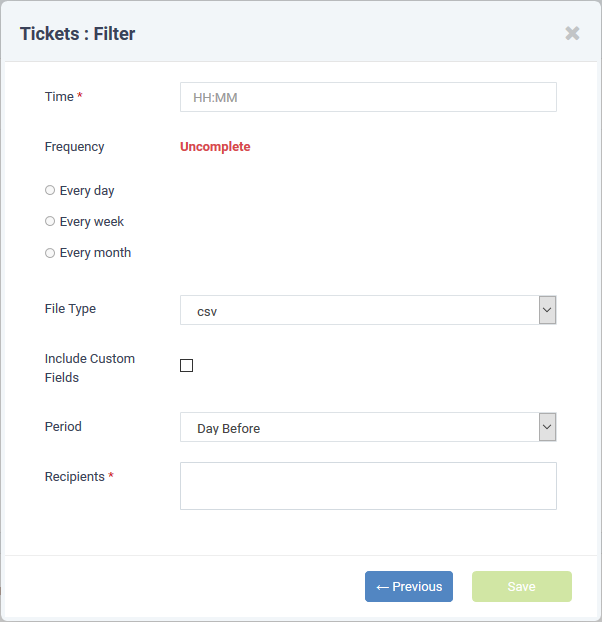
- Time - Time of day at which the report should be generated and sent
- Frequency - How often the report should be generated and sent:
- Every day - The report will be sent daily
- Every week - Select the day(s) of the week on which the report should be sent.
- Every month - Select the day(s) of the month on which the report should be sent.
- Every day - The report will be sent daily
- File Type - File format of the report. The report will be delivered to recipients in the format you choose here. The available options are:
- CSV
- PDF
- CSV
- Include Custom Fields - Specify whether or not the report should contain the custom field values in the details of the item for which the report is generated.
- Period - The report coverage period. The options available are:
- Day Before - Creates a report for the 24 hours preceding the time of report generation
- Week Before - Creates a report for the 7 days preceding the time of report generation
- Month Before - Creates a report for the month preceding the time of report generation
- Day Before - Creates a report for the 24 hours preceding the time of report generation
- Recipients - Select staff/agents to whom the reports should be sent.
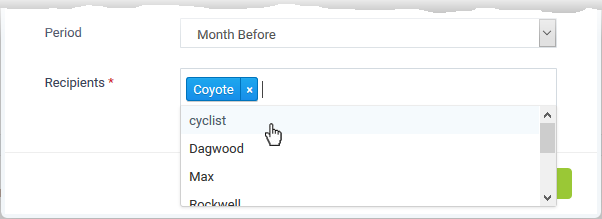

- Click 'Save'
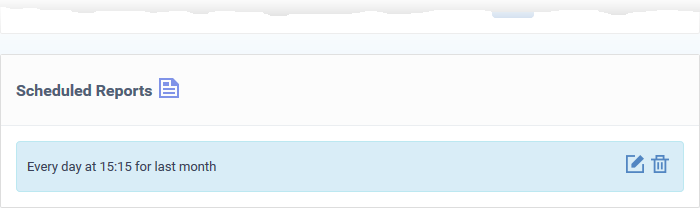
The schedule is saved and shown at the bottom of report screen.
The reports will be automatically sent to the configured recipients per the selected frequency.


---