How to generate reports in the Comodo One portal
Login to Comodo One / Dragon > Click 'Reports' on the menu bar
The reports interface lets you generate reports on:
- Service desk tickets
- Managed devices
- Malware identified on managed devices
- Files discovered on managed devices
- Files submitted to Valkyrie for analysis and their verdicts
You can generate a report on demand, or schedule automatic reports at set intervals
This article explains how to generate reports in Comodo One, but you can also create reports in the Endpoint Manager and Service Desk applications themselves.
- See this help page if you need help to create reports in Endpoint Manager
- See this wiki if you need help to create reports in Service Desk
Use the links below to jump to the task you need help with:
- The Comodo One reports interface
- Create or schedule reports
- View the reports
- View and manage report schedules
The Comodo One reports interface
- Login to Comodo One / Dragon
- Click 'Reports' on the menu bar

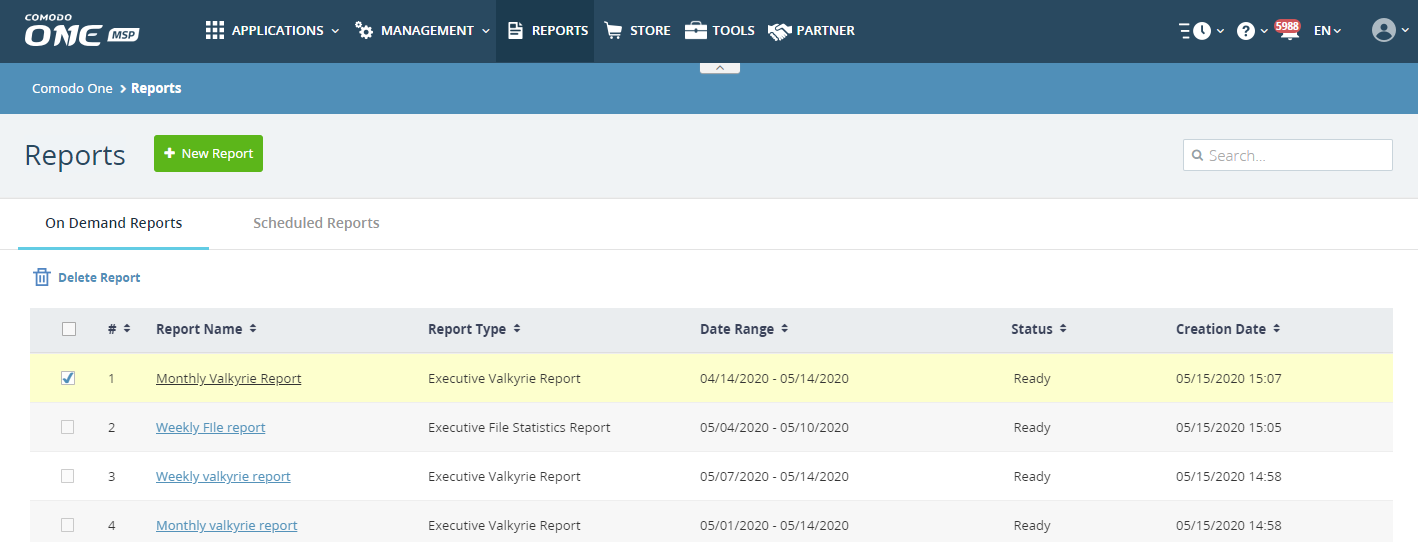
The interface has two tabs:
- On Demand Reports - Manually generated reports
- Scheduled Reports - Created automatically at time intervals of your choice
Report Name - Label of the report. You specify the report name when you create the report.
Report Type - Module which the report concerns. For example, 'Executive Ticket Summary Report', 'Executive Managed Devices Report' and 'Executive File Statistics Report'
Date Range/Period - Time period covered by the report.
Schedule - Report frequency. Applies to scheduled reports only.
Status - The current stage of the report.
On-demand reports have the following statuses:
- Waiting - Report is awaiting a place in the queue
- Requested - Report is queued for production
- In-progress - Report is currently being created
- Ready - Report is available to view and download
- Failed - Comodo One / Dragon encountered an error when creating the report
Scheduled reports have the following statuses:
- Active - The report will be generated at the scheduled times.
- Inactive - The scheduled report is disabled.
You can activate or deactivate a schedule using the options at the top. See View and manage report schedules if you want help with this.
Creation Date - Date and time the report was generated.
Click 'Reports' > 'New Report'
You can run reports on-demand, or create a schedule to auto-generate reports at set times. You can create the following types of report:
- Executive Managed Devices Report - Summary of your EM device fleet as it stands. Includes total # devices overall, # of PCs/servers/smartphones
- Executive Windows Antivirus Report - Summary of antivirus protection and threat levels on your network. Includes # devices with AV installed, number of infected/clean devices, scan status and more.
- Executive Ticket Summary Report - Details about Service Desk tickets, including number of open/closed tickets, billable time, hours spent, etc
- Executive File Statistics Report - Summary of the trust level and status of files on your managed devices. Shows the # unknown files, # malware files, # quarantined files etc
- Executive Valkyrie Report - Lists white-listed and blacklisted files on your managed devices.
Run a report or create a schedule
- Click 'Reports' on the menu bar
- Click 'New Report' on the top:

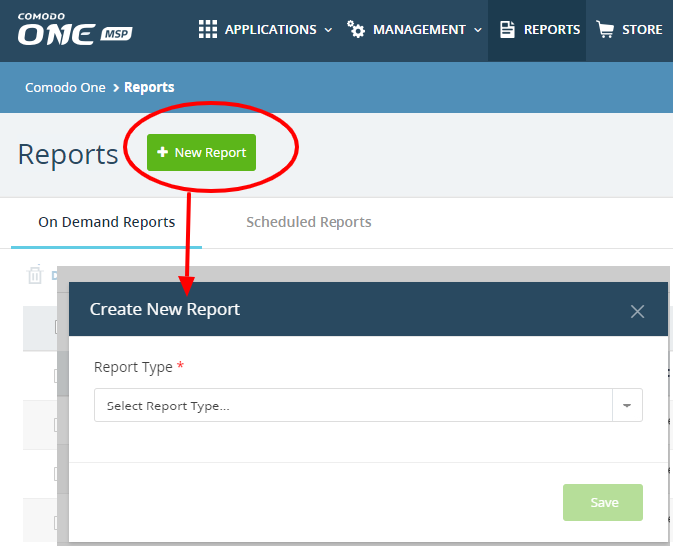
- Choose the report type from the options.
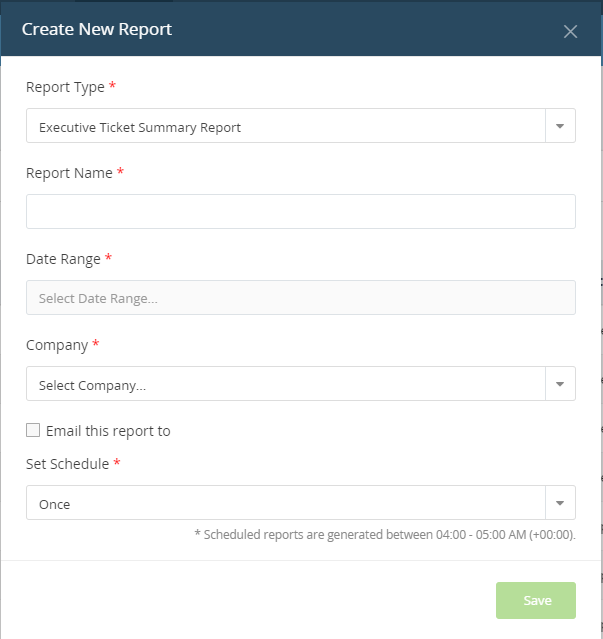

Report Name - Enter a descriptive label for the report.
Date Range - Click inside the field to choose the time period covered by the report.

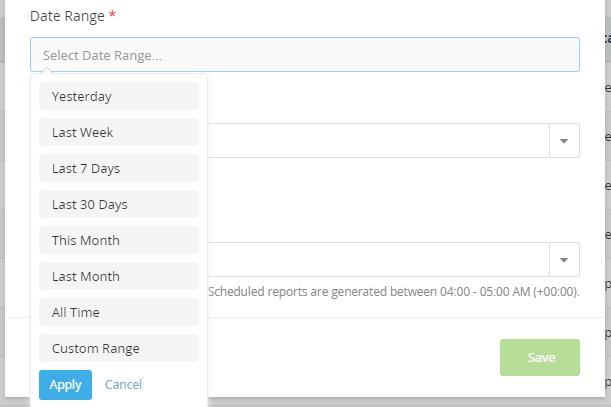
- Click 'Custom Range' to choose specific start and end dates.
- Click 'Apply' to confirm your date range
Company - Organization whose devices/ files/ tickets are covered by the report
- MSP customers - Select the target company from the drop-down
- Enterprise customers - Cannot change the target company
Email this report to - Enter the addresses of admins to whom you want to send the report. You can add multiple email addresses in the field. Press 'Enter' after each address.
Set Schedule - Select the frequency at which the report should be generated. Please note, the 'Set Schedule' feature is not available for custom date range.
The available options are:
- Once - A one-off report. There will be a slight delay while the report is generated. The report will appear in the list when ready.
- Daily - The report is generated every day
- Weekly - The report is generated every week on the day the schedule was created.
- Monthly - The report is generated once per month on the day of the month that the schedule was created.
Click 'Save'.
|
|
- Click 'Reports' on the menu bar
- Click 'On-Demand Reports' to view manually generated reports, or 'Scheduled Reports' to view auto-generated reports
- Click on the name of a report to view it.

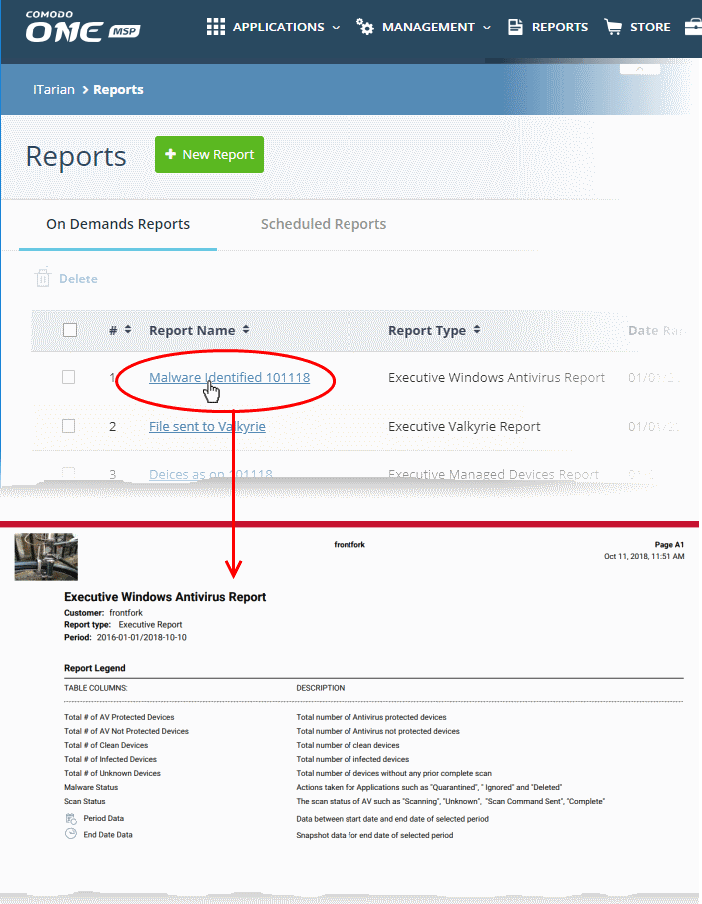
- The report opens in pdf format. Click the download button to save a copy.
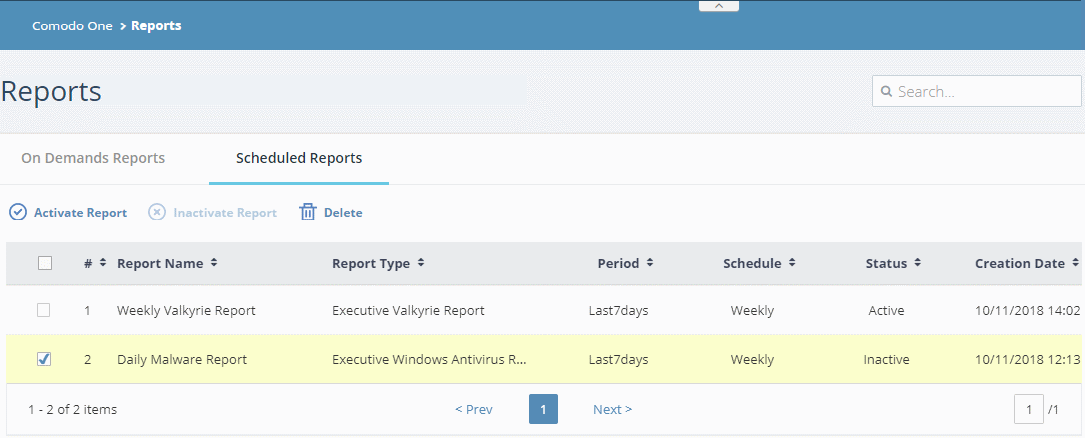
View and manage report schedules
- Click 'Reports' on the menu bar
- Click the 'Scheduled Reports' tab
- Click a report name to view it as a pdf
Select reports using the check-boxes on the left to perform the following actions:
- Inactivate Report - Stops the report from being generated at the scheduled times
- Activate Report - Resume automatic report generation at the scheduled times
- Delete - Removes the schedule from the list.
Further reading:

How to generate reports in Service Desk
Generate reports in Endpoint Manager


---