How to manage email templates and variables in Service Desk
Click 'Admin Panel' > 'Emails' > 'Templates'
- Template sets allow you to create standardized emails for announcements, report notifications, tickets, and user responses.
There are two categories of the template:
- Global template – Click 'Settings' > 'Emails'
This template is used for emails from all departments IF no department template is set.
- Department templates – Click 'Staff' > 'Departments'
These templates are used for emails from specific departments. Department templates over-rule global templates.
Both department and global templates the following sub-categories:
- Scheduled Reports Templates: For emails to staff who receive scheduled reports
- System Management Templates: For announcements to staff members
- Staff Ticket Templates: For alert emails to staff when a predefined setting is triggered
- End-User Ticket Templates: For auto-response emails to end-users.
General notes:
- You can create a custom template by cloning then editing an existing template.
- You can insert variables which dynamically fetch data from your portal. For example:
%{ticket.staff.name} - Inserts the name of a staff member to whom the ticket is assigned
Use the following links to go to the area you need help with:
- Login to Comodo One / Dragon
- Click 'Applications' > 'Service Desk'
- Open the admin panel (see the last link on the left)
- Click 'Emails' > 'Templates'


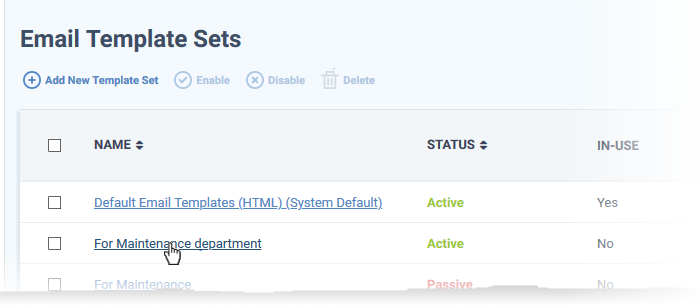
Name: The label of the email template
- Click the name of a set to view/edit templates within it
Status: Whether the template is enabled or disabled. Only active templates are available for selection in 'Settings' > 'Emails' and 'Staff' > 'Departments'.
- Select a template set and click 'Enable' or 'Disable' at the top as required
In-use: Shows whether the template is used for global emails or a specific department
Date Added: Date and time at which the template was created
Last Updated: Date and time the template was most recently edited by an admin
Add a new template set
- Open the admin panel (see the last link on the left)
- Click 'Emails' > 'Templates'
- Click 'Add New Template Set'

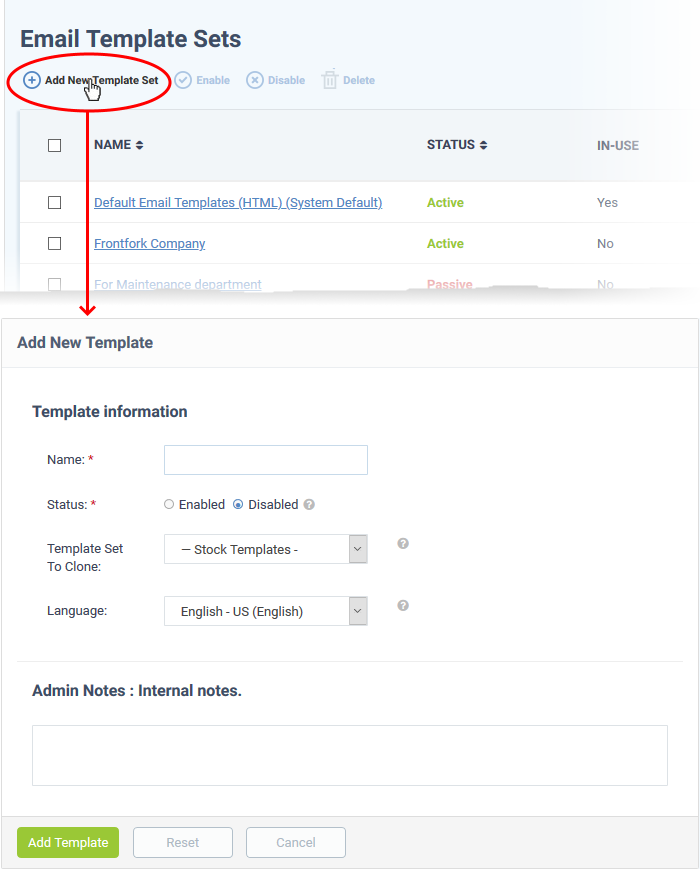
- Name: Enter a label for the template set
- Status: Choose whether the template should be active or not. Only active templates are available for selection in 'Settings' > 'Emails' and 'Staff' > 'Departments'.
- Template Set To Clone: Choose an existing set to use as the starting point for your new, custom set.
- Language: Select the language of the new email template set.
- Admin Notes: Add any comments on the new template set for internal reference.
Click 'Add Template' to save the new template.
You can now edit the templates in your cloned set as required:
Edit a template set
- Open the admin panel (see the last link on the left)
- Click 'Emails' > 'Templates'
- Click an email template set


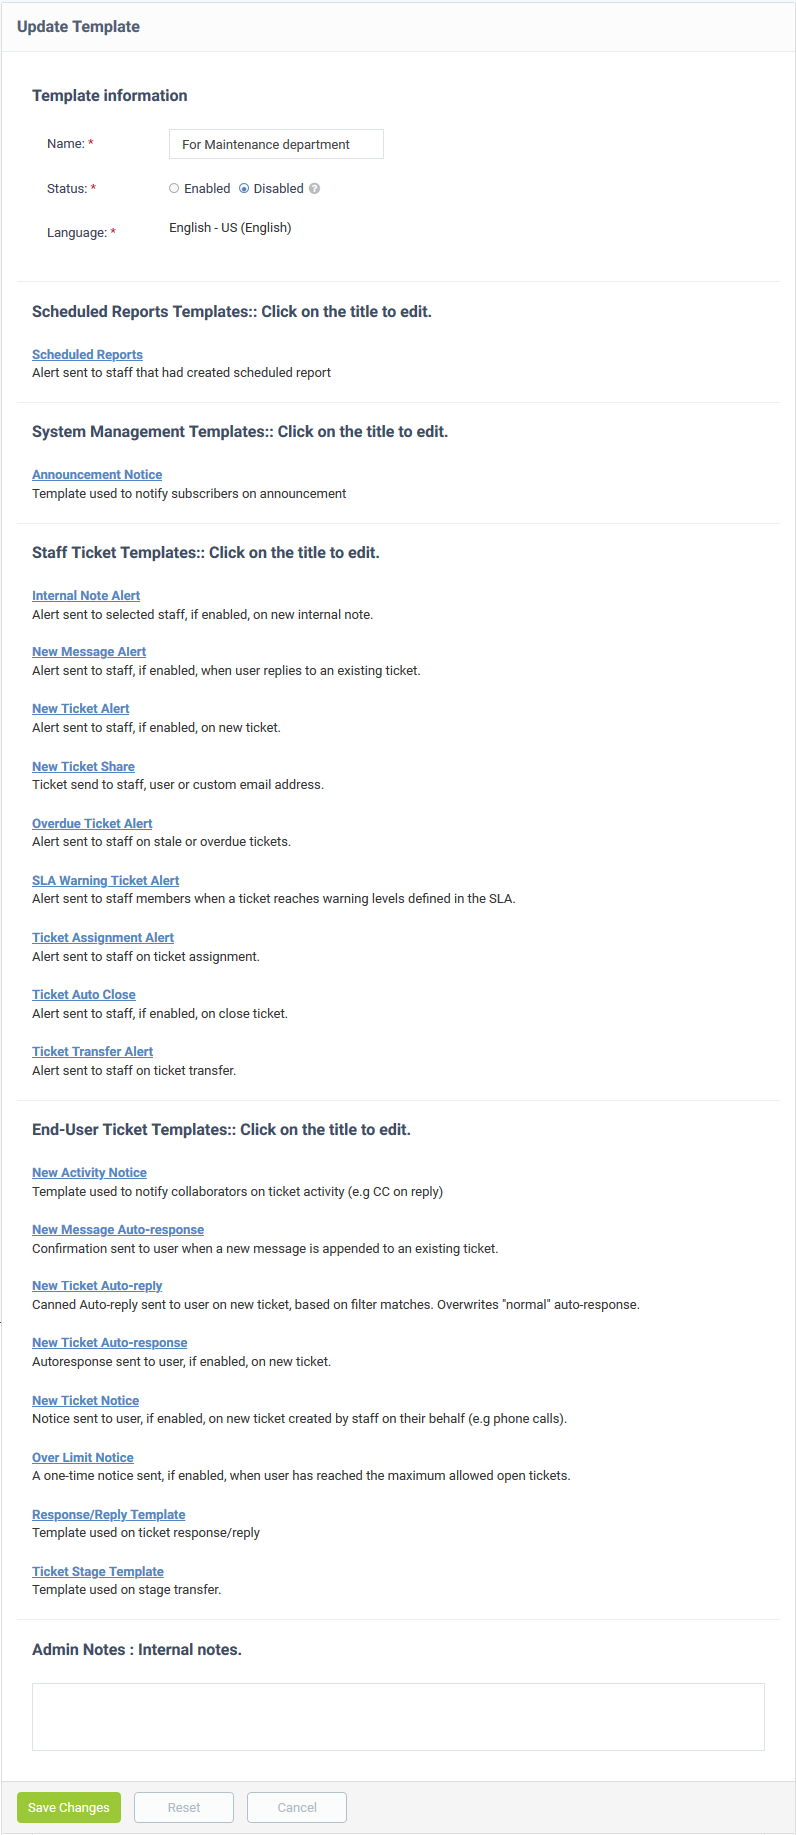
The set contains the following templates:
Scheduled Reports Templates
- Scheduled Reports: Used to notify staff members that a report is ready.
System Management Template:
- Announcement Notice: Emails used for messages to staff. See this wiki to read more about announcements.
Staff Ticket Templates:
- Internal Note Alert: Sent to staff when a new internal note is added to a ticket. This can be enabled or disabled in 'Admin Panel' > 'Settings' > 'Alerts & Notices' interface.
- New Message Alert: Sent to staff when a user replies to an existing ticket. The alert can be enabled or disabled in 'Admin Panel' > 'Settings' > 'Alerts & Notices' in the 'New Message Alert' section.
- New Ticket Alert: Sent to staff when a new ticket is created. This can be enabled or disabled in 'Admin Panel' > 'Settings' > 'Alerts & Notices' interface.
- New Ticket Share: Sent to staff members when the member is added to a ticket.
- Overdue Ticket Alert: Sent to staff when a ticket is overdue. This can be enabled or disabled in 'Admin Panel' > 'Settings' > 'Alerts & Notices' interface.
- SLA Warning Ticket Alert: Sent to staff when activity, or lack of activity, on a ticket jeopardizes the terms of a service level agreement (SLA) with a customer.
- Ticket Assignment Alert: Sent to staff when a ticket is assigned to them. This can be enabled or disabled at 'Admin Panel' > 'Settings' > 'Alerts & Notices'.
- Ticket Auto Close Alert: Sent to staff when a ticket is closed by auto-close rules. This can be enabled or disabled at 'Admin Panel' > 'Settings' > 'Alerts & Notices'.
- Ticket Transfer Alert: Sent to staff when a ticket is reassigned to them. This can be enabled or disabled at 'Admin Panel' > 'Settings' > 'Alerts & Notices'.
End-User Ticket Template:
- New Activity Notice: Sent to end-users when there is a new response to one of their tickets.
- New Message Auto-response: Sent to end-users after they post a new message to a ticket.
- New Ticket Auto-reply: Canned responses sent to end-users after they submit a new ticket. These templates are sent when the content of their ticket triggers a rule. The ‘auto-reply’ overrules the ‘auto-response’
- New Ticket Auto-response: Sent to end-users when a new ticket is created by them. The ‘auto-response’ is sent if no ‘auto-reply’ rule is triggered. The alert can be enabled or disabled at ‘Admin Panel’ > ‘Settings’ > ‘Autoresponder’.
- New Ticket Notice: Sent to end-users when a ticket is created on their behalf by a staff member. For example, the user described their issue over the phone, and the staff member subsequently created a ticket from the conversation. The alert can be enabled or disabled at ‘Admin Panel’ > ‘Settings’ > ‘Autoresponder’.
- Over Limit Notice: Sent to end-users when they have reached the maximum number of open tickets that they are allowed. You can configure this number at ‘Admin Panel’ > ‘Settings’ > ‘Tickets’ > 'Maximum Open Tickets'. The alert can be enabled or disabled at ‘Admin Panel’ > ‘Settings’ > ‘Autoresponder’.
- Response/Reply Template: Sent to end-users with canned response/reply alerts for active tickets.
- Ticket Stage Template: Sent to end-users when a ticket moves from one phase of processing to the next. Applies only to multi-stage tickets.
Click on a template to view and edit the content. For example, the following screenshot shows the 'New Ticket Alert' template in the 'Staff Ticket Template' category:

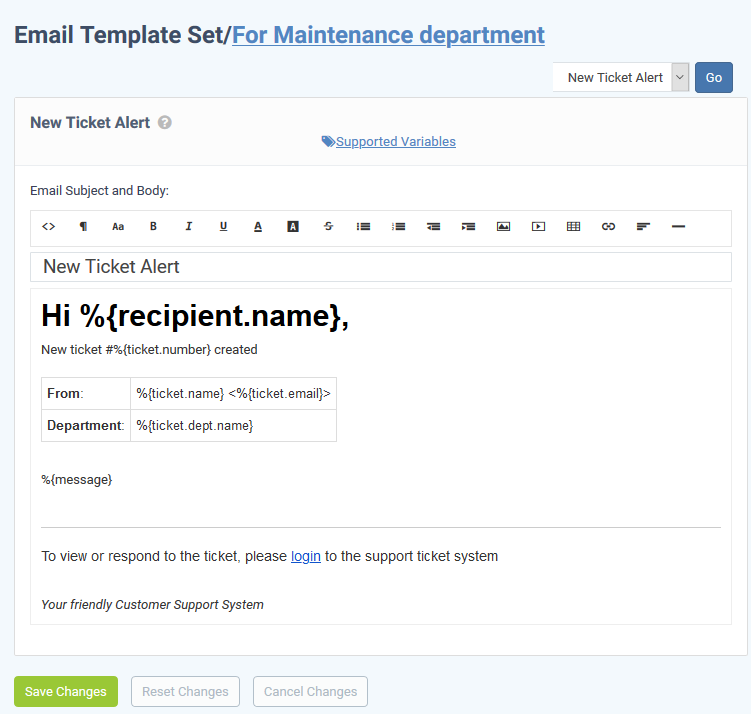
- Edit the template content as required.
- You can also insert variables to the content as required. The values for the variables are dynamically fetched from ticket details and from the data you have in the support portal. See the next section, Insert Variables, if you need help with this.
- Click 'Save Changes' to update the template.
Insert variables
Variables are dynamic fields which you can add to your email templates. The values of the variables are drawn from the ticket data and from your support portal. For example:
%{ticket.dept} - Inserts the name of the department to which the ticket is assigned.
- Place your mouse over 'Supported Variables' to view a list of variables you can use

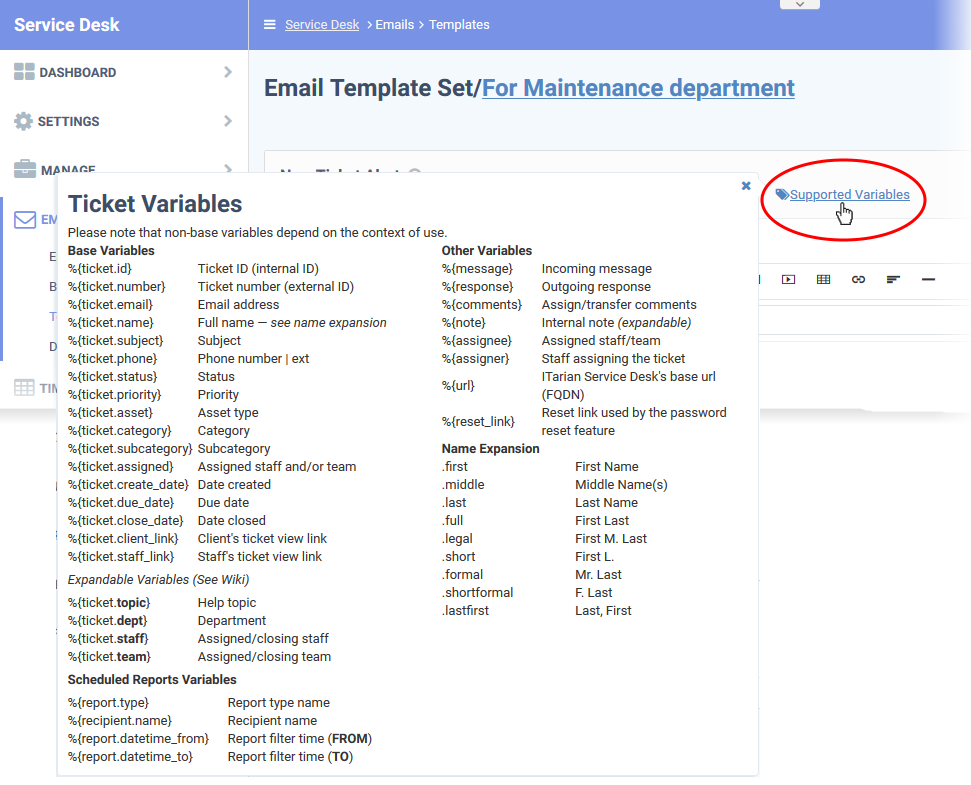
- Insert the variables into the content where required. For example ‘Your ticket has been assigned to %{ticket.assigned} in the %{ticket.dept} department.’
Expandable Variables:
Expandable variables are variables to which you can add certain terms to fetch very specific information:
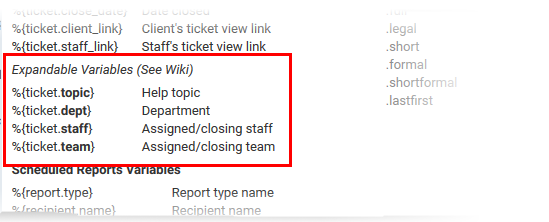
The possible extended variables are given below:
topic
%{ticket.topic.name} – The ticket category to which the ticket belongs.
%{ticket.topic.parent} – The parent category to the category to which the ticket belongs.
dept
%{ticket.dept.name} - The department to which the ticket is assigned.
%{ticket.dept.manager} - The person-in-charge of the department to which the ticket is assigned.
%{ticket.dept.signature} - The signature message configured for the department.
%{ticket.dept.emailAddress} - The contact email address of the department to which the ticket is assigned.
staff
%{ticket.staff.name} – The staff member or the admin to whom the ticket is assigned.
%{ticket.staff.dept} – The department to which the staff member belongs.
%{ticket.staff.TZoffset} – The date and time at which the ticket is assigned to the staff member.
%{ticket.staff.email} – The email address of the staff member to whom the ticket is assigned.
%{ticket.staff.signature} – The signature message of the staff member


---