How to add, register and manage users in Service Desk
Click 'Staff Panel' > 'Users' > 'User Directory'
- 'Users' are the individuals who submit tickets to your support team. They can submit tickets via your support centre, by email, or direct from an Endpoint Manager device.
Users are added to Service Desk in the following ways:
- Individually add users via the Service Desk interface, or bulk import them from .csv.
- Create a new user when you create a ticket on behalf of that user. The new user is automatically enrolled as a guest.
- Endpoint Manager integration – Users can submit a ticket direct from a managed endpoint by right-clicking on the Endpoint Manager tray icon. The device user is added as a guest.
Guest users must be registered if they are to login into your support portal to create / track tickets. Guests can be registered in the following ways:
- Register them manually.
- Send them an enrollment mail with an account activation link
- Set a temporary password for the user to login to the support portal
Use the following links to jump to the task you need help with:
- Global default user registration settings
- The 'User Directory' interface
- Add users
- Register a user
- Send password reset/activation email to the user
- Manage account access and user information
- Add form fields for user details
- Add a user to a customer company
- Manage tickets raised by a user
- Create a new ticket on behalf of a user (external wiki)
- Export users list
- Edit a user
- Delete a user
Global default user registration settings
Click 'Admin Panel' > 'Settings' > 'Users'
- Global user settings let you choose the default method for registering users. You can register accounts manually, via activation mail, or with a temporary password.
- The setting you choose here only applies if you enable 'Register with default settings' in the 'Create New User' screen.
- Click 'Staff Panel' > 'User Directory' > 'Add New User' to see the 'Create New User' screen.
- If you disable 'Register with default settings' then you can choose the registration method on a per-case basis.
- See Add Users for more on the 'Create New User' screen.
- Click 'Staff Panel' > 'User Directory' > 'Add New User' to see the 'Create New User' screen.
- The setting above only applies to users that you manually add or import from CSV. This setting does not apply to:
- Users who register themselves by signing up at the web portal. These users always receive an activation email.
- Users who are added as guests because they submitted a ticket from a managed device. These users need to be registered manually. See Register a User if you need help with this.
- Users who register themselves by signing up at the web portal. These users always receive an activation email.
Configure user registration settings
- Click ‘Admin Panel’ > 'Settings' > 'Users'

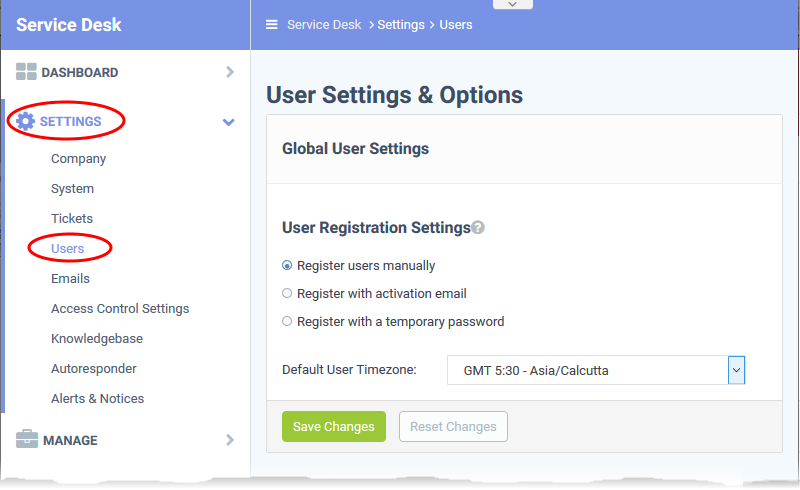
Choose one of the following:
- Register users manually - Register by selecting a user in the 'User Directory' area and clicking the 'Register' button. See Register a user if you need more help with this.
- Register with activation email - An enrollment mail is sent to new users with an account activation link. The link takes the user to your support portal to create a password. Once registered, the user can log in and manage/view their tickets.
- Register with a temporary password – Create a temporary password for the user. Get them to enroll at your support portal with their email address + the temp. password:

Once registered, you should communicate the URL of your web-portal and the password to the user. The user can login to the portal using their email as user name and the password you sent. If 'Require password change on first login' is enabled, the user will be asked to change the password immediately.
- Default User Timezone - Choose the time zone of the target user.
- Click 'Save changes' for your settings to take effect.
The 'User Directory' interface
- Login to Comodo One / Dragon
- Click 'Applications' > 'Service Desk'
- Open the staff panel (see the last link on the left)
- Click 'Users' > 'User Directory'
Column Headers

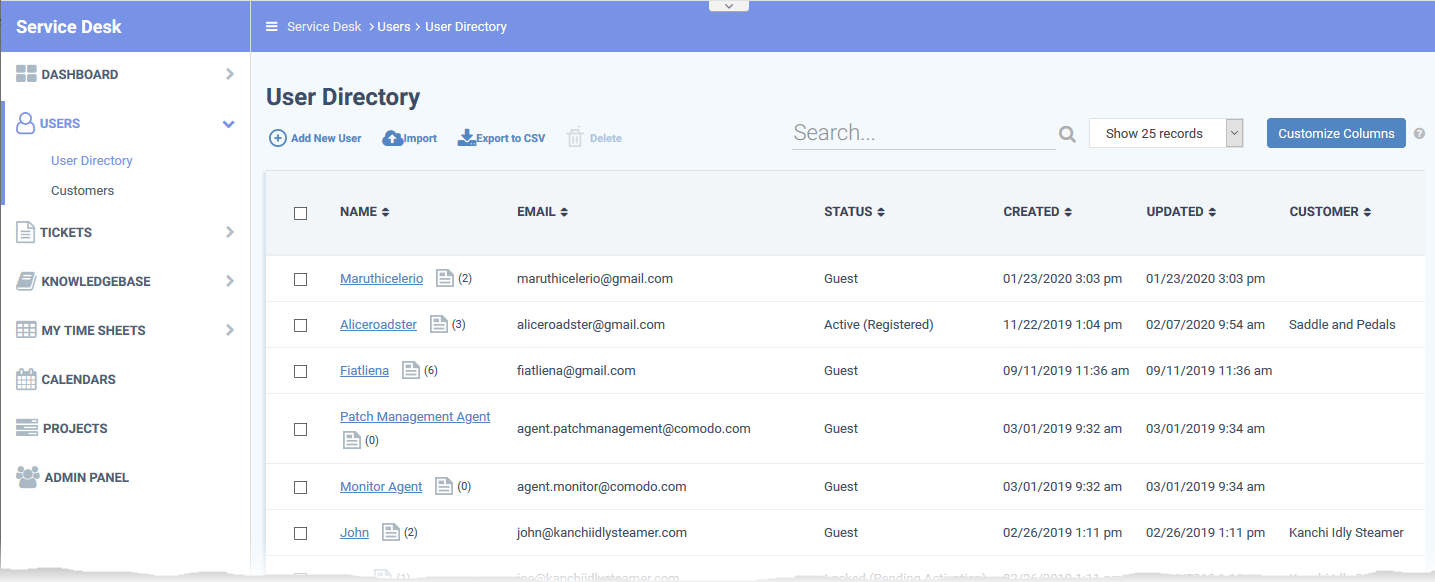
- The user directory shows basic details about each user in six columns. You can add or remove columns by clicking 'Customize Columns'.
The following is a list of all possible columns:
- Name - The label of the user. The number beside a username shows the number of tickets they have submitted. Click on the user's name to view all tickets they have created.
- Email - The email address of the user.
- Status - Whether the user is a registered or guest user.
- Created - The date and time on which the user was added to Service Desk.
- Updated - Date and time of the most recent update to the user's details. You can quickly view/edit user details by placing your mouse cursor over a user name.
- Last Ticket Update - Date and time of the most recent update to a ticket submitted by the user.
- Customer - The company to which the user belongs.
- Phone Number - The contact number of the user as registered with service desk
- Internal Notes - Comments about the user as entered by the administrators while adding or editing the user, for internal reference.
Modify table columns
- Click the 'Customize Columns' button to add or remove columns:

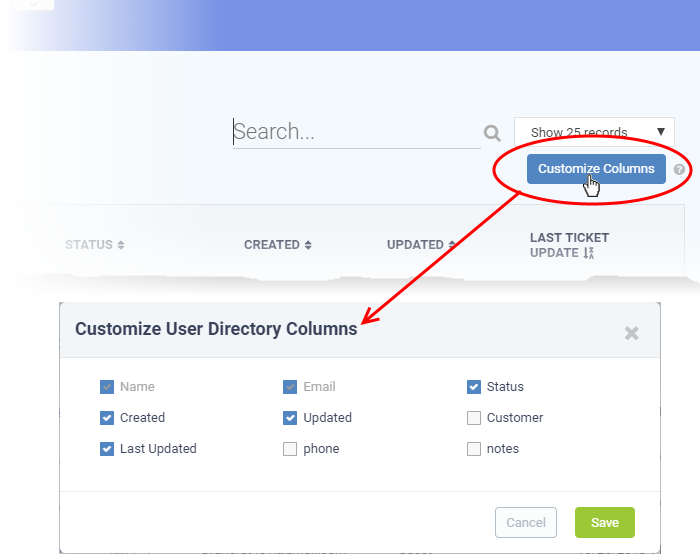
- Use the check-boxes to enable or disable columns as required
- Note: Mandatory columns appear grey and cannot be disabled.
- Click 'Save' to add/remove the selected columns to the list.
- You can add users individually or import them from a .csv file.
- Users must be registered in order for them to login Service Desk to create and track tickets.
- You can assign users to customers in the 'Customers' screen (‘Staff Panel’ > ‘Users’ > ‘Customers’).
- Open the 'Staff Panel'
- Click 'Users' > 'User Directory'
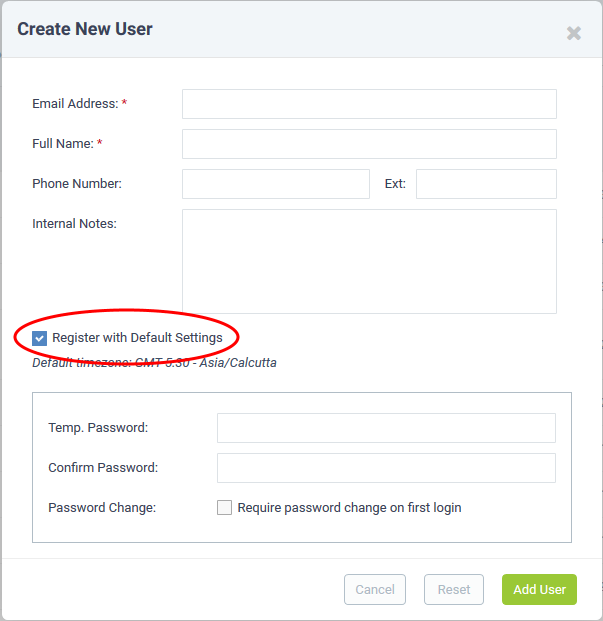
- Click the 'Add New User' link:

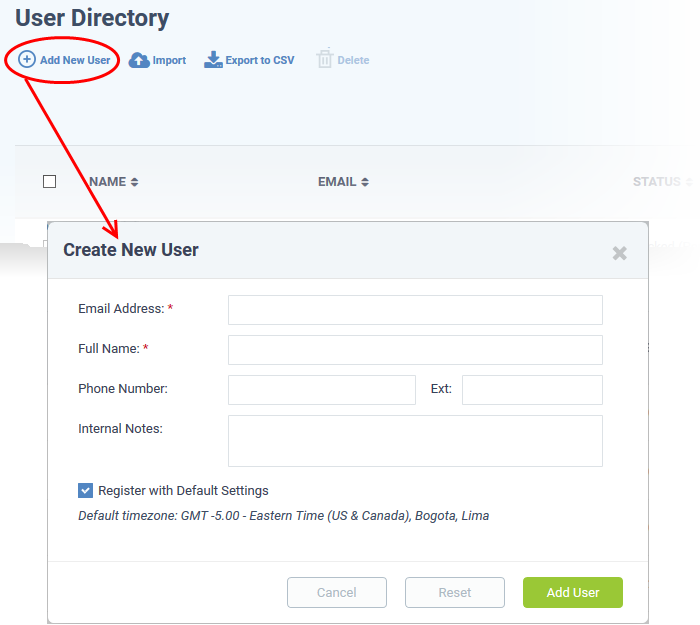
Email Address: Enter the email address of the user. After registration, this email address acts as their username to log into your support portal.
Full Name: Enter the user’s first and last names.
Phone Number: Enter the user’s contact number.
Internal Notes: Type any remarks you feel you need to add about the user.
Register with Default Settings: Enable to enroll the user with the default registration method. Disable to register with a different method.
- You can view/change the default registration method at ‘Admin Panel’ > ‘Settings’ > ‘Users’.
- It may be ‘Register users manually’, ‘Register users with an activation mail’, or ‘Register with a temporary password’.
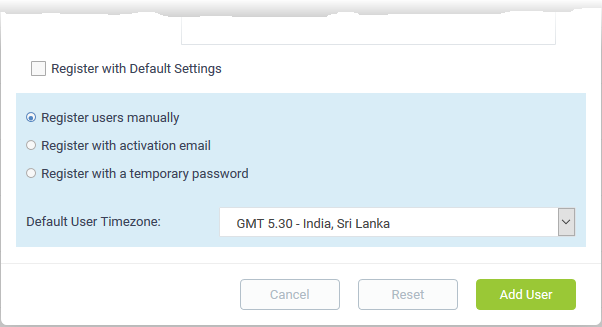

- Register users manually - The user has initially added a guest and needs to be manually registered afterwards. You can register a guest as follows:
- Click ‘Users’ > ‘User Directory’ > click on the name of the guest > Click the ‘Register’ button
- See Register a user if you need more help with this.
- Click ‘Users’ > ‘User Directory’ > click on the name of the guest > Click the ‘Register’ button
- Register with activation email - The user is initially added as a guest and sent a mail which contains a link to register their account.
- The link leads to your support web portal where the user will create a password and so register their account. After registration, the user can log in and manage/view their tickets.
- The link leads to your support web portal where the user will create a password and so register their account. After registration, the user can log in and manage/view their tickets.
- Register with a temporary password - Create a temporary account password which registers the user immediately.
- You need to send the password and URL of your support portal to the user. This allows them to log in and manages their tickets.
- 'Require password change on first login' - Enable to force the user to create a new password after first login (recommended).
- You need to send the password and URL of your support portal to the user. This allows them to log in and manages their tickets.
- Default User Timezone - Select the time zone to which the user belongs.
Click 'Add User'.
The user is added as a guest or registered user depending on the registration method. Once registered, you can manage their account and assign them to a customer company.
Import users
- Open the 'Staff Panel' if it isn't open already (last link in the left-hand menu)
- Click 'Users'
- Click 'Import' at the top
There are two ways to import users:
1. Copy Paste - Import users with name and email address only.

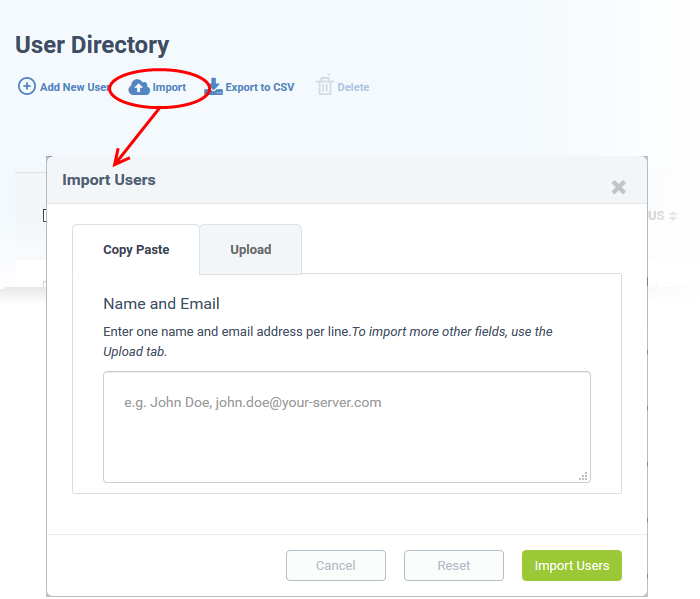
- Enter the user's full name, followed by a comma, then their email address.
- Add more users in subsequent lines.
- Click Import Users' to add the users as guests.
2. Upload - Import users from a .csv file. More details can be added about a user with this method.
- Create a .csv file of users that you want to import. The file should have the following column headers:
Email,Name,Phone,Notes,Customer ID (Optional)
- Each row should contain the contact information of a single user
- Save the .csv then click 'Browse' to upload the file to Service Desk:

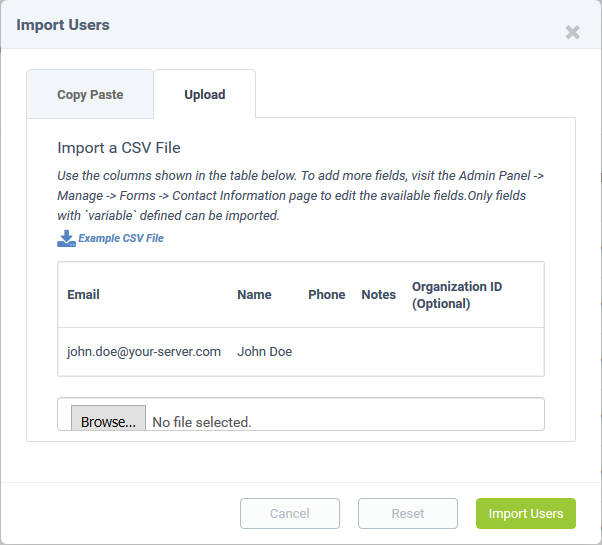
Tip: Click 'Example CSV File' to download a sample file.
Depending on your settings, imported users are added as guests, or their account activation started. See Global default user registration settings if you need further help with this.
Register a user
Staff can register guests in the 'User Details' screen. Users can also register themselves by signing up for an account at your support centre page.
Register a guest user
- Open the 'Staff Panel' (see the last link in the left-hand menu)
- Click 'Users'
- Click on the name of the guest user that you want to register
- Click the 'Register' button

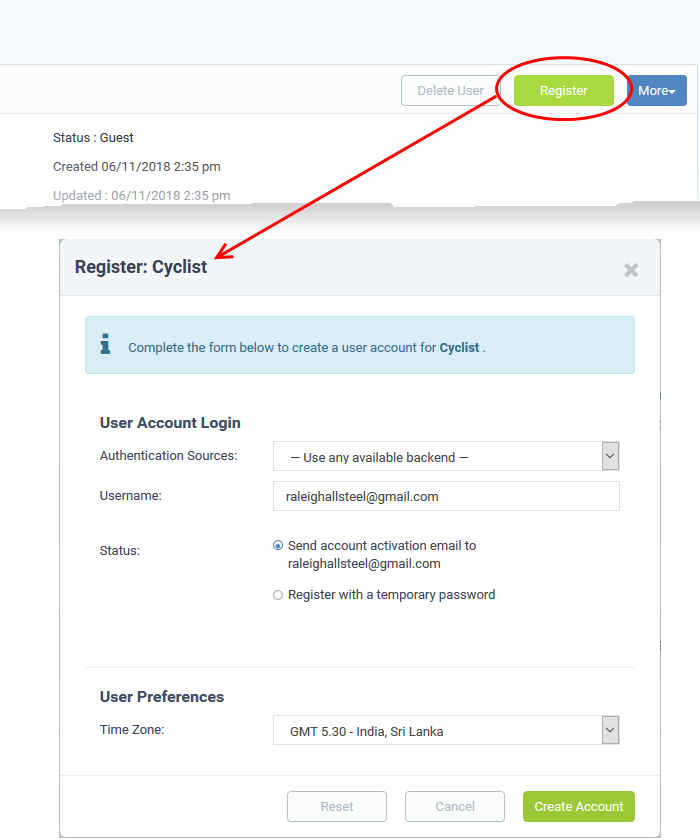
- Complete all required fields then click the 'Create Account' button. The account is created with the status 'Locked (Pending Activation)'. The account needs to be activated for the user to access the portal and create support tickets.
There are two ways you can activate an account:
Activation via activation Email
- Select 'Send account activation email...'
- Select the time zone to which the user belongs
- Click 'Create Account'
- The user's status is changed to 'Locked (Pending)'. An activation email is sent to the user. After clicking the activation link in the mail, the user is asked to create a password. Once activation is complete, their status will change to 'Active (Registered)'.
Activation via temporary password
- Select 'Register with a temporary password'
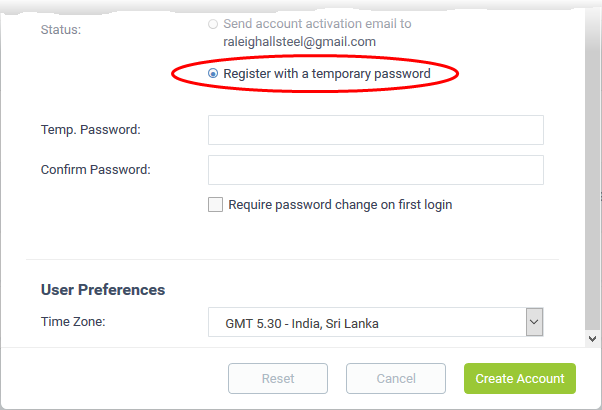

- Create and confirm the temporary password.
- Require password change on first login - The user must create a new password right after logging in with the temporary password.
- Timezone - Select the time zone to which the user belongs
- Click 'Create Account'
The user is registered. You should communicate the temporary password and the URL of your portal to the user. The user can log in with their email address and the temp. password.

Tip - Your Service Desk portal can be accessed at https://<your_subdomain_name>.servicedesk.comodo.com
Send password reset/activation email to the user
- Open the staff panel (See the last link on the left)
- Click 'Users' > 'User Directory'
- Click the name of the user whose password you wish to reset/to whom you wish to send an activation mail
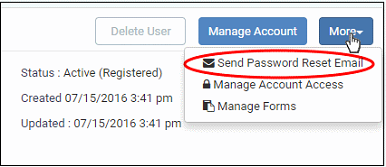
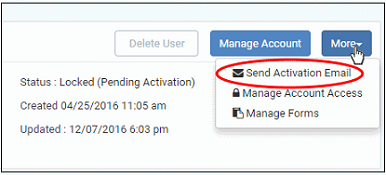
- Click the 'More' button on the upper-right of the user details screen:
|
|
|
Locked (Pending Activation) Users |

Reset password
- Click the 'Send Password Reset Email' link
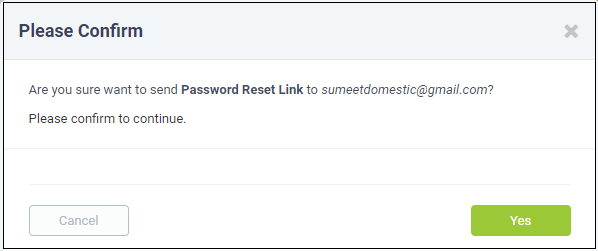

- Click 'Yes' to confirm sending the password reset email to the user.
An email containing the password reset link is sent to the user. The user has to click the link than enter their registered email address in the 'Forgot My Password' page.
Activate a user
- Click the 'Send Activation Email' link

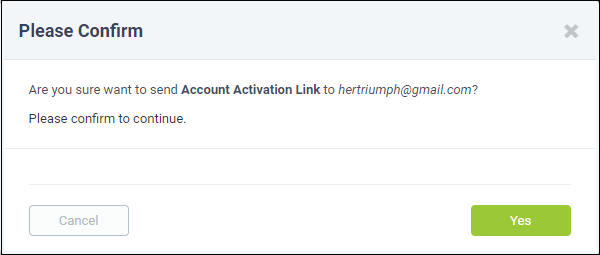
- Click 'Yes' to confirm and send the activation mail.
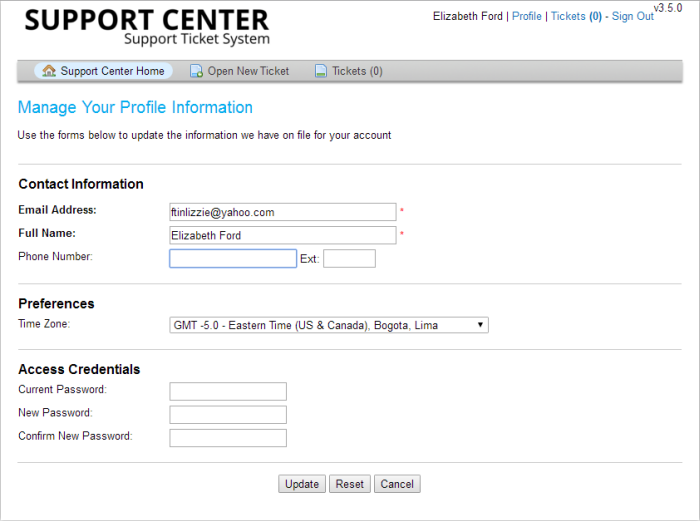
An activation email is sent to the user. After clicking the activation link, the user can configure their password in the 'Manage Your Profile' Information page. Once activation is complete their status will change to 'Active (Registered)'.
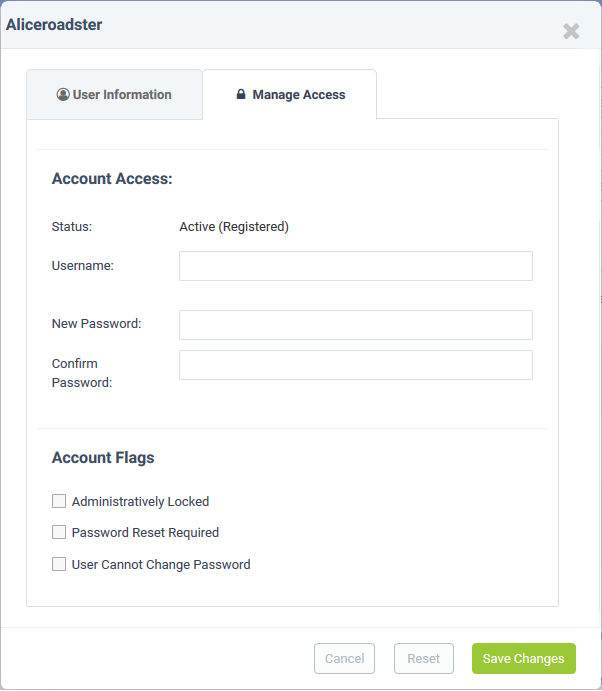
Manage account access and user information
You can lock a user's account and disallow password changes.
- Open the staff panel (see the last link on the left)
- Click 'Users' > 'User Directory'
- Click the name of the user to open their 'User Page'
- Click the 'Manage Account' button or click the 'More' button and choose 'Manage Account Access '
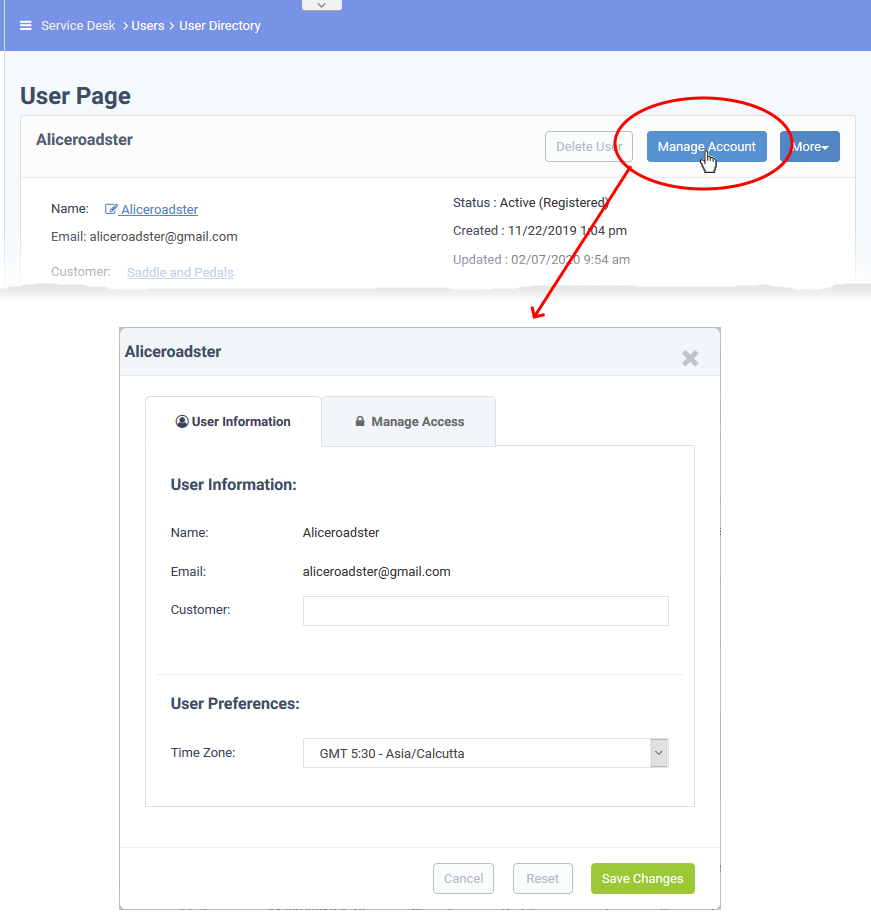

User Information - change a user's company and time zone.
Manage Access tab - configure the user's access to their own account:

Add form fields for user details
You can additional fields to the form if you want to add more information about users.
- Open the staff panel (see the last link on the left)
- Click 'Users' > 'User Directory'
- Click the name of the user to open their details page
- Click the 'More' button and choose 'Manage Forms'

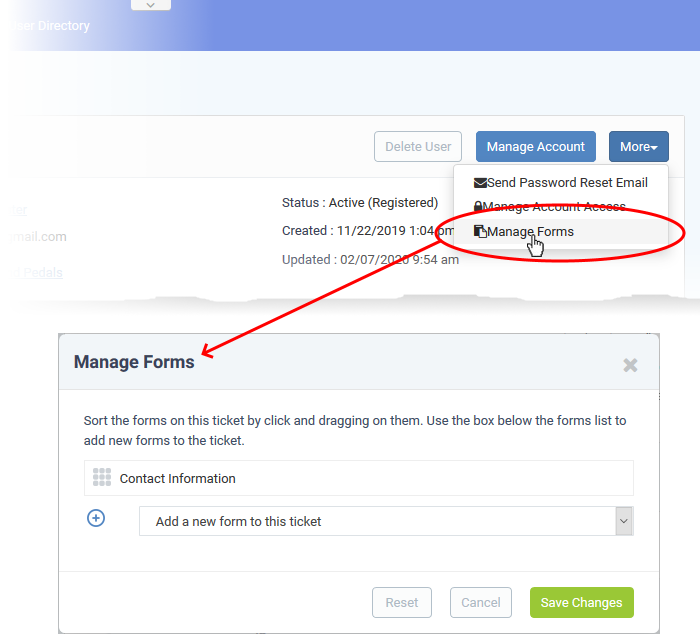
- Select the form you want to add from the drop-down.
- Click the 'Save Changes' button.
- Staff can update a user's details by clicking their name in the 'User Details' interface.

Add a user to a customer company
- All customers that you add to Comodo One / Dragon are automatically imported to Service Desk.
- You can also create ‘standalone’ customers in Service Desk itself. Standalone customers are specific to Service Desk and are not available in Comodo One / Dragon or other modules such as Endpoint Manager.
- See this wiki if you want to read more about adding customers to Service Desk
- See this wiki if you want to read more about adding customers to Service Desk
- You can add users to an existing customer or to a new customer.
Add a user to a customer
- Open the staff panel (See the last link on the left)
- Click 'Users' > 'User Directory'
- Click the name of the user to open their 'User Page'
- Click the 'Add Customer ' link as shown below:

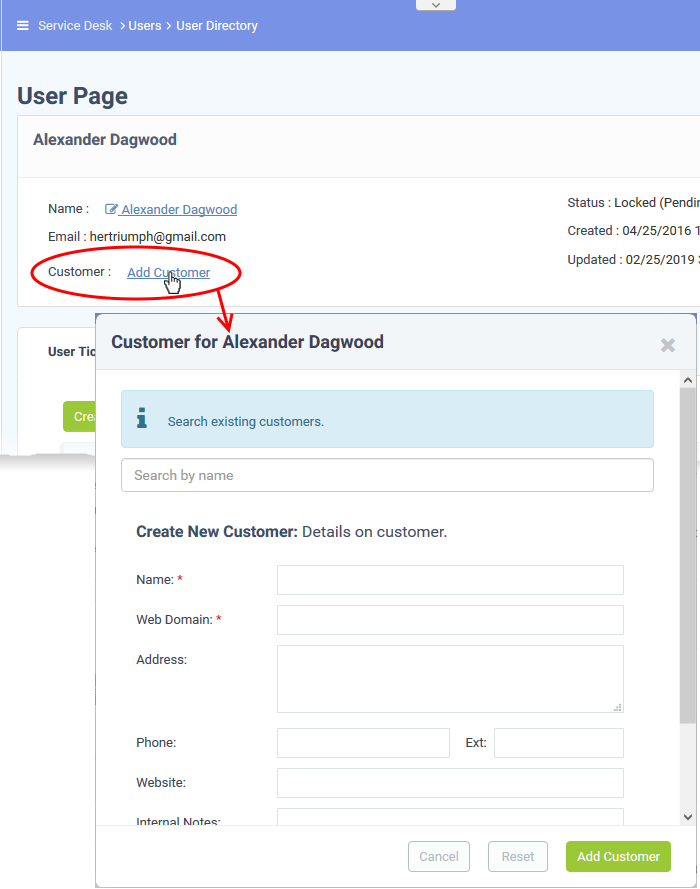
- Type the first few letters of an existing customer’s name in the search field.
- Select the target company from the suggestions then click ‘Continue’:
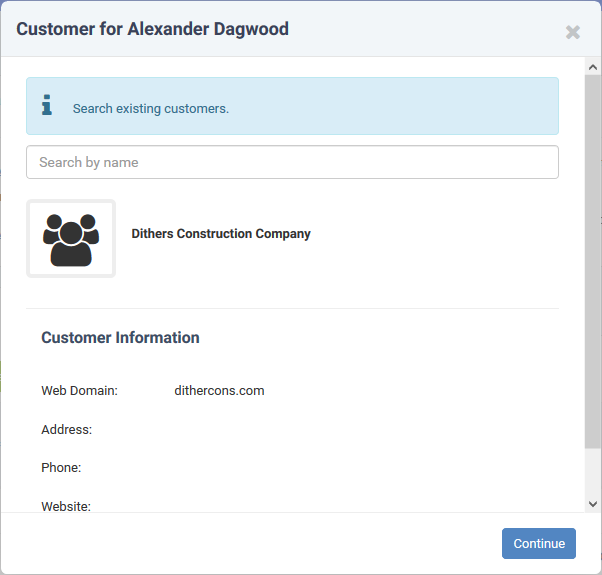

The user is added to the customer.
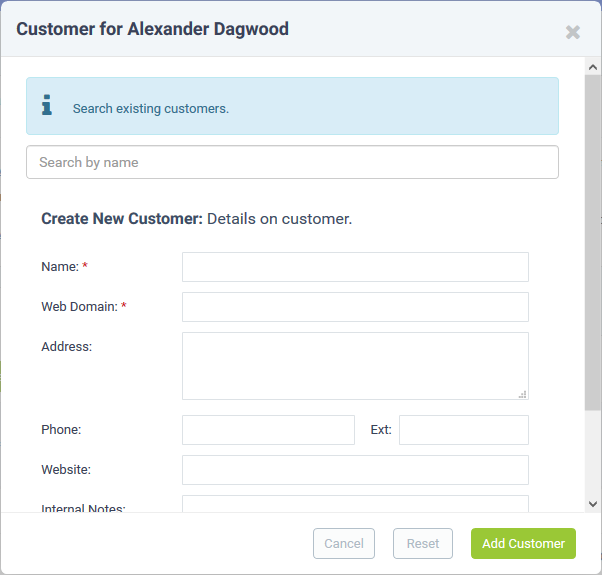
- Alternatively, complete all form fields to create a new customer then click 'Add Customer':

Manage all tickets from a specific user
You can view and manage user tickets in the user directory area.
- Open the staff panel (see the last link on the left)
- Click 'Users' > 'User Directory'
- Click the name of the user to open their details page:

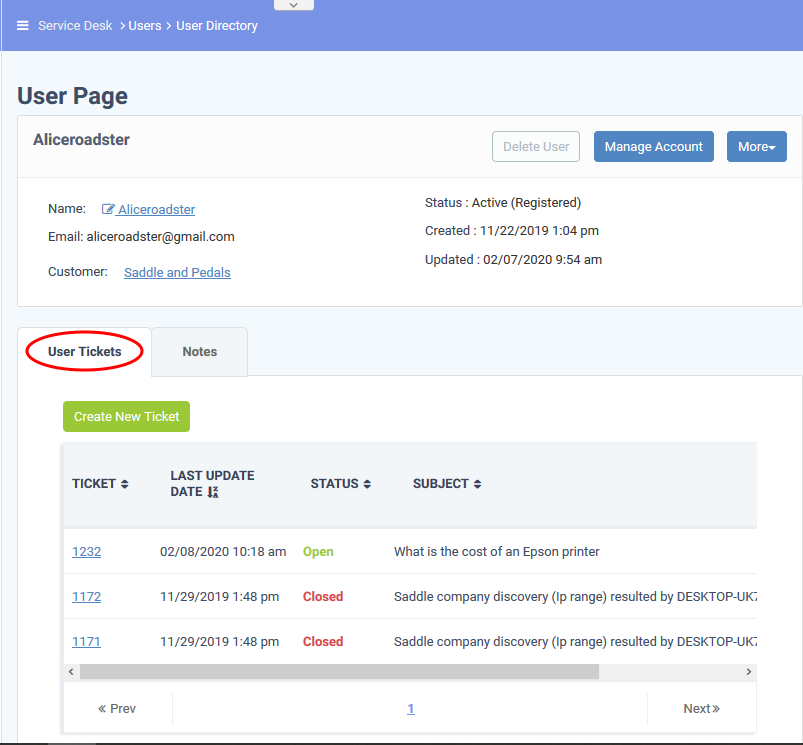
The ‘User Tickets’ tab lists all tickets created by the user or created on behalf of the user by a staff member.
Ticket: The number assigned to the ticket.
- Click the number to open the ticket details screen. See this wiki for help to review, respond and take actions on the ticket.
Last Update Date: Date and time the ticket was most recently edited.
Status: The current standing of the ticket in your workflow. For example open, closed, overdue or paused.
Subject: Summary of the issue as entered by the user.
Assigned To: The staff member responsible for dealing with the ticket.
Place your mouse over a ticket to view its details.
Generate a users report
You can generate a report on users as follows:
- Open the staff panel (See the last link on the left)
- Click 'Users' > 'User Directory'
- Click 'Export to CSV':

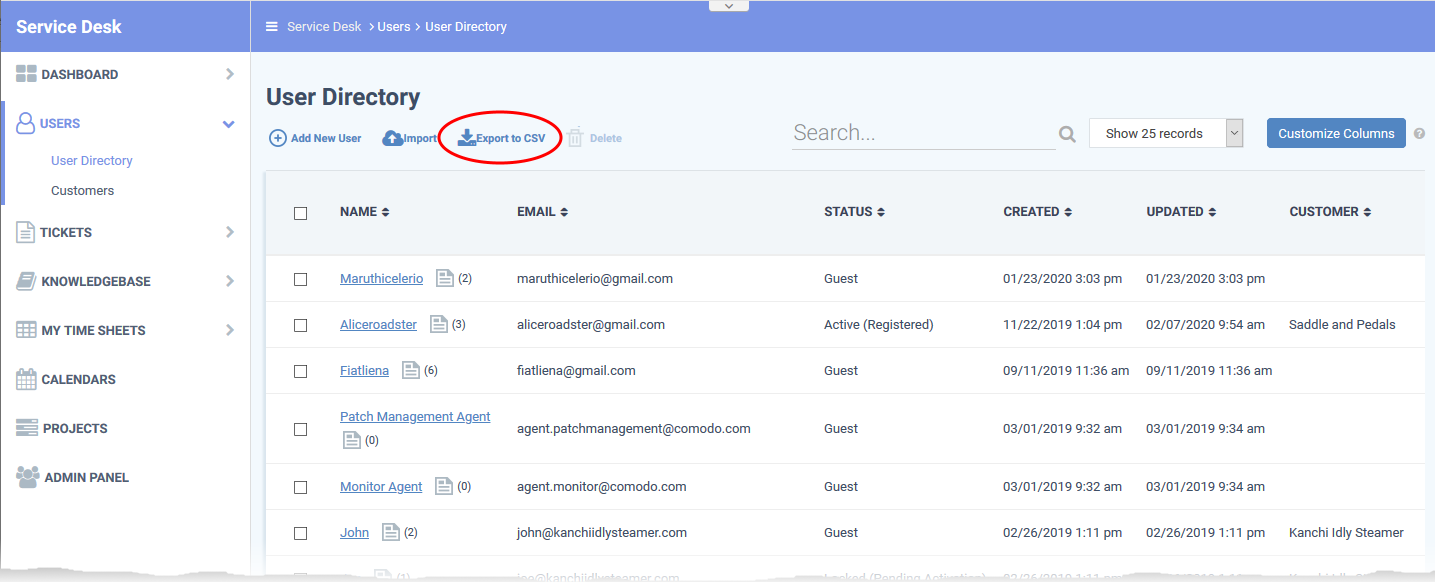
.csv files are best viewed in spreadsheet applications like Microsoft Excel and OpenOffice Calc.
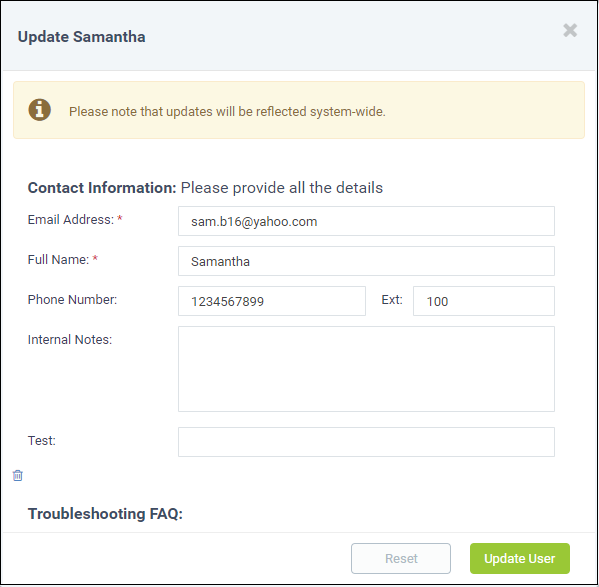
Edit a user
- Open the staff panel (see the last link on the left)
- Click 'Users' > 'User Directory'
- Click the name of the user to open their details page
- Click the name of the user:

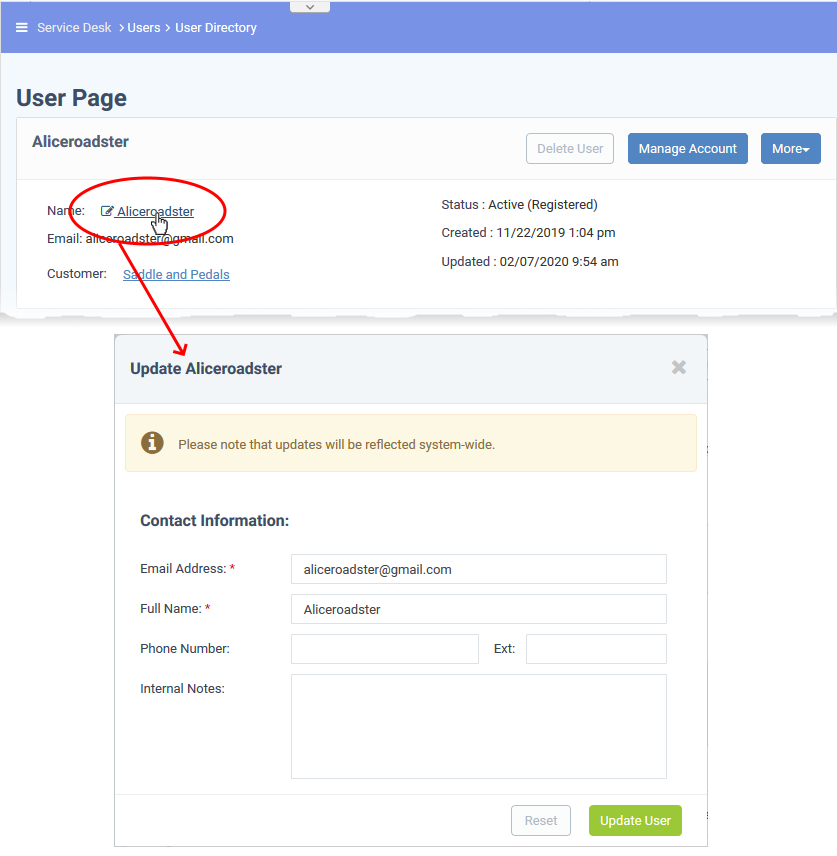
- Edit user details as required
- Click 'Update User' to save your changes.
Delete a user
You can remove users at anytime. You have the option to reassign their tickets to other users if required.
- Open the staff panel (see the last link on the left)
- Click 'Users' > 'User Directory'
- Click the name of the user to open their details page
- Click 'Delete User' as shown:

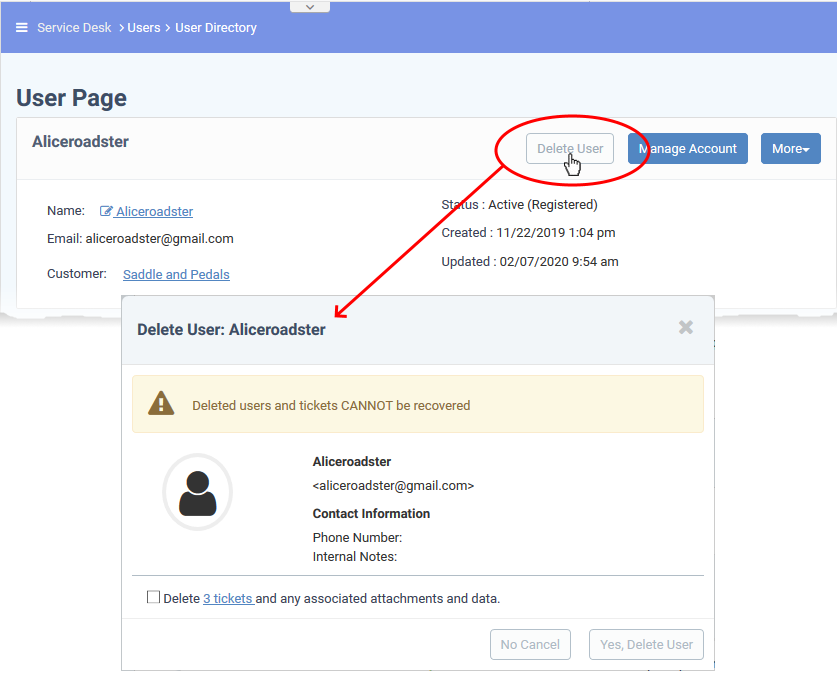
- You cannot remove users that still have tickets associated with them. You can delete their tickets OR reassign them to other users.
- Click the '<NN> tickets' link to reassign their tickets to a different user. You can reassign some or all of their tickets to others.
- Enable the ‘Delete...’ checkbox to delete all tickets still associated with the user.
- Click the '<NN> tickets' link to reassign their tickets to a different user. You can reassign some or all of their tickets to others.
- Click 'Yes, Delete User' when ready.
You cannot restore a deleted user. If required, you can re-create the user by creating a new user account.
Remove multiple users at once
- Open the staff panel (see the last link on the left)
- Click 'Users' > 'User Directory'
- Select the users to be removed
- Click the 'Delete' button at the top.

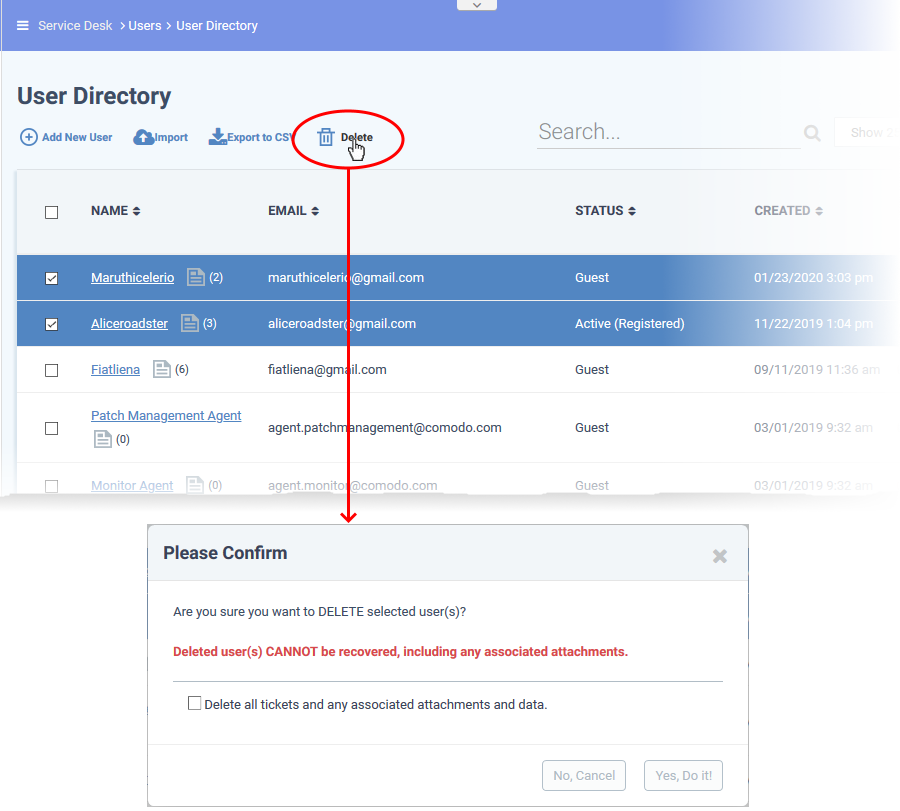
- Delete all tickets and any associated attachments and data - Enable this to confirm the removal of any tickets associated with the users
- Click 'Yes, Do it!' to confirm the deletion.


---