How to install and manage patches on Windows devices
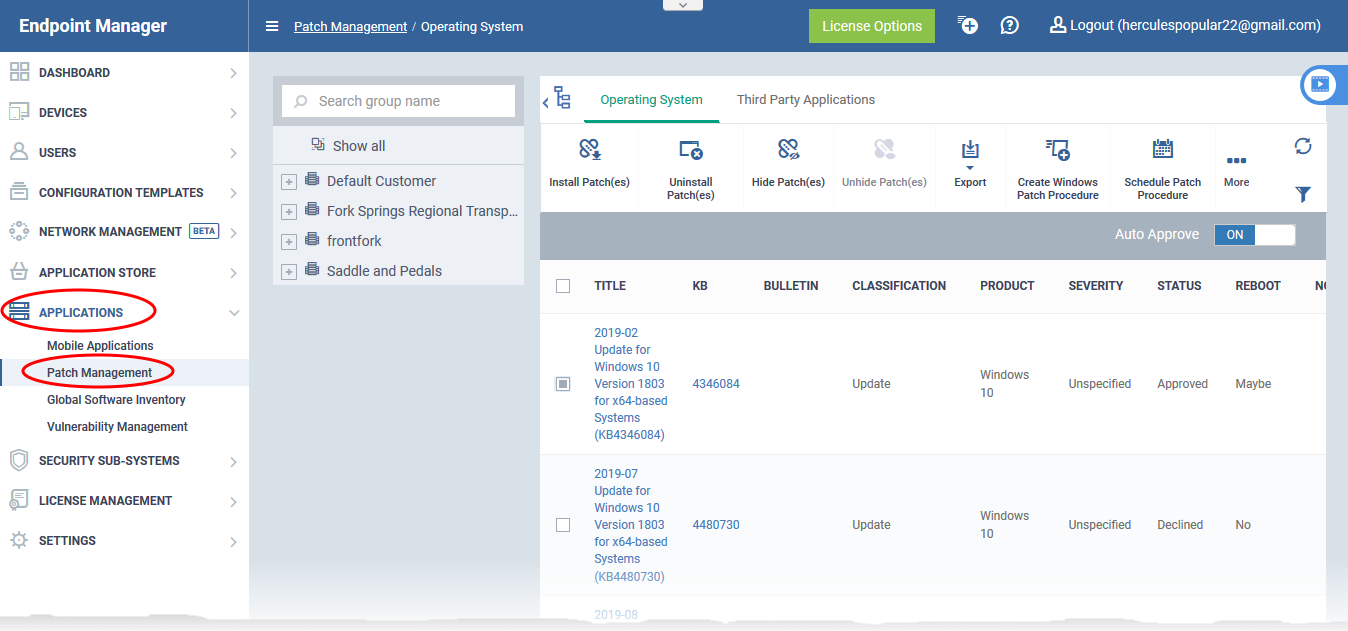
Open Endpoint Manager > Click 'Applications' > 'Patch Management'
- The patch management area lets you install OS updates and patches for 3rd party applications on managed Windows devices.
- You can also uninstall patches if you want to roll back to a previous version. or create procedures to auto-install patches.
- All available patches are listed by default. You can filter patches by the company and device group.
Use the links below to jump to the task you need help with:
- The Patch Management interface
- Operating System patches
- Third party application patches
- Further reading
The Patch Management interface
- Login to Comodo One / Dragon
- Click 'Applications' > 'Endpoint Manager'
- Click 'Applications' > 'Patch Management':

The interface has two tabs:
- Operating System - All OS updates are available for your managed Windows devices.
- Each patch has additional details such as classification, the Windows component to which the patch applies, severity, release date, installation status and links to knowledge base articles.
- The interface lets you install or uninstall selected patches on multiple devices. You can also generate a report on the overall patch status.
- See Operating System patches for more details.
- Each patch has additional details such as classification, the Windows component to which the patch applies, severity, release date, installation status and links to knowledge base articles.
- Third Party Applications - All patches that are available for 3rd party applications installed on your Windows endpoints.
- See Third party application patches for help to deploy patches.
- See EM Supported 3rd Party Applications for a list of applications we support for patching.
- See Third party application patches for help to deploy patches.
View patches by company / device group
The tree structure on the left shows all enrolled organizations and device groups:


- Type a company or group name in the search field to look for a specific entity
- Click a company name to view patches for all device groups under it
- Click '+' beside a company to view device groups under it
- Click a device group to view patches for devices belonging to that group
- Click 'Show all' to clear any selections and view all patches
- Click 'Applications' > 'Patch Management' > 'Operating System' tab
- The 'Operating System' tab lets you deploy and manage OS updates on Windows devices.
- Endpoint Manager checks Microsoft update servers for available patches and lists them here. You can deploy or uninstall patches as required.
- Each patch is accompanied by various details, including patch classification/severity, the Windows component to which it applies, the release date, and the number of endpoints that require the patch. Each column in Operating System patches lists can be sorted in ascending or descending order.
- Each patch must be approved before deployment. Unapproved /declined patches cannot be deployed to endpoints either manually or automatically (through scheduled procedures).
- You can hide patches if you do not want to deploy them. Hidden patches are not available for deployment in the 'Device Management' screen ('Devices' > 'Device List' > 'Device Management') and are not executed if added to a patch procedure.
- You can create procedures to automatically deploy updates when they become available, and generate reports on the patch status of all devices.
View and Manage operating system patches
- Click 'Applications' > 'Patch Management'
- Select the 'Operating System' tab
- Select a company or group to view updates for that entity's devices
Or
- Select 'Show all' to view every available Windows update
- Select a company or group to view updates for that entity's devices

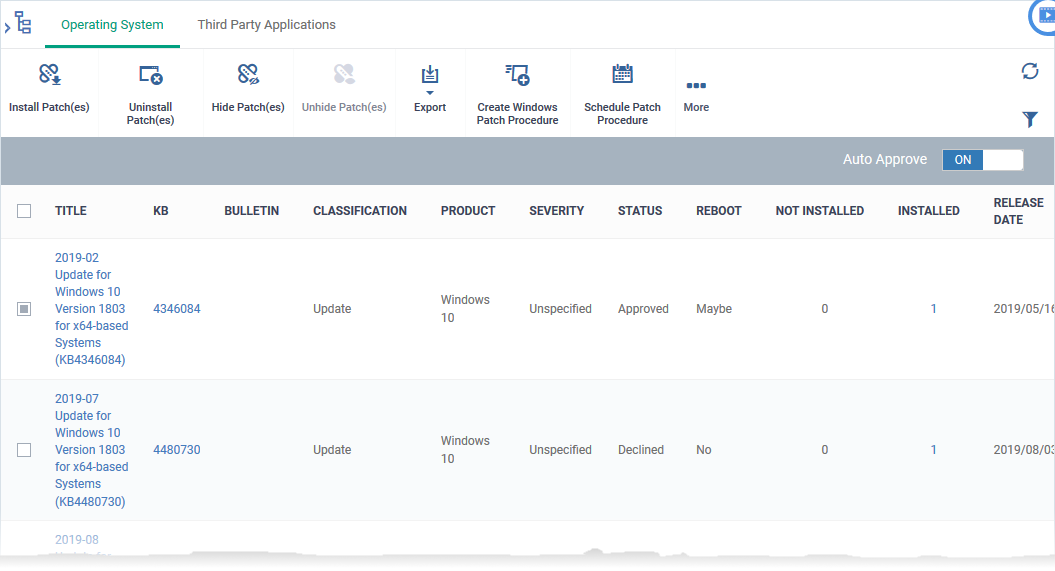
- Title - The descriptive name of the patch.
- Click the name to view patch details. See View Patch Details if you want more info on this.
- Click the name to view patch details. See View Patch Details if you want more info on this.
- KB - The knowledgebase article that describes the patch.
- Click the number to view the article.
- Click the number to view the article.
- Bulletin – The number of the Microsoft bulletin contains details about the patch release.
- Click the number to view the bulletin.
- Click the number to view the bulletin.
- Classification - The category of the patch. The possible values are:
Update - Fixes a specific non-critical problem, but not a security-related bug.
Definition update - Contains updates to a product's definition database. For example, an update to the virus signature database for Windows Defender.
Critical Update - Fixes a critical OS problem, or a critical security-related bug
Security update - Fixes a version-specific, security-related vulnerability
Update rollup - Contains a collection of hotfixes, security updates and other updates packaged together for easy deployment. These updates generally target specific Windows components.
Driver - Adds software for controlling peripherals or add-on devices that could be connected to the endpoint
Feature pack - Adds new functionality distributed after an OS release.
Service pack - Contains a collection of hotfixes, security updates, critical updates, updates, and additional fixes.
Tool - Installs a utility or feature for a specific task or a set of tasks.
Upgrades - Updates the Windows OS version on the endpoint to the latest build.
- Product - The Windows component to which the patch applies.
- Severity - The criticality of the patch. The possible levels are:
- Critical
- Important
- Low
- Moderate
- Unspecified
- Critical
- Status - Whether the patch is approved for deployment through EM. The possible values are 'Auto-Approved', ''Waiting for Approval', 'Approved' and 'Declined'.
- If the 'Auto-Approve' is enabled, all patches identified are automatically set 'Approved' status. Else the patches are to be manually approved by the admin. See 'Approve / decline patches' for more details.
- Reboot - Whether or not the endpoint requires a restart to complete the patch installation.
- Not Installed - The number of managed endpoints on which the patch is yet to be installed.
- Click the number to view all devices that need the patch. You can deploy the patch to those devices which need it.
- See View Patch Details and Install a patch on selected endpoints if you need more help.
- Click the number to view all devices that need the patch. You can deploy the patch to those devices which need it.
- Installed - The number of managed endpoints on which the patch has already been installed.
- Click the number to view all devices which have the patch installed.
- See View Patch Details and Install a patch on selected endpoints if you need more help.
- Click the number to view all devices which have the patch installed.
- Release Date - The date on which the patch was released by Microsoft.
The OS patch interface lets you:
- View details of a patch
- Approve / decline patches
- Hide / restore patches
- Install selected patches on all managed endpoints at once
- Install a patch on selected endpoint
- Uninstall selected patches from all managed endpoints at once
- Create a new patch procedure
- Generate patch statuses report
- Click 'Applications' > 'Patch Management'
- Select the 'Operating System' tab
- Select a company or a group to view the list of patches and Windows updates available for its devices
Or
- Select 'Show all' to view a list of all available patches and Windows updates
- Select a company or a group to view the list of patches and Windows updates available for its devices
- Click on the name of a patch to view its details.

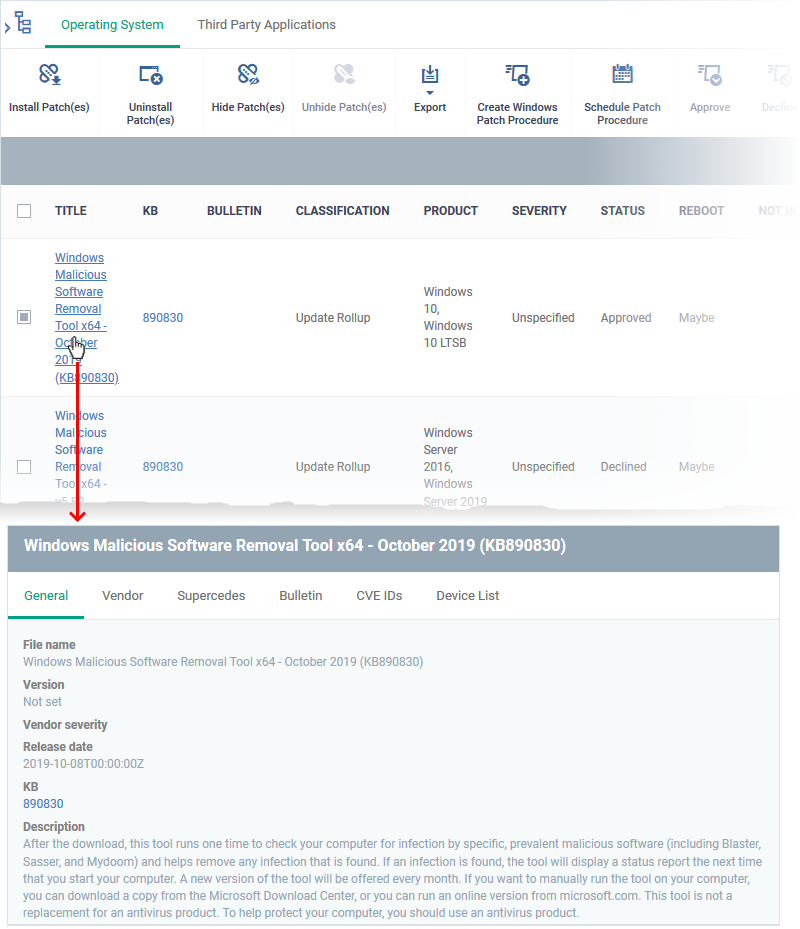
Patch details are shown in six tabs:
- General - Name and general description, version number, severity, release date and a link to the knowledge base (KB) article for the patch.
- Vendor - The publisher of the patch, with a link to the patch support page.
- Supercedes - Information on previous patches which are superseded by this patch
- Bulletin – The bulletin is a short summary of the patch provided by the patch vendor.
- CVE IDs - Shows the Common Vulnerabilities and Exposure (CVE) items that are addressed by the patch.
- Device List – Shows all Windows endpoints for which the patch is appropriate, and informs you which devices have it installed and which do not. You can install the patch on target endpoints as required. See Install a patch on selected endpoints if you want help with this.
Each patch added to the patch management interface needs to be approved for deployment to endpoints through EM.
Declined patches cannot be installed manually (both from the 'Patch Management' interface and the 'Device Management' screen), or automatically through any patch procedures, you create.
There are two ways of approving patches:
Set auto-approval for OS patches
- Click 'Applications' > 'Patch Management'
- Select the 'Operating System' tab
- Use the 'Auto Approve' switch on the right to enable or disable auto-approval
- Enabled – New patches added are set to 'Auto-Approved' state and can be installed on to devices. However, you can manually decline any auto-approved patch
- Disabled – New patches added are set to the 'Waiting for Approval' state. You can manually approve or decline a patch. The patches cannot be deployed until it is approved.
- Enabled – New patches added are set to 'Auto-Approved' state and can be installed on to devices. However, you can manually decline any auto-approved patch
Manually approve or decline a patch
- Click 'Applications' > 'Patch Management'
- Select the 'Operating System' tab
- Select a company or a group to view the list of patches and Windows updates available for its devices
Or
- Select 'Show all' to view a list of all available patches and Windows updates
- Select a company or a group to view the list of patches and Windows updates available for its devices
Approve
- Select the patches you want to approve, in 'Waiting for Approval' or 'Declined' states
- Click 'Approve' from the options on the top or click 'More' and choose 'Approve'
The patches are set to 'Approved' state. These can be deployed manually or through a scheduled procedure.
Decline
- Select the patches you want not to be installed, in 'Waiting for Approval', 'Approved' or 'Auto-Approved' states
- Click 'Decline' from the options on the top or click 'More' and choose 'Decline'
The patches are set to the 'Declined' state. These cannot be deployed manually or through a scheduled procedure.
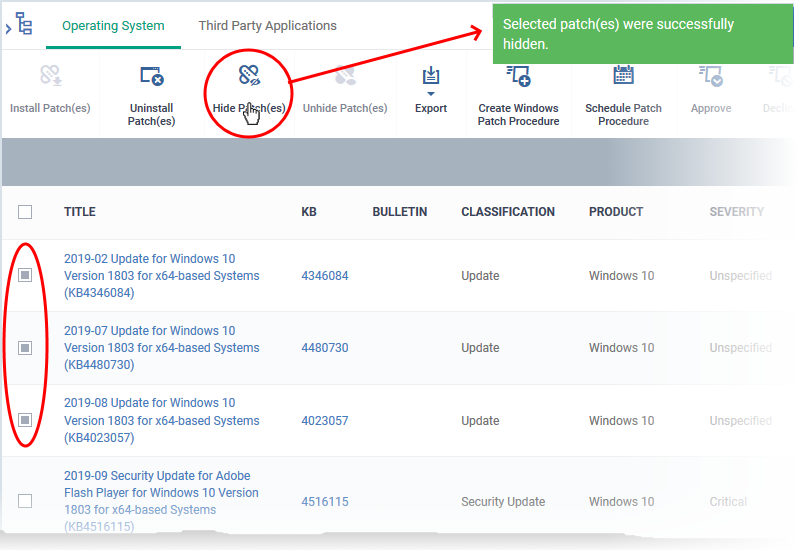
- You can hide patches that you do not want to install at this point.
- Hidden patches will not be available for deployment from the 'Device Management' screen, and are not installed by any patch procedures you create.
- You can view hidden patches by enabling 'Show hidden patch(es)’ in the filter menu.
Hide unwanted patches
- Click 'Applications' > 'Patch Management'
- Select the 'Operating System' tab
- Select a company or a group to view the list of patches and Windows updates available for its devices
Or
- Select 'Show all' to view a list of all available patches and Windows updates
- Select a company or a group to view the list of patches and Windows updates available for its devices
- Select the patches you want to hide then click 'Hide Patch(es)'

View hidden patches and restore them
- Click 'Applications' > 'Patch Management'
- Select the 'Operating System' tab
- Select a company or a group to view the list of patches and Windows updates available for its devices
Or
- Select 'Show all' to view a list of all available patches and Windows updates
- Select a company or a group to view the list of patches and Windows updates available for its devices
- Click the funnel icon
on the right, select 'Show hidden patch(es)', then click 'Apply'

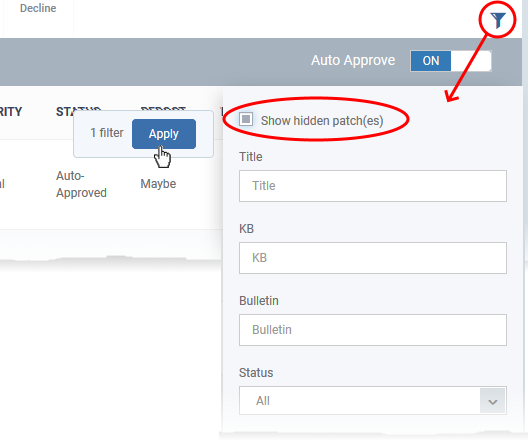
Hidden patches have a dark gray background.
- Select the patches you want to reinstate then click 'Unhide Patch(es)'

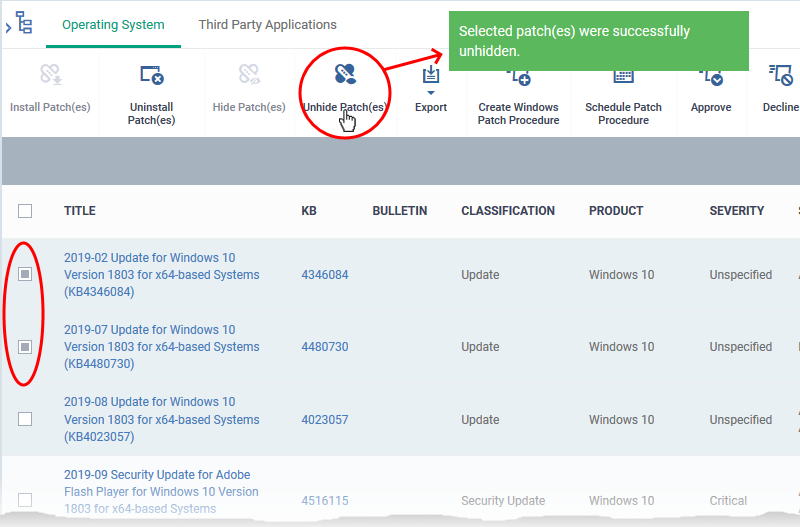
The patches are reinstated to the list.
Install selected patches on all endpoints at once
Note - Make sure patch management is allowed in the profile active on the devices. See this wiki for more details.
- Click 'Applications' > 'Patch Management'
- Select the 'Operating System' tab
- Select a company or a group to view the list of patches and Windows updates available for its devices
Or
- Select 'Show all' to view a list of all available patches and Windows updates
- Select a company or a group to view the list of patches and Windows updates available for its devices
- Select the patches you want to install then click 'Install Patch(es)'
- Reminder – You can install only approved patches.

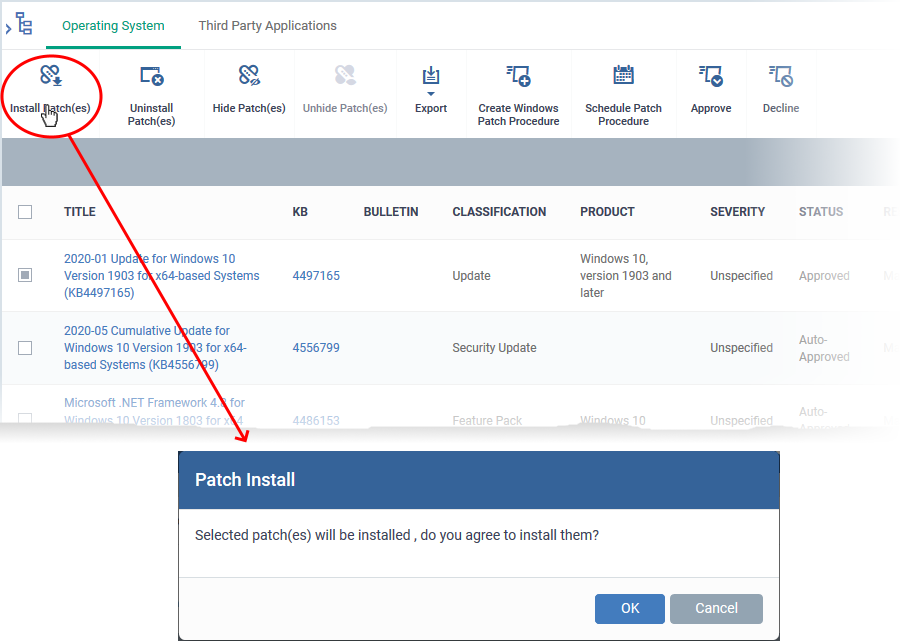
- Click 'OK' in the confirmation dialog
The command is sent to install the patches on all endpoints that need it.
Install a patch on selected endpoints
Note - Make sure patch management is allowed in the profile active on the devices. See this wiki for more details.
- Click 'Applications' > 'Patch Management'
- Select the 'Operating System' tab
- Select a company or a group to view patches available for its devices
Or
- Select 'Show all' to view a list of all available patches and Windows updates
- Select a company or a group to view patches available for its devices
- Click the number in the 'Not Installed' column of the patch you want to install.
- Reminder – You can install only approved patches.

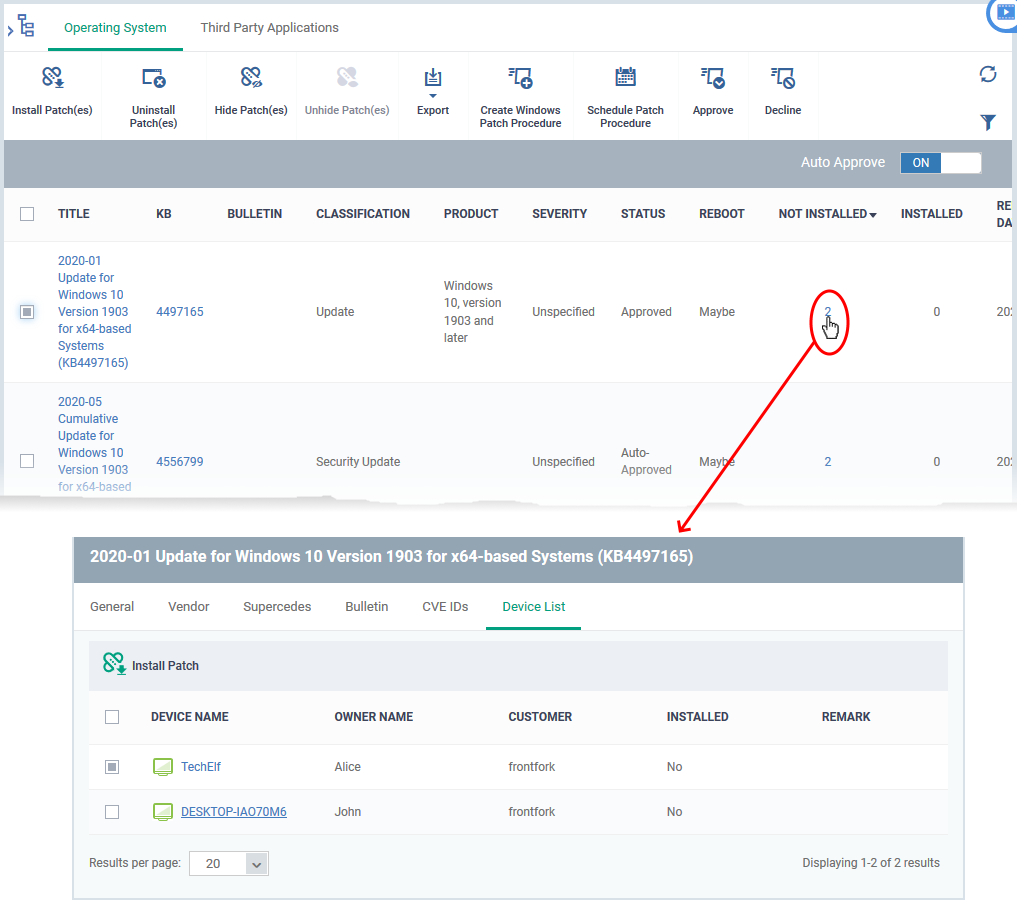
The patch details screen opens at the 'Device List' tab. The screen shows all managed devices to which the patch is relevant. The 'Installed' column tells you whether the patch is installed on the device.
- Select all devices which you want to patch
- Click 'Install Patch'
The command is immediately sent to all target devices
Uninstall selected patches from all managed endpoints
You can remove unwanted patches and updates from managed devices. This is useful if you want to roll back to a previous version of the Windows component or the OS itself.
Note - Make sure patch management is allowed in the profile active on the devices. See this wiki for more details.
- Click 'Applications' > 'Patch Management'
- Select the 'Operating System' tab
- Select a company or a group to view patches available for its devices
Or
- Select 'Show all' to view a list of all available patches and Windows updates
- Select a company or a group to view patches available for its devices
- Select the patches you want to remove then click 'Uninstall Patch(es)'
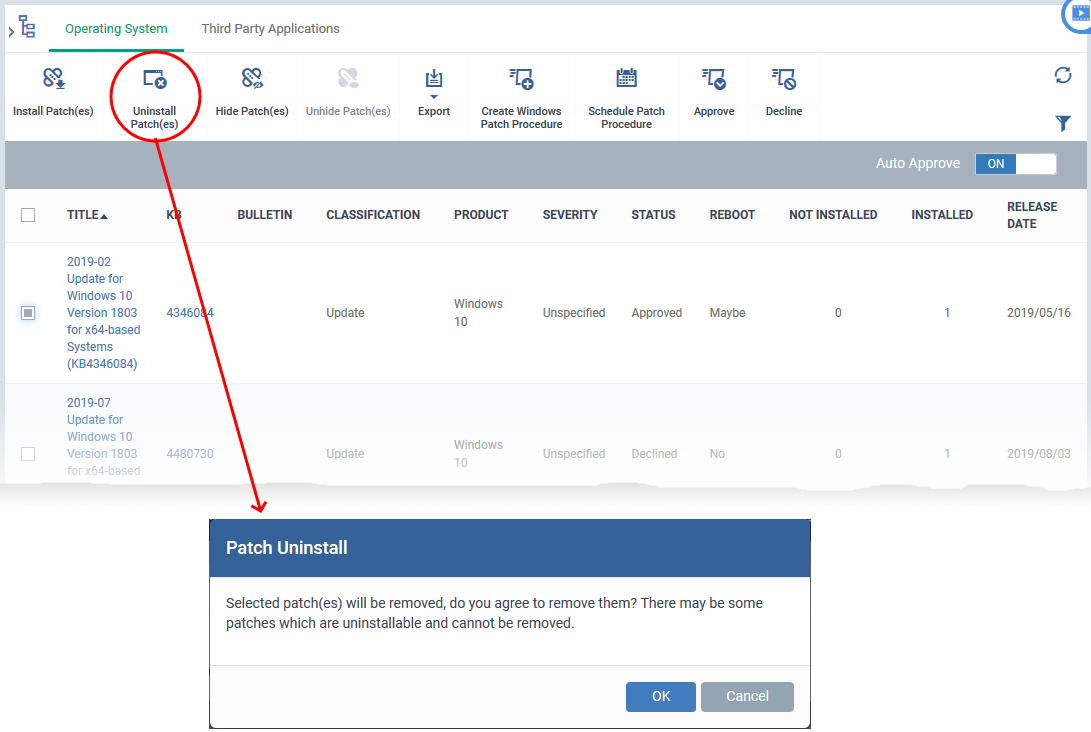
- Click 'OK ' in the confirmation dialog
- The uninstall command is immediately sent to target devices.
Patch procedures let you set up a regular patching schedule for your devices. You first create the procedure then add it to a profile that is active on your devices.
- Click 'Applications' > 'Patch Management'
- Select the 'Operating System' tab
- Click the 'Create Patch Procedure' button:

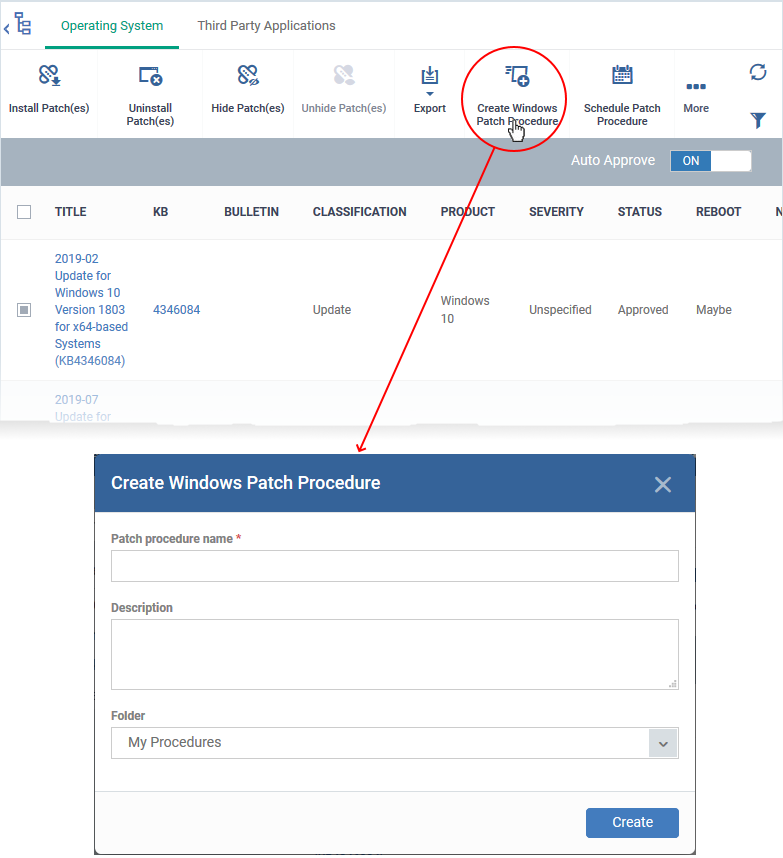
- Create a name and specify the folder in which you want to save the procedure.
- Select the categories of OS patches you want to install and configure endpoint restart options.
- See this wiki page for help to create an OS patch procedure.
Generate a patch status report
Click 'Applications' > 'Patch Management'
- Select the 'Operating System' tab
- Click the 'Export' button:


- The CSV file is available in 'Dashboard' > 'Reports'
- See this wiki page if you need help downloading the report.
Third party application patches
Click 'Applications' > 'Patch Management' > 'Third Party Applications'
- The communication client on each endpoint analyzes all 3rd party applications installed on the endpoint.
- The checked locations include 'C:\Program Files\' and 'C:\Users\{user}\AppData\' folder so as to cover all applications in the endpoint, installed on locations other than their default location.
- The client reports the applications and their patch status to the Endpoint Manager.
- The 'Third Party Applications' tab lists all available patches and updates available for your managed Windows devices and lets you apply patches and updates to them.
- The interface also shows details such as patch category, vendor name, and the number of devices that require the patch and release date. Each column in third-party patches lists can be sorted in ascending or descending order.
- You can filter patches by company and device group.
- Each patch must be approved before deployment. Unapproved /declined patches cannot be deployed to endpoints either manually or automatically (through scheduled procedures).
- You can hide applications that you do not want to update.
- Hidden applications are also not available for update from the 'Device Management' screen ('Devices' > 'Device List' > 'Device Management). They are also skipped if named in a patch procedure.
- Click the funnel icon on the right and enable 'Show hidden patch(es)' to view hidden items.
- Hidden applications are also not available for update from the 'Device Management' screen ('Devices' > 'Device List' > 'Device Management). They are also skipped if named in a patch procedure.
- You can also create a procedure to automatically deploy patches for 3rd party applications.
View and manage third party application patches
- Click 'Applications' > 'Patch Management'
- Select the 'Third Party Applications' tab
- Select a company or a group to view patches for just that entity’s devices
Or
- Select 'Show all' to view all available patches and updates
- Select a company or a group to view patches for just that entity’s devices
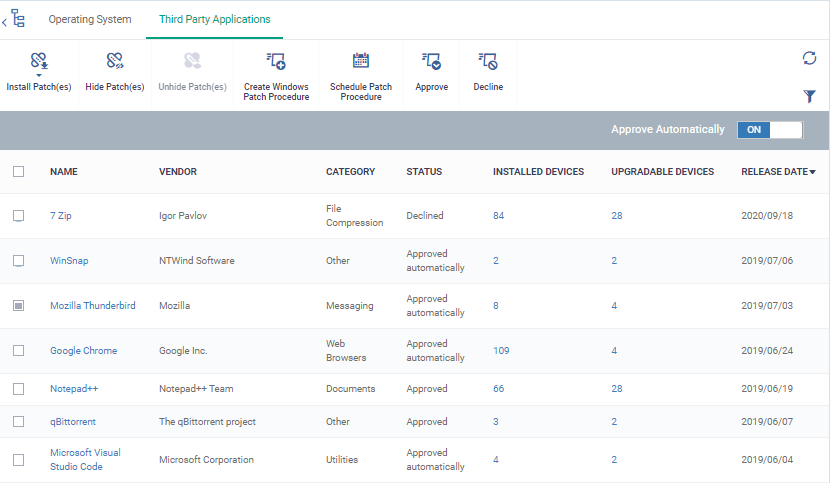
Each row shows the name of the software that needs updates. It also shows you how many devices have the software installed and how many of those require the update.
- Name - The target application
- Click the name to view application details.
- See View details of an application if you want more info on this.
- Click the name to view application details.
- Vendor - The software publisher.
- Category - The type of application.
- Status - Whether the patch/update is approved for deployment through EM. The possible values are 'Auto-Approved', ''Waiting for Approval', 'Approved' and 'Declined'.
- If the 'Auto-Approve' is enabled, all patches are automatically set 'Approved' status when they are added. Else the patches are to be manually approved by the admin. See 'Approve / decline application updates' for more details.
- Installed Devices - Total number of devices on which the application is installed. This figure includes devices with patched and unpatched versions of the software.
- Upgradable Devices - Number of devices that need updates because they are using an older version of the software.
The 'Patch Management' > 'Third Party Applications' interface lets you:
- View details of an application
- Approve / decline application updates
- Hide / restore applications
- Update selected applications on all upgradable devices at once
- Update an application on selected devices
- Create a new 3rd party application patch procedure
View details of an application
- Click 'Applications' > 'Patch Management'
- Select the 'Third Party Applications' tab
- Select a company or a group to view updates for that entity’s devices
Or
- Select 'Show all' to view a list of all available patches and update
- Select a company or a group to view updates for that entity’s devices
- Click the name of any application to open its details screen:
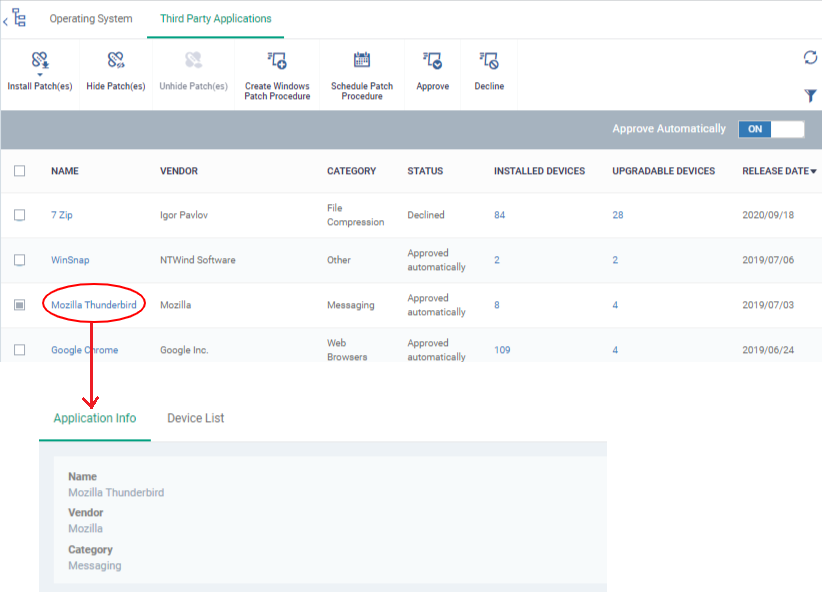
- Application info - The name, software publisher and the category of the application.
- Device List - The list of devices on which the application is installed. You can update the application on specific devices from this screen.
Approve / decline application updates
Each patch or application update added to the patch management interface needs to be approved for deployment to endpoints through EM.
Declined applications cannot be updated manually (both from the 'Patch Management' interface and the 'Device Management' screen), or automatically through any patch procedures you create.
There are two ways of approving patches/updates:
Set auto-approval for third party application updates
- Click 'Applications' > 'Patch Management'
- Select the 'Third Party Applications' tab
- Use the 'Auto Approve' switch on the right to enable or disable auto-approval
- Enabled - New application updates added are set to 'Auto-Approved' state and can be updated on to devices. However, you can manually decline any auto-approved update
- Disabled - New application updates added are set to the 'Waiting for Approval' state. You can manually approve or decline a patch. The patches cannot be deployed until it is approved.
- Enabled - New application updates added are set to 'Auto-Approved' state and can be updated on to devices. However, you can manually decline any auto-approved update
Manually approve or decline an application update
- Click 'Applications' > 'Patch Management'
- Select the 'Third Party Applications' tab
- Select a company or a group to view updates for that entity’s devices
Or
- Select 'Show all' to view a list of all available patches and updates
- Select a company or a group to view updates for that entity’s devices
Approve
- Select the applications you want to approve, in 'Waiting for Approval' or 'Declined' states
- Click 'Approve' from the options on the top or click 'More' and choose 'Approve'
The applications are set to 'Approved' state. These can be updated manually or through a scheduled procedure.
Decline
- Select the applications you want not to be updated, in 'Waiting for Approval' , 'Approved' or 'Auto-Approved' states
- Click 'Decline' from the options on the top or click 'More' and choose 'Decline'
The applications are set to a 'Declined' state. These cannot be updated manually or through a scheduled procedure.
- You can hide those applications that you do not want to update
- Hidden applications will also disappear from the 'Device Management' screen and are skipped by any patch procedures you create.
- You can reveal hidden applications by using the 'Show hidden patches’ switch
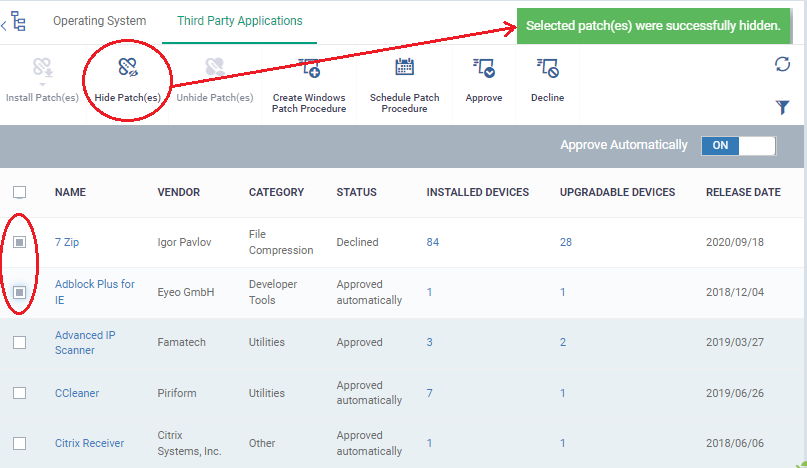
Hide upgradable applications
- Click 'Applications' > 'Patch Management'
- Select the 'Third Party Applications' tab
- Select a company or a group to view updates for that entity’s devices
Or
- Select 'Show all' to view a list of all available patches and updates
- Select a company or a group to view updates for that entity’s devices
- Select the applications you want to hide then click 'Hide Patch(es)'

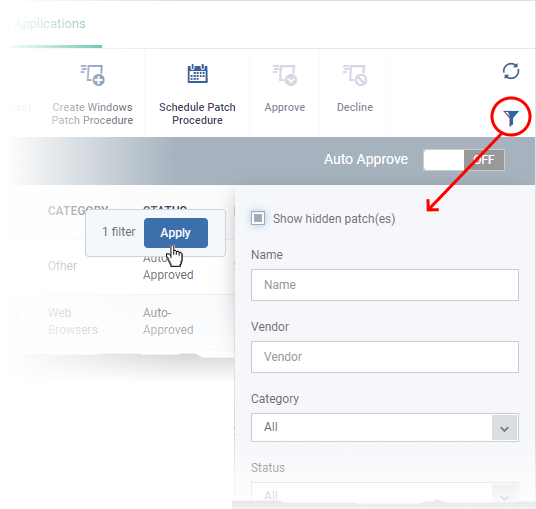
- Click 'Applications' > 'Patch Management'
- Select the 'Third Party Applications' tab
- Select a company or a group to view updates for that entity’s devices
Or
- Select 'Show all' to view a list of all available patches and update
- Select a company or a group to view updates for that entity’s devices
- Click the funnel icon
on the right, select 'Show hidden patch(es)' then click 'Apply'

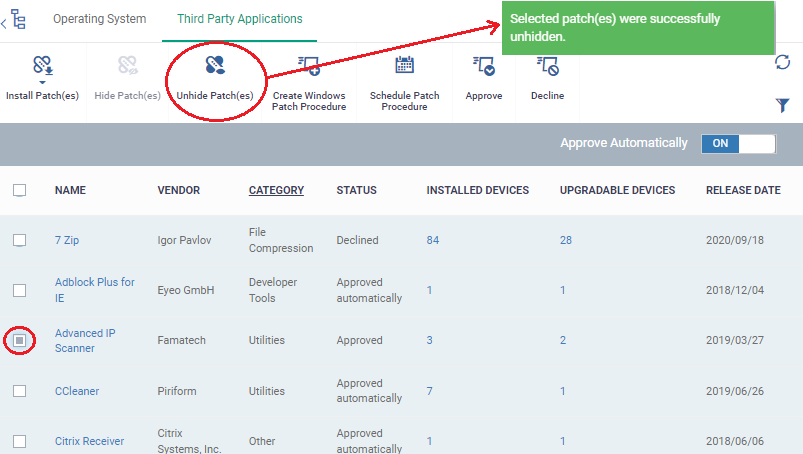
Hidden applications have a dark grey background.
- Select the hidden app(s) from the list and click 'Unhide Patch(es)'

Update selected applications on all devices
Note - Make sure third party application patch management is allowed in the profile active on the devices. See this wiki for more details.
- Click 'Applications' > 'Patch Management'
- Select the 'Third Party Applications' tab
- Select a company or a group to view updates for that entity’s devices
Or
- Select 'Show all' to view a list of all available patches and update
- Select a company or a group to view updates for that entity’s devices
- Make sure that the application you want to update is approved
- Select the applications you want to update, click 'Install Patch(es)' > 'Update to Latest Version'

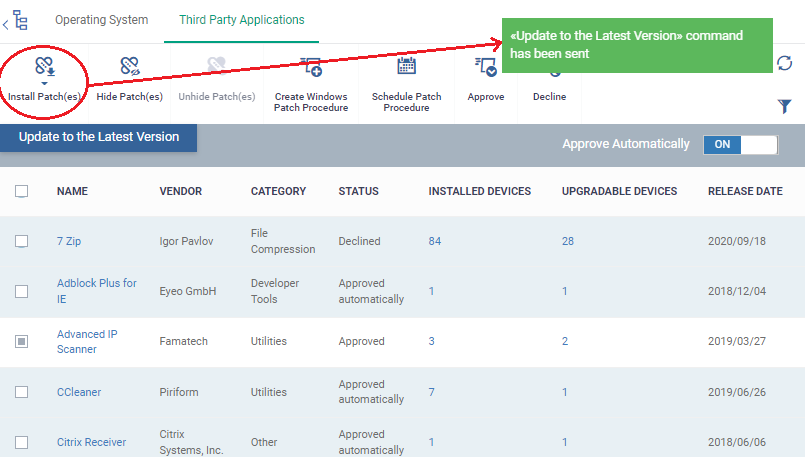
A command is sent to the communication client (CC) on devices to start the update.
- Once the command is received, CC checks whether the update has already been downloaded by other devices in the network.
- If the update is available, CC establishes a peer-to-peer connection with the device and downloads the patch. This reduces bandwidth as the update is downloaded from the local network.
- If the update is not available on any devices in the local network, CC downloads the update from the EM patch portal.
Update an application on selected devices
Note - Make sure third party application patch management is allowed in the profile active on the devices. See this wiki for more details.
- Click 'Applications' > 'Patch Management'
- Select the 'Third Party Applications' tab
- Select a company or a group to view updates for that entity’s devices
Or
- Select 'Show all' to view a list of all available patches and update
- Select a company or a group to view updates for that entity’s devices
- Make sure that the application you want to update is approved
- Click the number in the 'Upgradable Devices' column:

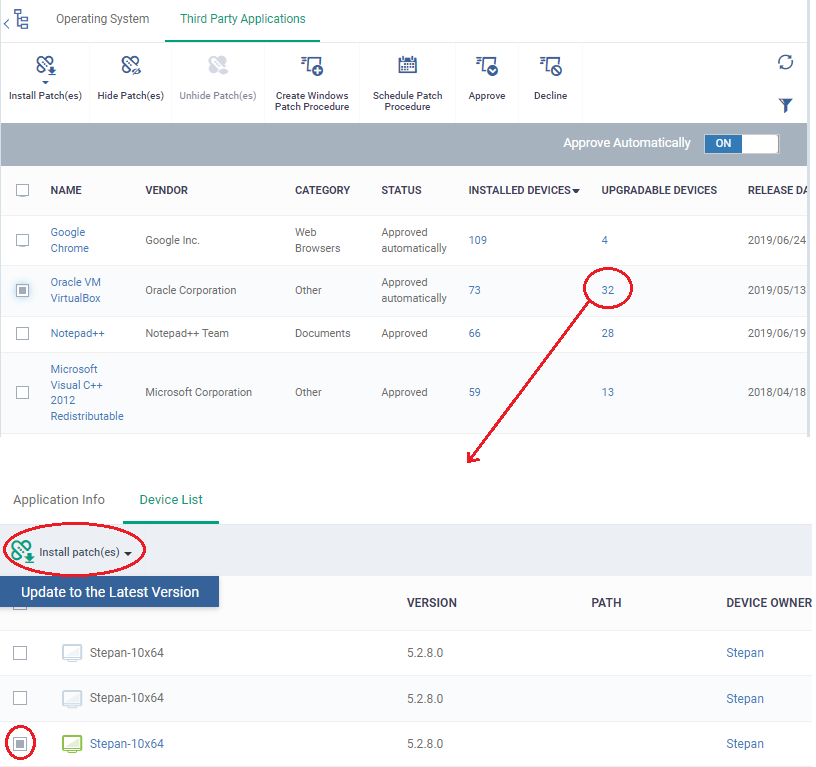
The application details screen shows all devices which require the update.
- Select your target devices
- Click 'Install patch(es)' > 'Update to Latest Version'
A command is sent to the communication client (CC) on devices to start the update.
- Once the command is received, CC checks whether the update has already been downloaded by other devices in the network.
- If the update is available, CC establishes a peer-to-peer connection with the device and downloads the patch. This reduces bandwidth as the update is downloaded from the local network.
- If the update is not available on any devices in the local network, CC downloads the update from the EM patch portal.
Create a new 3rd party application patch procedure
- Click 'Applications' > 'Patch Management'
- Select the 'Third Party Applications' tab
- Click 'Create Patch Procedure':

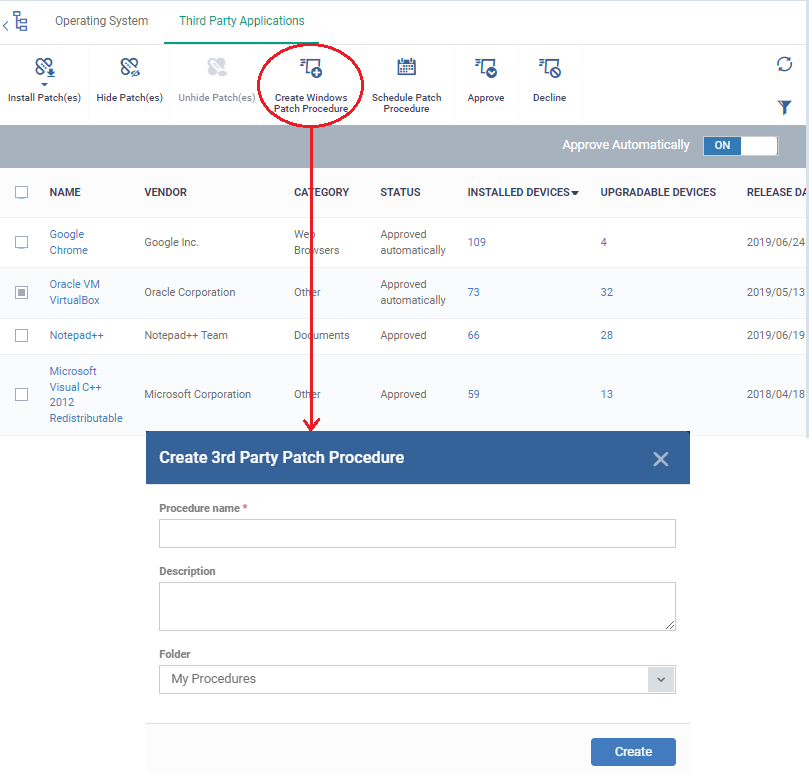
- The 'Create 3rd Party Patch Procedure' wizard starts.
- Create a name for the procedure, select a save-folder, select the applications you want to update, and configure endpoint restart options.
- See this wiki page for help to create and configure a third-party patch procedure.


---