How to remotely install custom MSI / packages on Windows devices
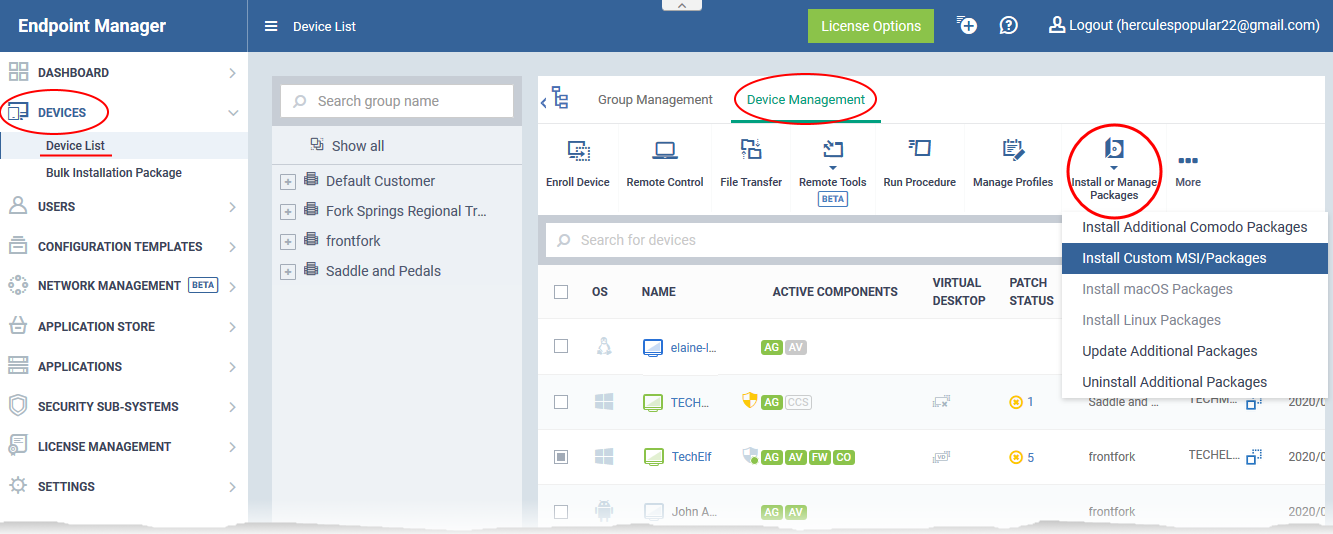
Open Endpoint Manager > click 'Devices' > 'Device List' > select a target device > Click the 'Install or Manage Packages' button.
-
Endpoint Manager console lets you remotely install third party applications from MSI packages on Windows devices by specifying the URLs of the packages
-
You can also specify command line options for the installation and configure reboot options.
Remotely install third-party MSI packages
-
Login to Xcitium
-
Click 'Applications' > 'Endpoint Manager'
-
Click 'Devices' > 'Device List'
-
Click the 'Device Management' tab in the top menu
-
Select a company or a group to view just their devices
Or -
Select 'Show all' to view every device in EM
-
-
Select your target Windows devices using the check-boxes on the left
-
Click 'Install or Manage Packages' > 'Install Custom MSI/Packages':
-
Alternatively, click on the name of the device > select 'Install or Manage Packages' > Install Custom MSI/Packages'
The 'Install Custom MSI/Packages' dialog appears:


-
MSI/Package URL - enter the location of the installer. Make sure it is from a https site. For example, https://www.hass.de/files/nodes/story/45/npp.6.8.4.installer.msi
-
Command-line Options - Enter any required installation switches (optional).
-
You need only enter the command here. E.g. /L or /quiet
-
Click the 'Read more' link to read more about command-line options.
-
-
Choose the reboot option you prefer:
-
'Force the reboot in...' - restart the end-point a certain period of time after installation. Choice of 5, 10, 15 or 30 minutes
-
The following message will be displayed on the device:

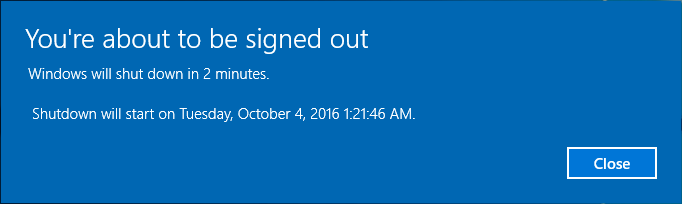
The device will be restarted automatically when the time period elapses.
-
'Suppress the reboot' - Do not restart the machine after installation. CCS will only become fully functional after the device is restarted.
-
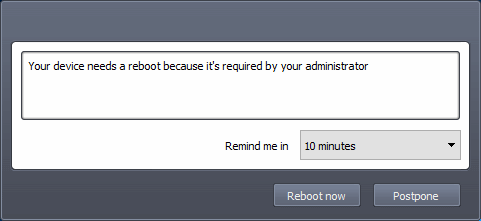
'Warn about the reboot and let users postpone it' - Show an alert to the user which advises them that their computer needs to be restarted. You can enter a custom message which is shown to the user:

-
Maintenance window status - Details of any maintenance windows in the device's profile.
-
Total number of devices outside of maintenance window - The number of devices that are not part of a maintenance window. The installation can run on these devices.
-
Number of devices blocked by maintenance windows settings - The number of devices on which you cannot run the installation because the admin has blocked installs outside of maintenance window.
-
Number of devices warned by maintenance window settings - The number of devices that are part of a maintenance window and have warnings enabled. You can still install on these devices.
-
Skip devices warned by maintenance windows settings - A maintenance window is a time-slot reserved for running important tasks on target devices. Admins can enable a warning if somebody attempts an installation task outside of the window. This setting will skip those devices which have been added to a maintenance window with warnings enabled.
-
-
See this wiki if you want to read more on maintenance windows.
-
Click 'Install'
An installation command is sent to the device.
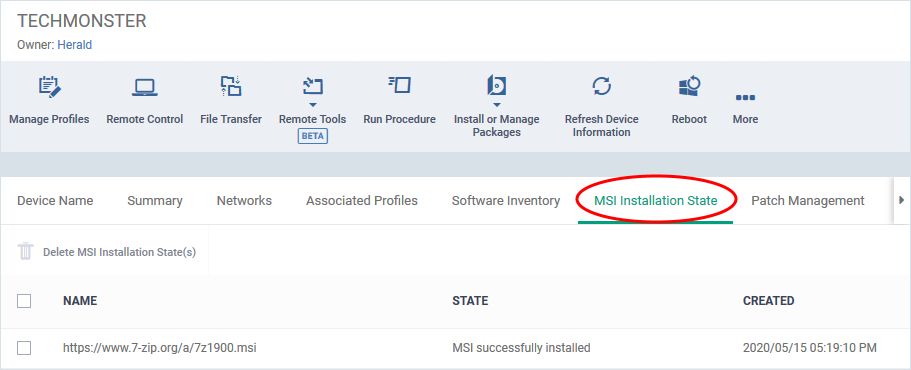
You can view the installation progress in the device details interface:
-
Click 'Devices' > 'Device List'
-
Click the 'Device Management' tab in the top menu
-
Select a company or a group to view just their devices
Or -
Select 'Show all' to view every device in EM
-
-
Click on the name of the device to open its device details interface
-
Click 'MSI Installation State' tab

Further reading:
How to install xcitium Client Security on Windows, Linux and Mac devices


---