North America
How to manage ticket categories
Views
4896 times
Category
Service Desk
Tags
Click 'Admin Panel' > 'Manage' > 'Ticket Categories'
- Ticket categories are help topics that are presented to users to help them more easily select the area with which they need assistance. For example, your help page might have a menu which says 'Please choose the area we can help you with', and offer categories such as 'Billing', 'Account Changes', 'Technical Support' and so forth.
- You can associate a ticket category with a custom form to gather more targeted information from an end-user. For example, you may need different information from a customer if they need help with an account question than you would if they have a problem with their printer.
- Ticket categories can be used to route tickets to a particular department or staff member if required. You can also create custom auto-responders and thank-you pages based on the ticket category chosen by your user.
Use the links below to jump to the area you need help with:
- Add a new ticket category
- Enable / disable a ticket category
- Edit a ticket category
- Remove a ticket category
- Further reading
- Login to Comodo One / Dragon
- Click 'Applications' > 'Service Desk'
- Open the admin panel (see the last link on the left)
- Click 'Manage' > 'Ticket Categories'

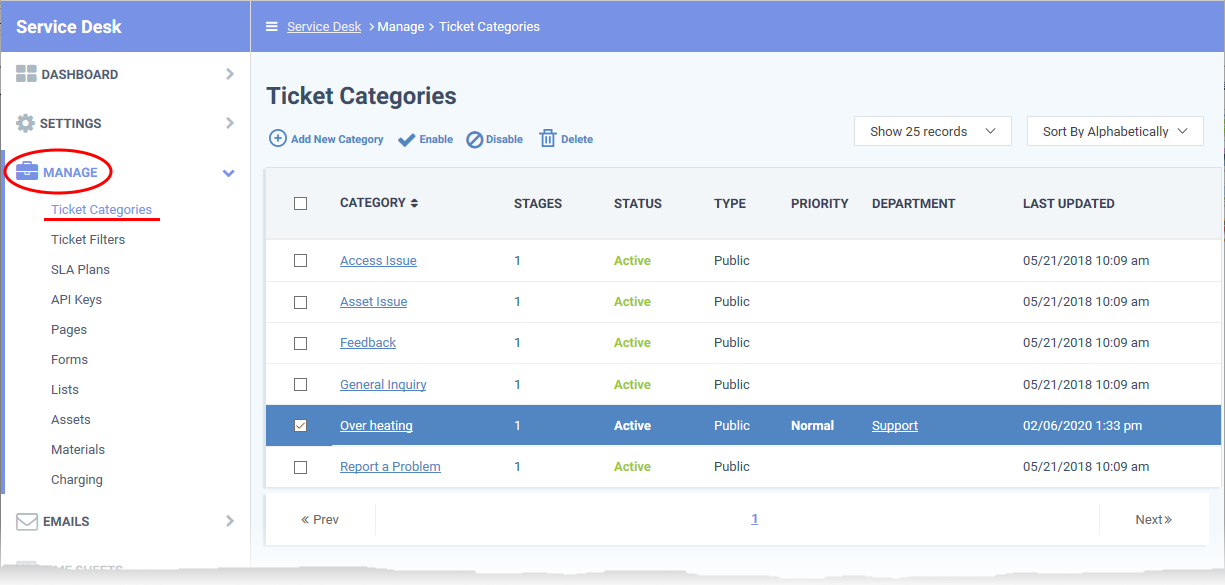
- Category - The name of the help topic. These topics are presented to end-users so that they may choose the area with which they need help. The topics you create depend on the support services you offer. Example categories you could consider are ‘General Inquiry’, ‘Billing Issue’, ‘Server Problem’, ‘Internet connection issue’, ‘Report a bug’, etc.
- Click on the name of a category to edit it.
- Click on the name of a category to edit it.
- Stages - The number of steps in tickets which belong to the category. A ticket may have multiple steps if it needs to pass from one department/staff member to the next, for example.
- Status - Shows whether the help topic is active or inactive. Users and staff can only create tickets in active help topics.
- Type - Shows whether the help topic is public or private:
- Public - Available to both end users and staff. End users can select the help topic when creating a ticket at your support portal. Staff can pick the topic when they create a ticket on behalf of a user.
- Private / Internal - The topic is only available only to staff. Staff can choose this topic when creating or editing a ticket.
- Public - Available to both end users and staff. End users can select the help topic when creating a ticket at your support portal. Staff can pick the topic when they create a ticket on behalf of a user.
- Priority - The urgency level of tickets in this category. See this help guide page if you’d like some general advice on ticket priorities.
- Department - The department assigned to tickets in this category.
- Last Updated - The date and time the category was most recently updated.
- Open the admin panel (see the last link on the left)
- Click 'Manage' > 'Ticket Categories'
- Click 'Add New Category'

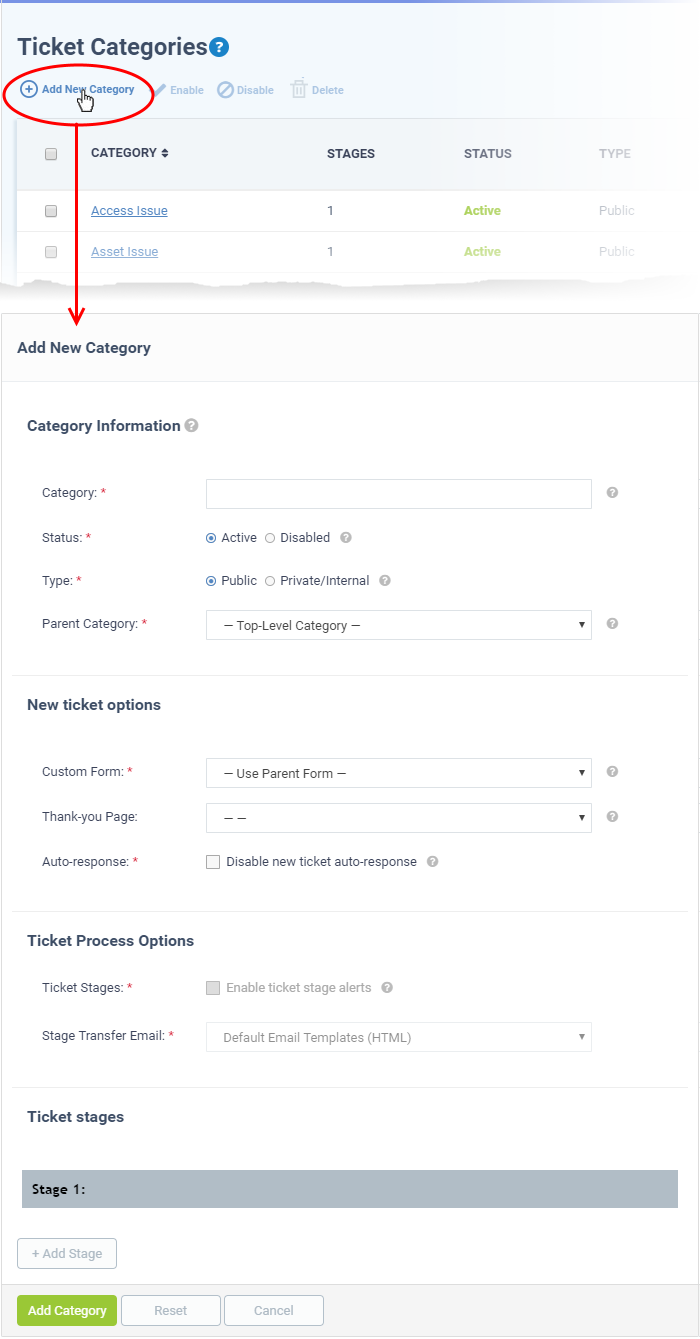
- Category: Enter a unique name for the ticket category. This should be a support topic that you want to present to end-users for selection. For example, 'Billing Inquiries', 'Technical Support', ‘Printer Issue’, etc.
- Status: Choose whether the ticket category is active or not. Users and staff can only create tickets in active help categories. You can change the status at any time in the ‘Ticket Categories’ screen:
- Click ‘Admin Panel’ > ‘Manage’ > ‘Ticket Categories’
- Select a category using the check-boxes on the left
- Use the 'Enable'/ 'Disable' buttons above the table to active or deactivate the category.
- Click ‘Admin Panel’ > ‘Manage’ > ‘Ticket Categories’
- Type: Choose whether the category is visible to end-users or only available to staff.
- Public - The category is published to your customer-facing portal for users to select when they create a ticket. It is also available to staff to choose when they create a ticket.
- Private/Internal - The category is only available staff. Staff can choose this category when creating a ticket in the staff panel.
- Public - The category is published to your customer-facing portal for users to select when they create a ticket. It is also available to staff to choose when they create a ticket.
- Parent Category: (optional). Choose a master category for this topic. Choosing a parent means this category becomes a child, or sub-section, of the parent. For example, ‘Hardware Issues’ could be your parent category, and ‘Printer Issues’ your sub-category.
- Custom Form: Choose the form that is presented to users if they pick this support category. Custom forms allow you to collect targeted information from a user about specific problems.
For example, the information you need to collect from a customer about a billing issue is likely to be different from the information you need for a printer issue.
- Click ‘Admin Panel’ > ‘Manage’ > ‘Forms’ to view, edit and create custom forms.
- See this wiki if you want to learn more about forms.
- Click ‘Admin Panel’ > ‘Manage’ > ‘Forms’ to view, edit and create custom forms.
- Thank-You Page: Choose the confirmation page that users see after submitting a ticket in this category. The page is shown to guest users only.
- See this wiki for help to customize your support portal pages.
- See this wiki for help to customize your support portal pages.
- Auto-response: Choose whether to send a confirmation email to the user after they submit a ticket to this category. This setting over-rules global and department-level auto-responder settings.
- See this wiki for more on auto-responder settings.
- Enable ticket stage alerts: Sends a notification to the user when the ticket moves from one stage to the next. This setting only applies to multi-stage tickets.
- Stage Transfer Email: Select the template you want to use for the stage transfer email.
- The item you select here is a template 'set' rather than just an individual mail.
- You can view and edit the content of the individual mail as follows:
- Click 'Admin Panel' > 'Emails' > 'Templates'
- Click on 'Default Email Templates (System Default)'
- Scroll to the 'End User Templates' section.
- Click on the ‘Ticket Stage Template’
- Edit the content as required
- Click 'Admin Panel' > 'Emails' > 'Templates'
- See this wiki if you want more help with email templates.
- The item you select here is a template 'set' rather than just an individual mail.
- You can set up category tickets to have a single stage, or multiple stages. Multi-stage tickets let you create a 'step-by-step' process to resolve specific types of issue. Each stage defines the department, priority, SLA and assignee of the ticket.
- For example, an issue with your website might first go to the support department for verification then onto the web-dev dept. to deploy the fix. The ticket transitions to the appropriate department/staff member at the end of each stage.
Click the 'Stage' stripe to add/edit the following settings:
- Stage Name: Create a label for the ticket stage
- Department: The department to which the ticket is assigned at this stage.
- Priority: Severity of the ticket at this stage. The options are Low, Normal, High and Critical. Please note that staff attending to the ticket can change the priority. Click here for general guidance on priority levels.
- SLA Plan: The service level agreement which applies to the ticket at this stage.
- Auto-assign To: The staff member to whom the ticket should be assigned at this stage. The assignee can re-assign the ticket to another staff member if required.
- Admin Notes: Add comments about the category. These are internal and not visible in the client portal.
Click 'Add Stage', to create a new stage for the ticket category
- Click the 'Add Category' button to save the category
Enable / disable a ticket category
- Open the admin panel (see the last link on the left)
- Click 'Manage' > 'Ticket Categories'
- Select the ticket category you want to activate/deactivate
- Click 'Enable' or 'Disable' at the top:
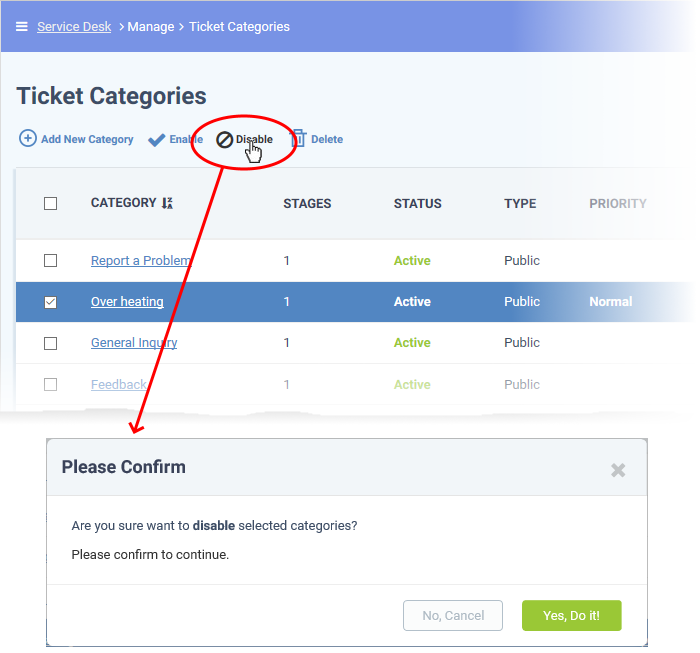
- Click 'Yes, Do it!' to confirm your action
- Open the admin panel (see the last link on the left)
- Click 'Manage' > 'Ticket Categories'
- Click on the name of the ticket category you want to edit.
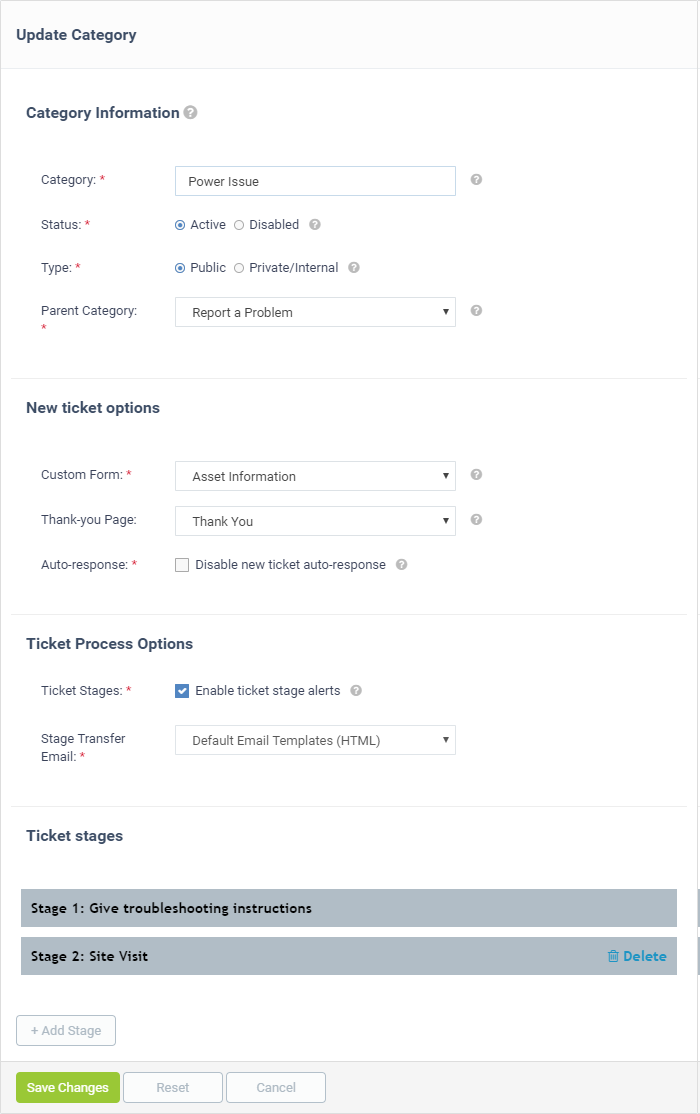
- Edit the settings as required
- The update process is similar to adding a new category. See above for descriptions of the various settings.
- Click 'Save Changes' for your modifications to take effect
- Open the admin panel (see the last link on the left)
- Click 'Manage' > 'Ticket Categories'
- Select the categories you want to remove and click 'Delete' at the top:

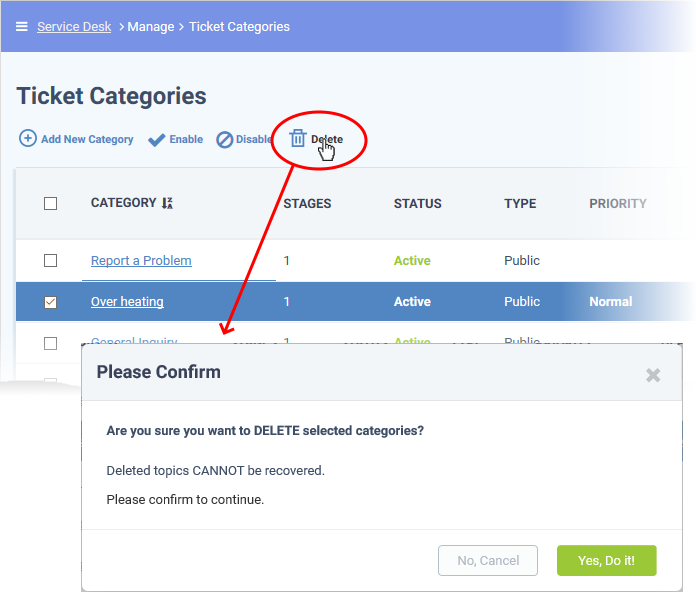
- Click 'Yes, Do it!' to confirm removal.
- Create custom forms and lists in Service Desk
- Configure auto-response settings in Service Desk
- Modify your company profile and customize your support portal
- Manage email templates and variables in Service Desk


CONTACT US
Call now!  (973) 859 4000 ext 3025
---