How to modify global ticket settings, time entry and attachments
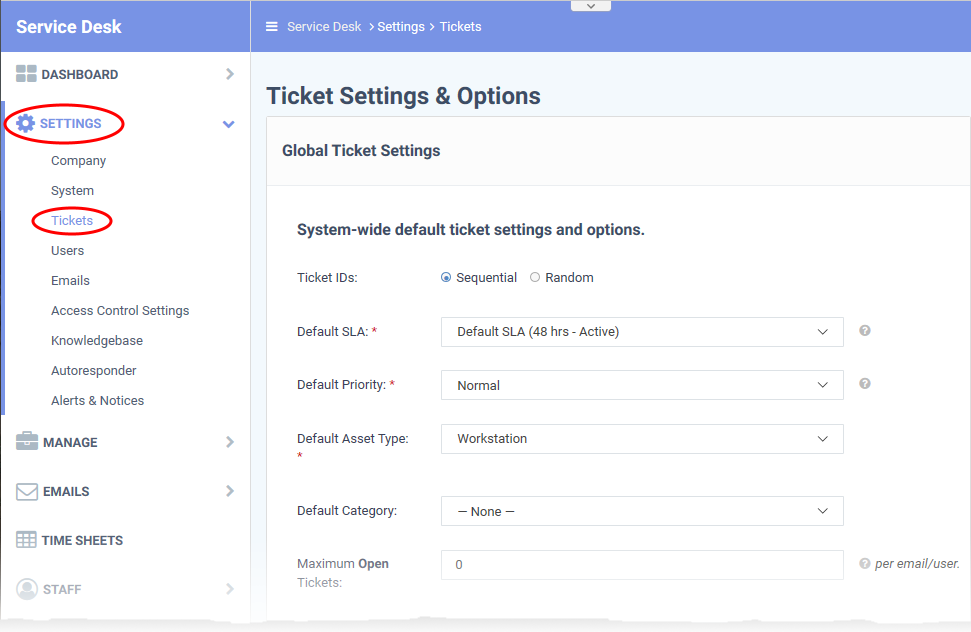
Click 'Admin Panel' > 'Settings' > 'Tickets'
- Global ticket settings let you define default settings for tickets submitted to your organization.
- These settings apply to all tickets unless superseded by a department or ticket category setting.
Use the links below for more help:
- Login to Comodo One / Dragon
- Click 'Applications' > 'Service Desk'
- Open the admin panel (see the last link on the left)
- Click 'Settings' > 'Tickets'

The interface has four areas:
- System-wide default ticket settings and options
- Time Settings (global)
- Attachments
- Accepted File types
System-wide default ticket settings and options

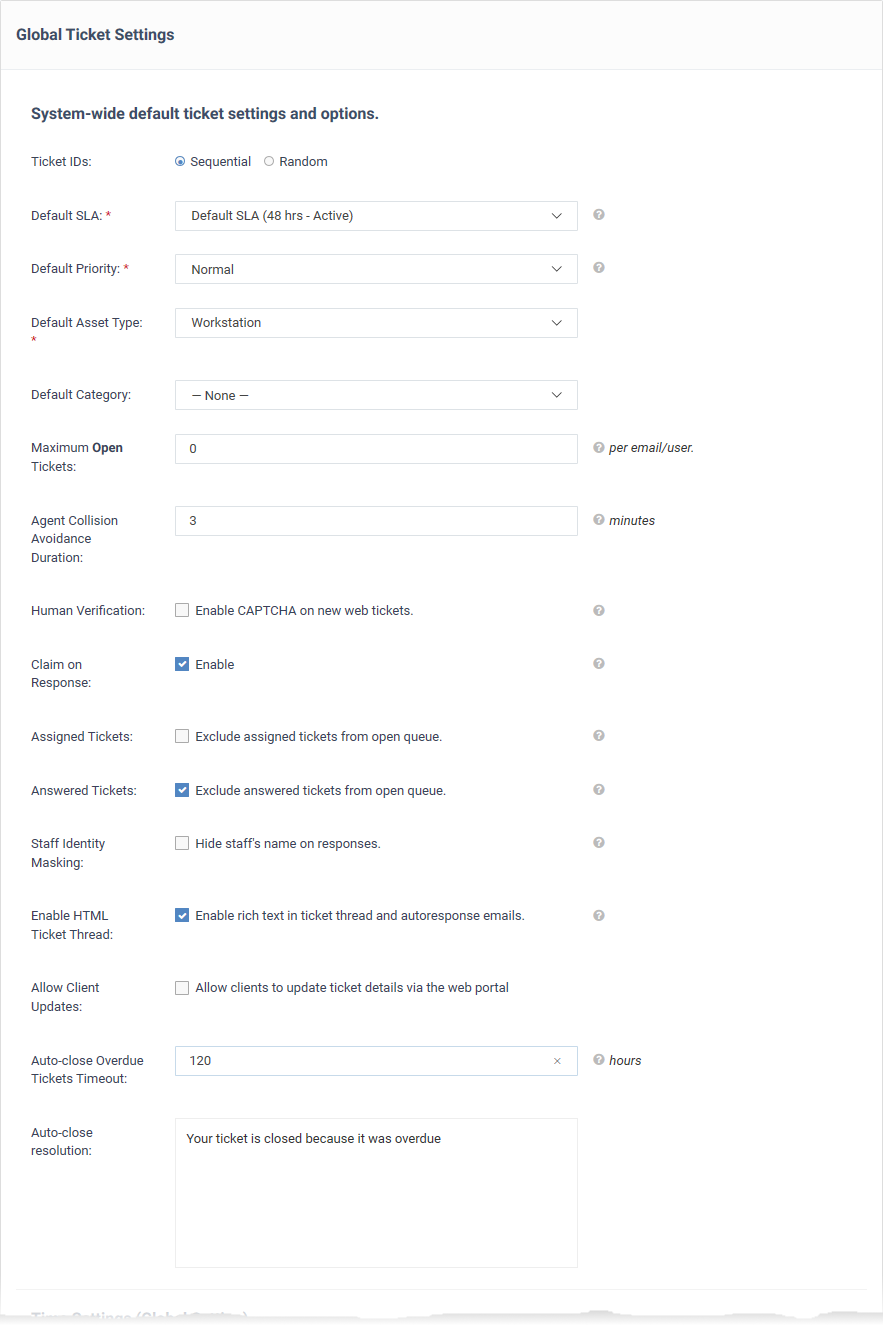
- Ticket IDs: Select whether ticket numbers are sequential (consecutive) or randomly generated.
- Default SLA: Choose the service level agreement (SLA) that applies to tickets IF no custom SLA applies. You can apply a custom SLA to a ticket category, multi-stage ticket, or department. The SLA determines how long a ticket can remain open before it is overdue.
- Default Priority: Choose the default severity level for tickets that have not been assigned a priority level by the department or ticket category. For example, ‘Low’, ‘Normal’, ‘High’ or ‘Critical’. See ticket priorities if you need general advice on priority levels.
- Default Asset Type: Assets are the type of item that the ticket concerns. For example, ‘workstation’, ‘printer’, ‘router’ etc. You can manage assets and specify asset rates at at ‘Admin Panel’ > ‘Manage’ > ‘Assets’. Choose the default asset for new tickets. The user can change the asset type when creating a new ticket.
- Default Category: The help topic that is assigned to a new ticket if the user does not select a category.
- See this wiki to read more about ticket categories.
- See this wiki to read more about ticket categories.
- Maximum Open Tickets: The highest number of tickets that a user is allowed to have open at once. Once the maximum is reached, users cannot create new tickets until an existing ticket is closed. Enter '0' for unlimited open tickets.
- Agent Collision Avoidance Duration: Enter the maximum length of time an agent (staff member) is allowed to lock a ticket. Other staff cannot edit locked tickets. Enter '0' to disable the ability to lock tickets.
- Human Verification: If selected, a CAPTCHA is shown on your support portal for the user to complete. This verify that the ticket is created by a human and not a bot.
- Claim on Response: If enabled, new tickets are auto-assigned to the agent that first responds to it. Note - reopened tickets are always assigned to the most recent respondent.
- Assigned Tickets: If enabled, tickets that are assigned to staff members are hidden in 'Open' tickets.
- Answered Tickets: If enabled, tickets with staff responses are placed in the 'Answered' tickets queue. If disabled, they are shown in the 'Open' tickets queue.
- Staff Identity Masking: If enabled, the ticket does not include the name of staff who work on the ticket.
- Enable HTML Ticket Thread: HTML lets users and staff use different fonts, colors and even images in their messages. The thread uses plain text if you don’t enable this option.
- Allow Client Updates: If enabled, users can use the web portal to update their ticket.
- Auto-close Overdue Tickets Timeout: The number of hours that overdue tickets are kept open after their due-date. Overdue tickets are auto-closed after this grace period expires. Enter '0' to disable this feature, so overdue tickets are never auto-closed.
- Auto-close resolution: Type a message that explains the ticket was automatically closed because it was overdue.
- This message is shown in the ticket thread and in the ticket details screen.
- This message is shown in the ticket thread and in the ticket details screen.

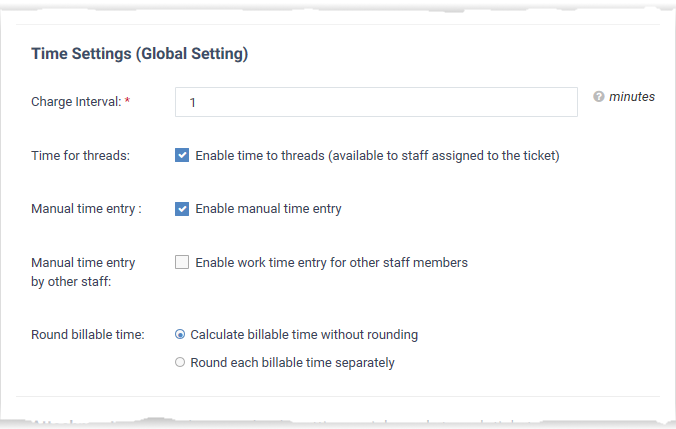
Charge Interval: The minimum number of minutes that can be added to billable time on a ticket. Fractions of this unit are always rounded up.
- For example, if you enter ‘1’ and staff work on a ticket for 17 minutes and 34 seconds, then the system records 18 minutes. If you enter ‘10’ and staff work on a ticket for 14 minutes and 16 seconds, then the system records 20 minutes.
- Note – Charge interval is only relevant IF you enable ‘Round each billable time separately’. It has no effect if you enable ‘Calculate billable time without rounding’ instead.
Time for threads: Enable a time-counter which starts/resumes when staff work on a ticket. The timer starts when staff open the ticket and stops when they close the session. Staff can manually pause and resume the counter.
Manual time entry: Allow staff to add time to the ticket. This can be used to record ‘away-from-system’ work when the staff member did not have the ticket open. For example, on-site visits, etc.
Manual time entry by other staff: Allow staff other than the person to whom the ticket is assigned to add their time spent to a ticket.
Round billable time:
- Calculate billable time without rounding – Billable time is a simple total of all time spent on a ticket, including seconds. For example, if a ticket has three work-sessions which last 17:34, 3:25 and 1:45 respectively, then the total is 22 minutes and 44 seconds.
- Round each billable time separately – Service Desk rounds-up the time spent in each session to the unit in the ‘Charge Interval’ box. Each session is rounded up before the total is calculated. Total billable time is the sum of all individual sessions.
For example, if your change interval is ‘1’, and a ticket has three work-sessions which last 17:34, 3:25 and 1:45 respectively, then the total is 24 minutes (18m + 4m + 2m).

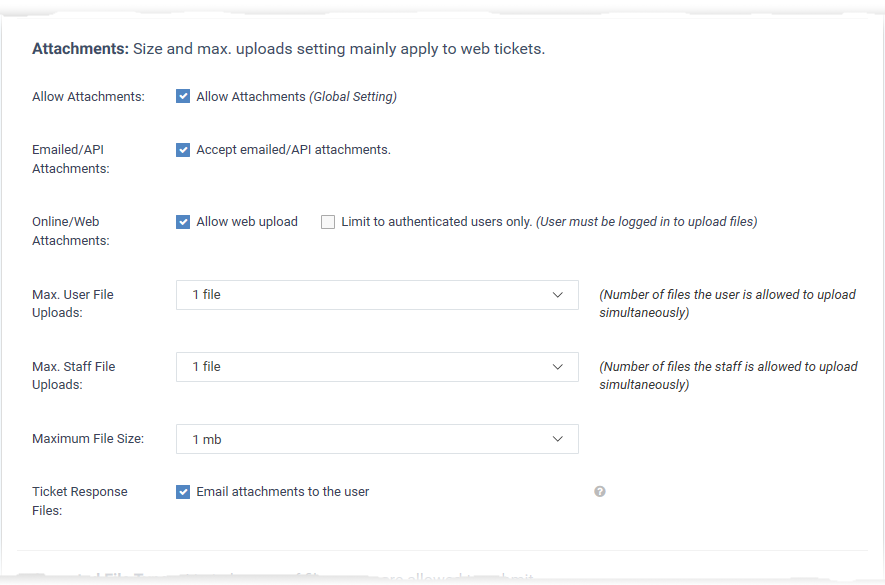
- Allow Attachments: Users and staff are permitted to upload attachments to tickets.
- Emailed/API Attachments: Choose whether users can attach files to email tickets or tickets created over API.
- Service Desk can automatically create tickets from emails sent to your support email address. See this wiki for help to do this.
- Service Desk can automatically create tickets from emails sent to your support email address. See this wiki for help to do this.
- Online/Web Attachments: Choose whether users can attach files to tickets that they created in your online portal.
- Max. User File Uploads: Set the max. a number of files a user can to attach to a ticket.
- Max. Staff File Uploads: Set the max. a number of files a staff member can attach to a ticket.
- Maximum File Size: Set the upper size limit of individual attachments.
- Ticket Response Files: If enabled, any attachments that staff add to a ticket response are included in the email to the user.

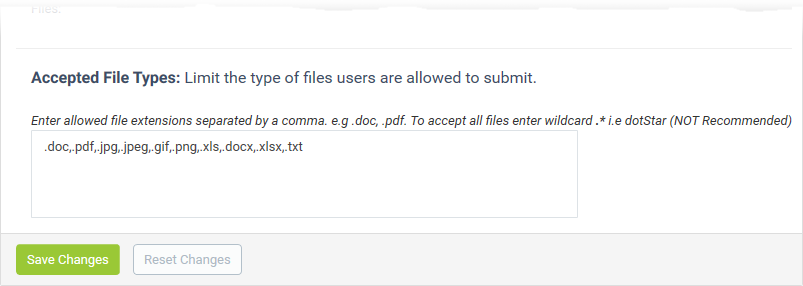
- Specify which types of file your users are allowed to add as attachments. Each extension should be separated by a comma.
Click the 'Save Changes' for your settings to take effect.
Setup your support email address
Update your company profile and customize your support portal


---