How to re-brand Xcitium Clients and the Virtual Desktop, and configure UI settings
Click ‘Configuration Templates’ > ‘Profiles’ > open a Windows profile > Click ‘Add Profile Section’ > ‘UI Settings’
- The UI settings section lets you change the appearance of the communication client (CC), security client (CCS) and the Virtual Desktop on managed endpoints.
- You can re-brand these items with your own company name, support details, logo, product name and product logo. A white-labelled interface can help reinforce your brand and deepen your connection with your customer.
- You can also select which components of CCS should be visible to end-users.
Use the links below to jump to the task you need help with:
- Add a 'UI Settings' section to a profile
- Configure general UI settings
- Rebrand the communication client (CC)
- Rebrand the security client (CCS) and Virtual Desktop
- Configure Virtual Desktop disclaimer settings
Add a 'UI Settings' section to a profile
- Login to Xcitium
- Click 'Applications' > 'Endpoint Manager'
- Click 'Configuration Templates' > 'Profiles'
- Click the ‘Profiles’ tab
- Open the Windows profile applied to your target devices
- Open the 'UI Settings' tab
OR
- Click 'Add Profile Section' > 'UI Settings', if it hasn't yet been added
- Open the 'UI Settings' tab

The UI settings screen has three tabs:
- General Settings - Select GUI language and decide which items are shown to the end-user.
- Communication Client Rebranding - Customize CC with your own brand name, company logo and more.
- xcitium Client Security Rebranding - Customize CCS and the virtual desktop with your own brand name, company logo and more.
- Open the 'UI Settings' section of a profile
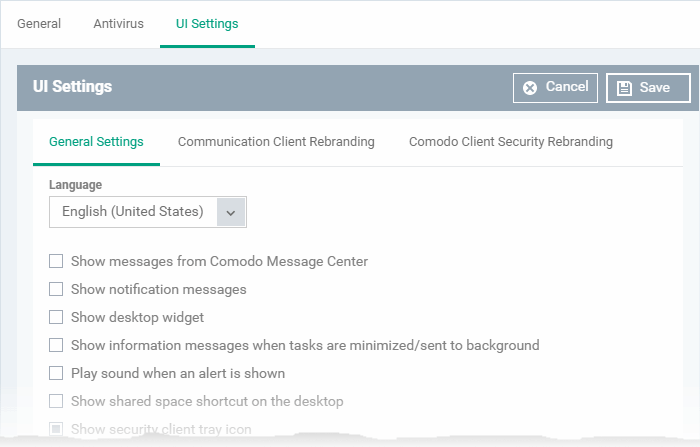
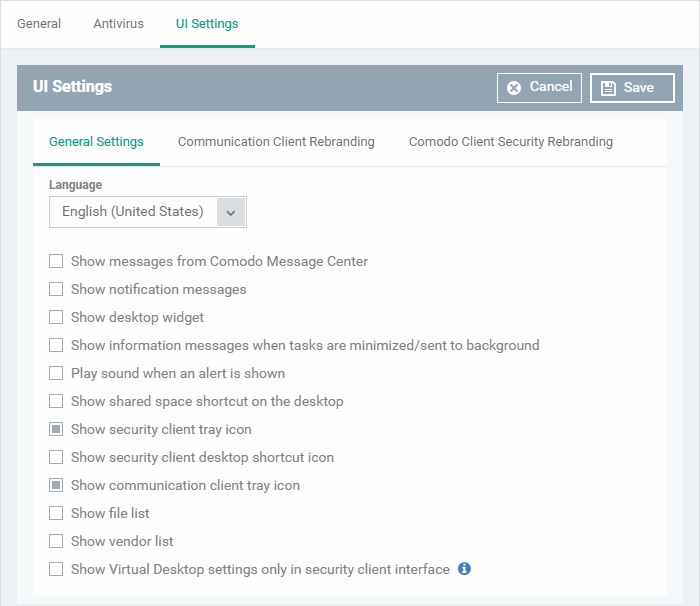
- Click the 'General Settings' tab then 'Edit':

- Language - The language which should be used in the Xcitium Client Security interface. Default = English (United States).
- Show messages from Xcitium Message Center - Message Center notifications appear as pop-ups at the bottom right-hand corner of the screen. They contain news about updates, offers and other items of interest.
- Select whether or not the messages should be displayed to end-users. (Default = Disabled)
- Select whether or not the messages should be displayed to end-users. (Default = Disabled)
- Show notification messages - Notifications inform end-users about actions and status updates. CCS notices appear in the bottom right hand corner of the screen (just above the tray icons).
- Select whether or not notifications should be shown to end-users. (Default = Disabled)
- Select whether or not notifications should be shown to end-users. (Default = Disabled)
- Show desktop widget - The widget contains shortcuts to important CCS tasks and information about security levels, traffic and background tasks.
- Select whether or not the widget should be shown on endpoint desktops. (Default = Disabled)
- Select whether or not the widget should be shown on endpoint desktops. (Default = Disabled)
- Show information messages when tasks are minimized/sent to background - These messages inform end-users of the effects of minimizing or moving a running task to the background. For example, when a virus scan task is moved to the background.
- Select whether or not information messages should be displayed to end-users. (Default = Disabled)
- Select whether or not information messages should be displayed to end-users. (Default = Disabled)
- Play sound when an alert is shown - If selected, CCS plays a chime whenever it raises a security alert. (Default = Disabled)
- Show shared space shortcut on the desktop - 'Shared Space' is the special folder on an endpoint where contained applications are allowed to save files. The shared space shortcut provides access to this folder.
- Select whether or not the shortcut should be shown to end-users. (Default = Disabled)
- Select whether or not the shortcut should be shown to end-users. (Default = Disabled)
- Show security client tray icon - Select whether or not the CCS icon should be shown in the system tray. (Default = Enabled)
- The tray icon lets end-users submit support tickets to Service Desk should they need assistance with their devices.
- If enabled, you can also let users submit tickets to specific departments. See the dedicated wiki page How to configure ticket submission in Communication Client for help with this.
- The tray icon lets end-users submit support tickets to Service Desk should they need assistance with their devices.
- Show security client desktop shortcut icon - Select whether or not the CCS desktop shortcut should be displayed. (Default = Disabled)
- Show communication client tray icon - Select whether or not the communication client shortcut icon should be available in the system tray. (Default = Enabled)
- Show file list - CCS can show a list of files on a device along with their trust ratings ('Trusted', 'Unrecognized' or 'Malicious'). This is available in CCS at 'Advanced Settings' > 'Security Settings' > 'File Rating' > 'File List'.
- See this help page to read more about CCS file list
- Select whether or not the file list should be available to end-users. (Default = Disabled)
- See this help page to read more about CCS file list
- Show vendor list - CCS ships with a list of trusted vendors who have a reputation for creating legitimate, safe software. CCS allows unknown files which are digitally signed by one of these vendors to run. Users can also add new vendors, and change the rating of existing vendors.
Click 'Advanced Settings' > 'Security Settings' > 'File Rating' > 'Vendors List' in CCS to view the vendor list.
- See this help page to read more about CCS vendor list
- Select whether or not the file list should be available to end-users. (Default = Disabled)
- See this help page to read more about CCS vendor list
- Show Virtual Desktop settings only in the security client interface - If enabled:
- The CCS tray icon and the widget are hidden on the endpoint.
- The CCS desktop and start menu shortcuts only show virtual desktop options:
- The CCS tray icon and the widget are hidden on the endpoint.

Run Virtual Desktop - Opens the virtual desktop
Open Virtual Desktop Settings - Opens the virtual desktop settings area in CCS ('Settings' > 'Containment' > 'Virtual Desktop')
End-users cannot access any other area of CCS.
(Default = Disabled)
Note: This setting only works if 'Allow user to override Virtual Desktop settings' is disabled in the 'Containment' section of the profile. See Configure Virtual Desktop disclaimer settings at the end of this page for more details.
Rebrand the communication client (CC)
The 'Communication Client Rebranding' tab lets you change the appearance and texts of the communication client on endpoints.
- You can change the company name, support website, phone number, and email.
- You can upload replacement images for the company logo, header logo, product icons, and product logo.
- The online editor lets you preview your changes in real-time.
Rebrand CC
- Open the 'UI Settings' section of a profile
- Click the 'Communication Client Rebranding' tab then 'Edit':
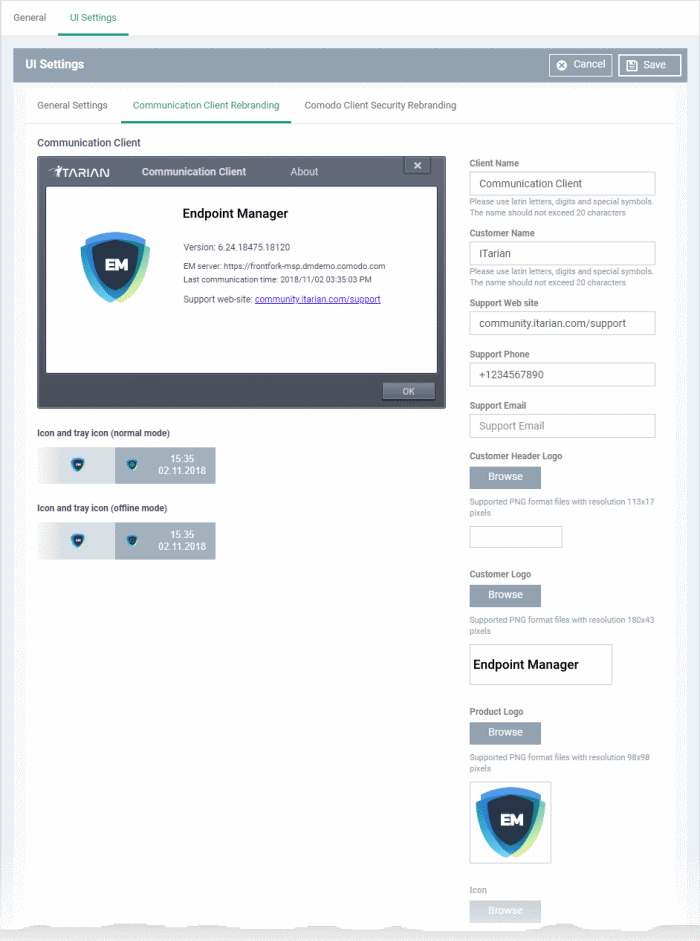

Type you replacement texts in the fields to see your changes reflected in the example image
Make sure all images you upload are the correct size and file format (.png).
- Client Name - Enter a custom label for the application.
You can use alphabetical, numeric and special characters. Maximum = 20 characters.
- Company Name - Your company name.
- Support Website - The URL of your support website.
- Support Phone - Your customer support phone number.
- Support Email - Your customer support email address.
The support website URL, phone number and the support email address are shown in the 'About' dialog of the CC application.
- Company Header Logo - Logo is shown at the top-left corner of the application window.
Accepted image size = 113 x 17 pixels
Accepted image file format = .png
- Company Logo - Logo is shown at the top of the CC 'About' dialog.
Accepted image size = 180 x 43 pixels
Accepted image file format = .png
- Product Logo - Logo is shown at the left of the CC 'About' dialog.
Accepted image size = 98 x 98 pixels
Accepted image file format = .png
- Icon - Windows start menu and shortcut icon.
Accepted image sizes = 16 x 16, 20 x 20, 32 x 32, 40 x 40, 48 x 48 and 64 x 64 pixels
Accepted image format = .ico. http://www.dihav.com/view.php?id=png2icon is a free tool to convert .png files to .ico files.'
- Tray Icon (normal mode) - Tray icon is shown when the communication client is connected to Endpoint Manager.
Accepted image sizes = 16 x 16 pixels
Accepted image file format = .png
- Tray Icon (offline mode) - Tray icon is shown when the communication client is not connected to Endpoint Manager.
Accepted image sizes = 16 x 16 pixels
Accepted image file format = .png
- Click 'Save' to apply your new design.
Rebrand the security client (CCS) and Virtual Desktop
The 'Xcitium Client Security Rebranding' tab lets you change the appearance of CCS and the Virtual Desktop. You can add your own company logos and texts to reinforce your brand in the eyes of your customers.
You can also create a disclaimer message which is shown to users when they start the virtual desktop. This is configured in the 'Containment' section of a profile. See Configure Virtual Desktop disclaimer settings at the end of this page for more details.
Rebrand CCS / Virtual Desktop interfaces
- Open the 'UI settings' section of a profile
- Click the 'Xcitium Client Security Rebranding' tab then click 'Edit':
Type your replacement text fields to see your changes reflected in the example images.

Make sure all images you upload are the correct size and file format (.png)
The changes you make here will be rolled out to all interfaces in CCS.
- Company Header Logo - Logo is shown at the top-left corner of the application window.
Accepted image size = 122 x 24 pixels
Accepted image file format = .png
- Company Logo - Logo shown in various CCS interfaces.
Accepted image size = 150 x 24 pixels
Accepted image file format = .png
- Product Logo - Logo shown on the left side of the CCS 'About' dialog.
Accepted image size = 106 x 106 pixels
Accepted image file format = .png
- Widget Caption - Logo shown on the header of the CCS desktop widget.
Accepted image size = 189 x 28 pixels
Accepted image file format = .png
- Icon - Windows start menu and shortcut icon. Also shown in various other interfaces of the application.
Accepted image sizes = 16 x 16, 20 x 20, 32 x 32, 40 x 40, 48 x 48 and 64 x 64 pixels
Accepted image format = .ico. http://www.dihav.com/view.php?id=png2icon is a free tool to convert .png files to .ico files.'
- Client Name - Enter a custom name for the application. This is shown in the interface itself and used as the product name in the Windows 'Start' menu.
You can use letters, numbers and special characters. Maximum = 20 characters.
Xcitium Virtual Desktop
- Client Name - Enter a custom name for the application. This is shown in the interface itself and used as the product name in the Windows 'Start' menu.
You can use letters, numbers and special characters. Maximum = 25 characters.
- Wallpaper icon - Shown at the center of the virtual desktop main screen.
Accepted image size = 128 x 128 pixels
Accepted image file format = .png
- Wallpaper image – Shown as the desktop background for the virtual desktop.
Accepted image size = 1920 x 1200 pixels
Accepted image file format = .png
- Start menu icon - Windows start menu and shortcut icon.
Accepted image size = 32 x 32 pixels
Accepted image file format = .png
- Widget icon - Logo shown on the header of the virtual desktop widget.
Accepted image size = 24 x 24 pixels
Accepted image file format = .png
- Click 'Save' to apply your new design.
Configure Virtual Desktop disclaimer settings
- Endpoint Manager can show a disclaimer whenever the virtual desktop starts automatically or is manually opened by a user. You can customize the text of this disclaimer, or disable it entirely.
- This section explains how to create a custom disclaimer for virtual desktop
- See How to configure virtual desktop settings in a Windows profile for more help on virtual desktop settings.
Set a custom Virtual Desktop disclaimer
- Click 'Configuration Templates' > 'Profiles'
- Click the ‘Profiles’ tab
- Open the Windows profile applied to your target devices
- Open the 'Containment ' tab
OR
- Click 'Add Profile Section' > 'Containment', if it hasn't yet been added
- Open the 'Containment ' tab
- Click the 'Virtual Desktop' tab
- Click 'Edit'

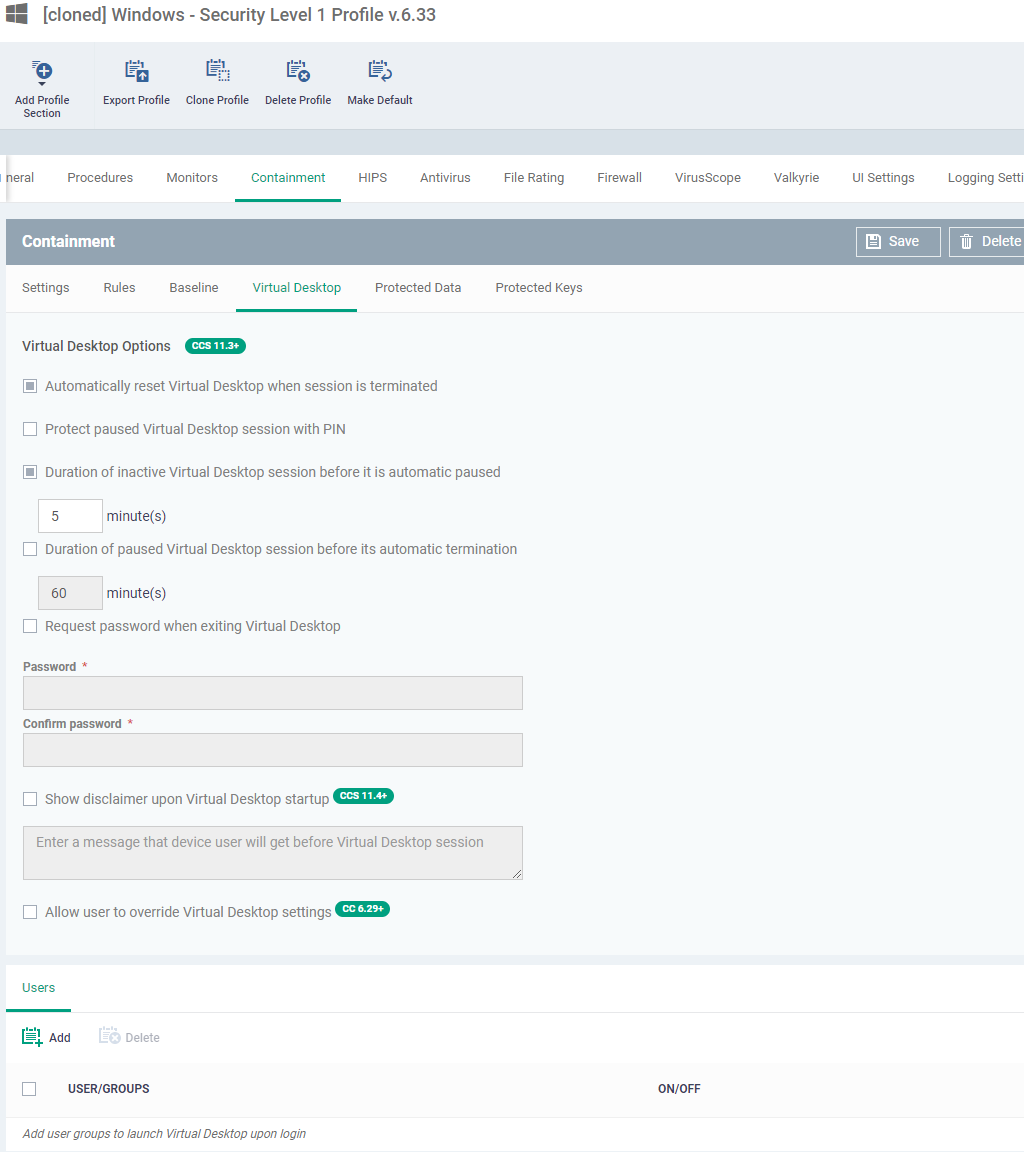
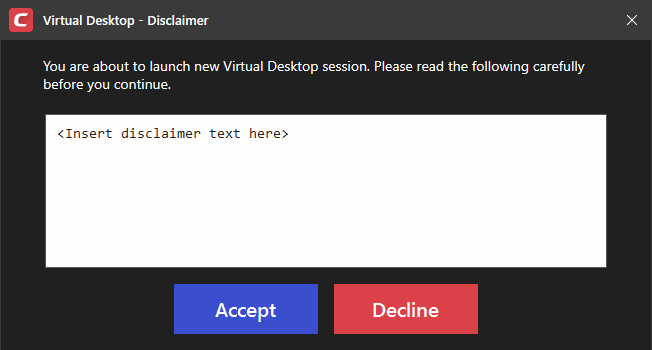
- Show disclaimer upon Virtual Desktop startup - Create a disclaimer which is shown when the virtual desktop starts. Users must accept the disclaimer before they can access the virtual desktop.
Enter the disclaimer message
The message is shown when the virtual desktop starts.

- Allow user to override Virtual Desktop settings – Any changes made to virtual desktop settings in CCS at the local endpoint are not reversed by Endpoint Manager.
By default, EM checks devices to see if the local CCS settings match those in the profile. It will re-implement the profile settings if it detects any deviation.
Enabling this option stops the process described above. The EM profile does not apply any virtual desktop settings. Only the local virtual desktop settings in CCS on the endpoint are applied to the device.
Note: You must disable 'Allow user to override Virtual Desktop settings' if you want to enforce 'Show Virtual Desktop settings only...' in the ‘UI Settings’ section of a profile.
Click 'Save' for your settings to take effect.


---