How to view, assign, schedule and manage tickets
Click 'Staff Panel' > 'Tickets'
- The tickets area lists all submitted tickets along with their status, priority and assignee
- You can respond to tickets, assign tickets to technicians, schedule tickets, view ticket materials and more
- The interface also lets you create a new ticket on behalf of a user
Use the following links for help with various tasks:
- Overview of the interface
- Add / remove columns
- View a short summary of a ticket
- Assign tickets to staff
- Schedule a ticket
- Edit, reassign, or add collaborators to a ticket
- View ticket materials and expense items
- View, respond and take action on a ticket (external wiki)
- Close / reopen tickets
- Create a ticket on behalf of a user (external wiki)
- Delete tickets
- Generate ticket reports
- Open the staff panel (See the last link on the left)
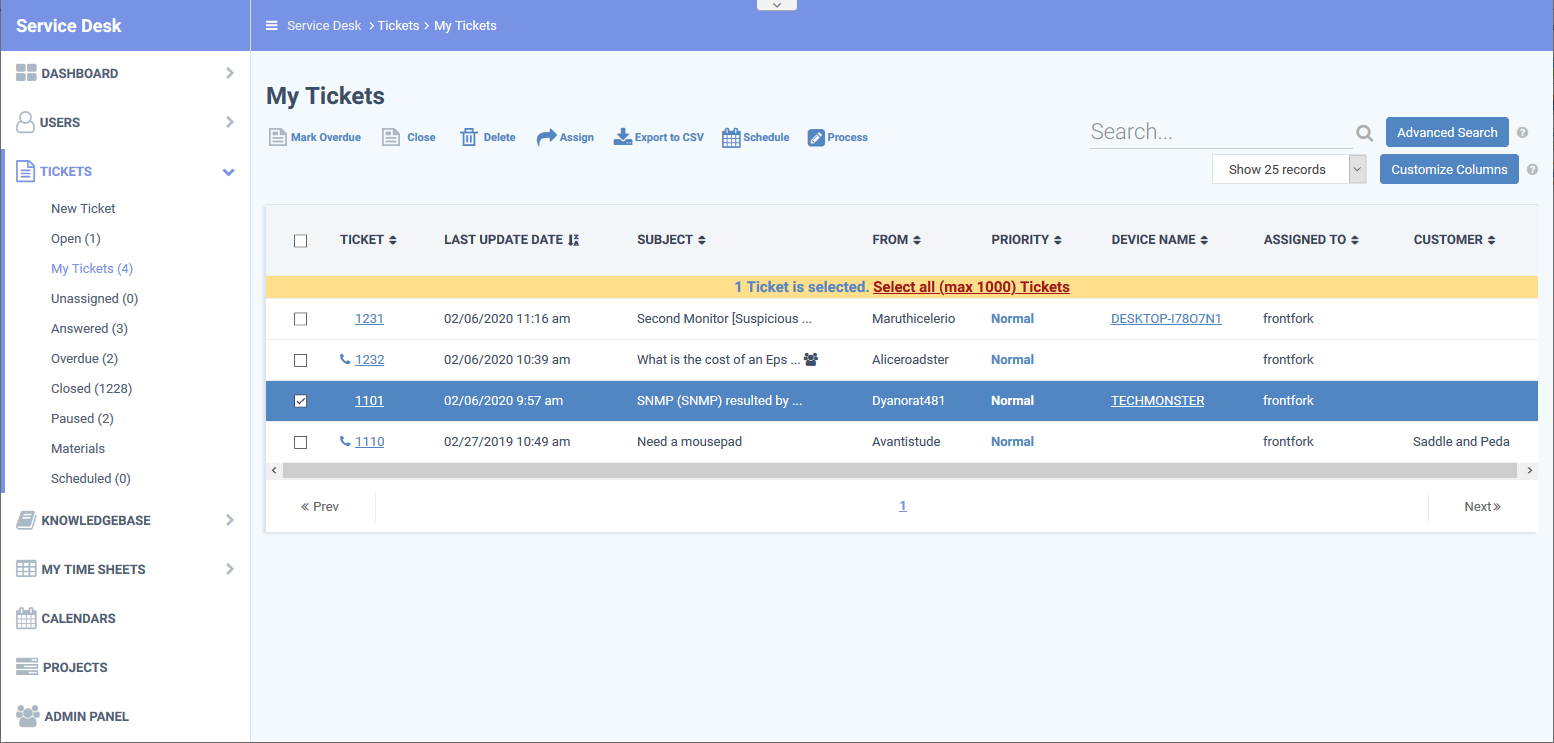
- Click 'Tickets' on the left then click 'Open' (to see all open tickets)
- Alternatively, select one of the other ticket categories:
My Tickets
Unassigned
Answered
Overdue
Closed
Scheduled
Paused

- New Ticket - Create a ticket on behalf of a user. See 'How to create a new ticket on behalf of a user' if you need help with this.
- Open - Tickets that are not yet resolved. Click the ticket number to answer, transfer, reassign or schedule the ticket.
- My Tickets - Tickets assigned to the person who is currently logged-in. Click the ticket number to answer, transfer, reassign, schedule, or register time-spent on a ticket.
- Unassigned - Tickets that have not yet been assigned. Admins can assign tickets to staff by clicking the ticket number then the 'Assign' link. See 'Assign tickets to a staff member' for more details.
- Answered - Tickets for which there has been at least one reply. Click the ticket number to review, reassign, transfer and more.
- Overdue - Tickets that were not closed within the period specified in the SLA.
- Closed - Tickets that are finished/complete. Click the ticket number to review, reopen, reassign etc.
- Scheduled - Tickets that have a set time by which they should be started and/or finished. The schedule is shown on the staff member's calendar. Click the ticket number to answer, re-assign, transfer, re-schedule, etc.
- Paused - Tickets that are not being worked on at the current time. The ticket can be resumed by the staff member assigned to the ticket, or by an admin. Click the ticket number then 'Resume' to do this.
- Materials – View material costs and other expenses added to tickets by staff. Material costs must be approved by an admin. See View materials/expense items added to a ticket for more on this.
The columns you see depend on the filters you have chosen, and you can modify columns by clicking the 'Customize Columns' button. The following is a list of ALL possible columns:
- Ticket - The number assigned to the ticket. Click the ticket number to open the 'Ticket Details' screen.


- Last Update Date - Date and time the ticket was created, re-opened, updated or closed.
- Subject - A brief description of the issue.
- The subject is usually chosen by the user or staff member who created the ticket.
- Tickets that were auto-created by another Comodo One / Dragon module will simply state the name of the module responsible. For example, 'RMM Generated Ticket'.
- The
icon indicates that one or more collaborators have been added to the ticket CC list
- The subject is usually chosen by the user or staff member who created the ticket.
- From - The name of the user who created the ticket, or on whose behalf the ticket was created.
- Priority - The criticality of the ticket.
- Ticket priority depends on the settings in 'Ticket Category', 'Department' and 'Ticket Filters'.
- Tickets sent in by email can have their priority set by the sender's mail client. This has to be enabled in 'Admin Panel' > 'Settings' > 'Emails'.
- If no custom settings apply, then tickets are given the default priority of 'Normal'.
- Ticket priority depends on the settings in 'Ticket Category', 'Department' and 'Ticket Filters'.
- Device Name - The endpoint which generated the ticket.
- This is only shown for tickets auto-created by Endpoint Manager.
- Click the device name to view more details about the device.
- See https://help.comodo.com/topic-459-1-1005-14892-View-Summary-Information.html if you need more information about the device details screen.
- This is only shown for tickets auto-created by Endpoint Manager.
- Assigned to - The text of this column header depends on the ticket status. For example, for 'Unassigned' tickets the column header will be 'Department'.
- Assigned to: The name of the staff member to whom the ticket is assigned
- Department: The name of the department to which the ticket is assigned
- Assigned to: The name of the staff member to whom the ticket is assigned
- Customer - The company of the user who raised the ticket
- Source - The channel through which the ticket was created. Possible channels are:

Phone
Other
Web
API
- Ticket Category - The help topic on which the user requested support. See How to manage ticket categories for more on this.
- Department - The department in your organization to which the ticket is assigned
- Due Date - The date and time by which the ticket should be closed.
- Closed By - Staff member who closed the ticket.
- Status - Ticket progress. Possible values are:
Open
Answered
Overdue
Closed
Paused
- Overdue - Indicates the ticket was not closed by its due date.
- Answered - Indicates whether or not a response has been given to the user.
- Asset - The product, service, or item that the ticket concerns.
- Category (Ticket Type) - Type of request that the ticket concerns. The possible values are:
Alert
Order
Problem
- Sub-category - Specific issue type as chosen by the person who created the ticket. For example, 'Overheating' may be a sub-category of 'Problem'.
- Scheduled Time - Date and time at which the ticket will be started.
- First Reply - Date and time of the first response to the user.
The columns you see on the right depend on the ticket filter chosen on the left. You can add columns if you want to view additional details or hide columns as required.
- Click the 'Customize Columns' button:

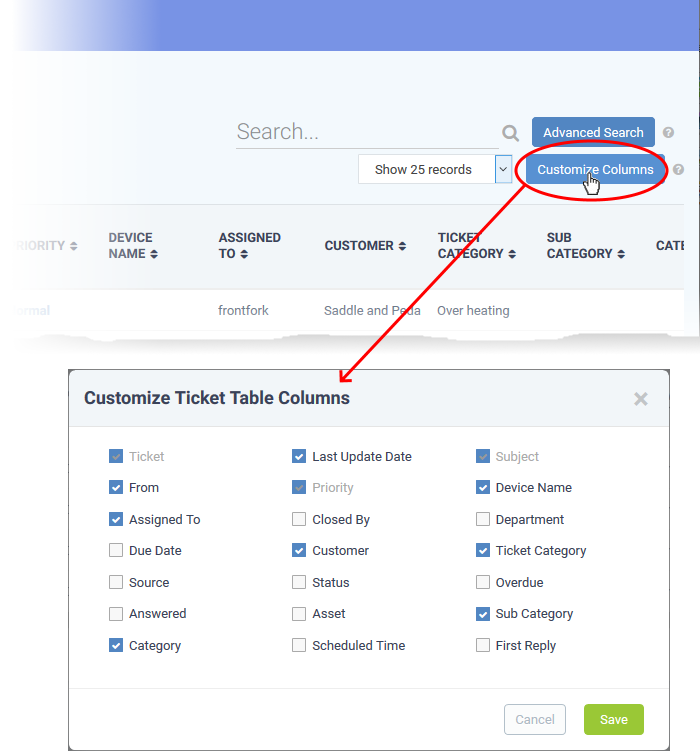
- Use the check-boxes to enable or disable columns as required
- Certain columns are mandatory for certain views
- Click 'Save' to add/remove the selected columns to the list
View a short summary of a ticket
- Place your mouse over a ticket to view brief details:
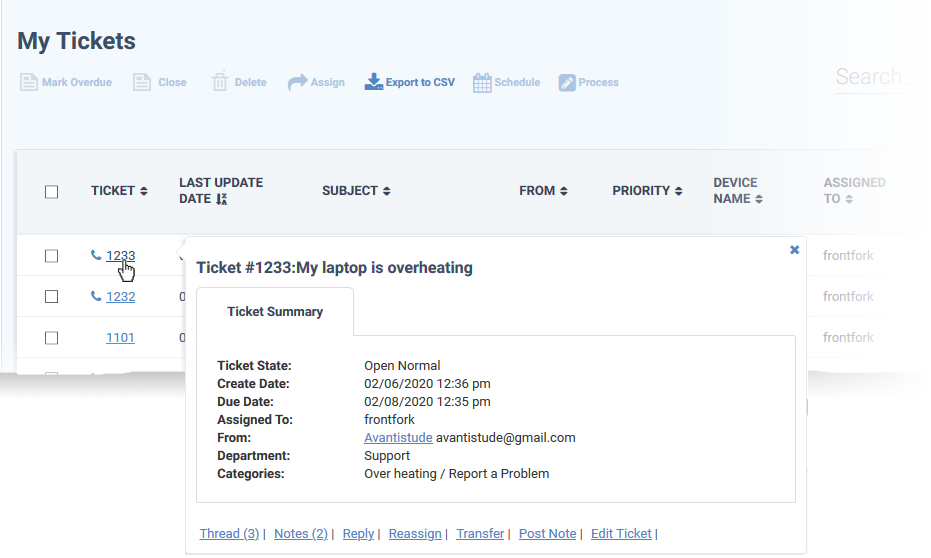

- The links at the bottom allow staff to manage the ticket.
- See 'How to view and take actions on a ticket' for more details.
Assign tickets to a staff member
- Admins can assign tickets to staff from the 'Tickets' interface.
- The ticket will appear in the 'My Tickets' area of the person to whom it is assigned.
Assign tickets
- Open the 'Staff' panel (see the last link on the left)
- Click 'Tickets' then a ticket type ('Open', 'Unassigned', 'Overdue', etc)
- Select one or more tickets then click 'Assign'
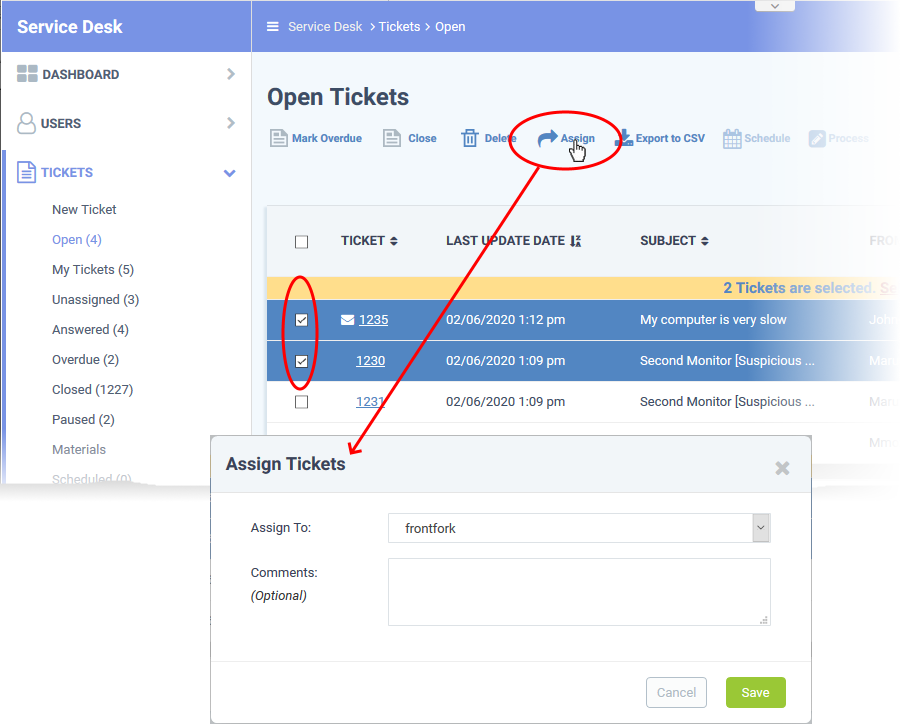

- Assign to - Select the admin/staff member to whom you want to assign the ticket
- Comments (Optional) - Enter task notes, instructions, or a reason you assigned the ticket to this person. The comment is added as an internal note on the ticket.
Click 'Save'
- Scheduled tickets are useful for tasks that will start at a set time in the future. For example, a site visit or scheduled maintenance.
- The schedule is added to the calendar of the currently logged-in admin/staff.
- The ticket is automatically assigned to the person who creates the schedule, even if it is currently assigned to someone else.
Create a schedule for a ticket
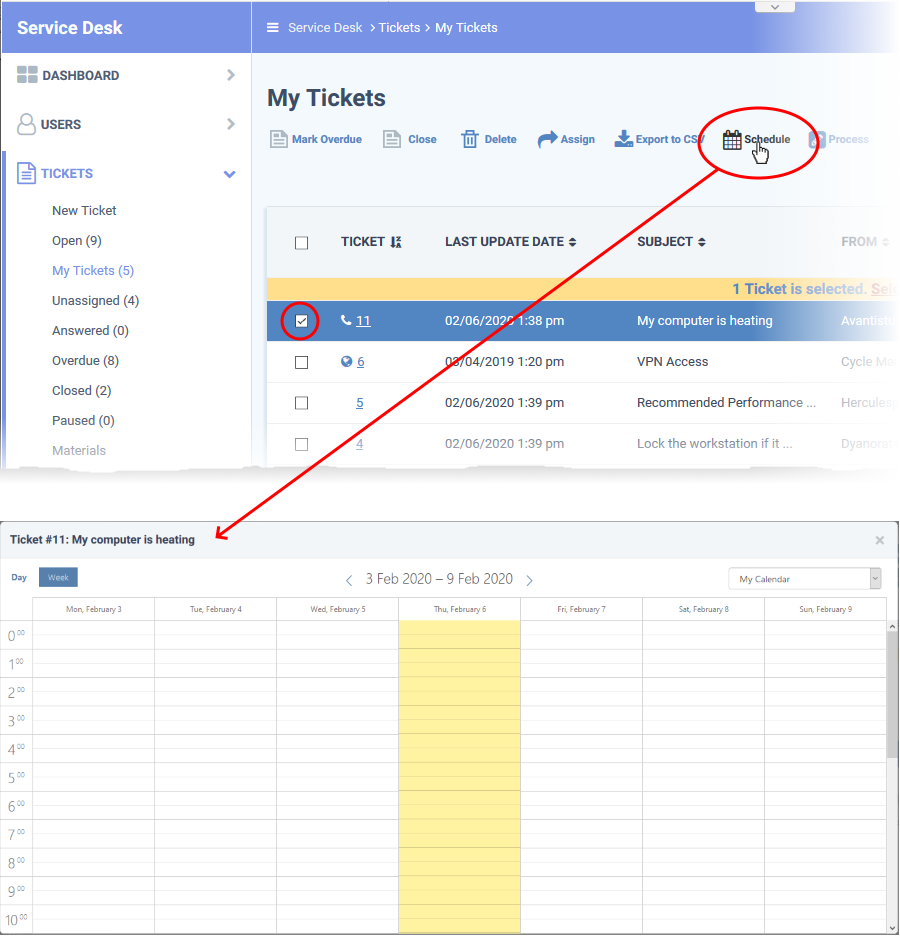
- Open the 'Staff' panel (see last link on the left)
- Click 'Tickets' then a ticket type ('Open', 'Unassigned', 'Overdue', etc)
- Select a ticket and click 'Schedule' at the top.
- The calendar for the currently logged-in admin/staff opens. The ticket details are shown on the title bar:

- The current week is shown by default. Use the '>' button to move to the next week/day
- Double-click the cell that represents the time slot you want for the ticket
- Enter a short description of the task.

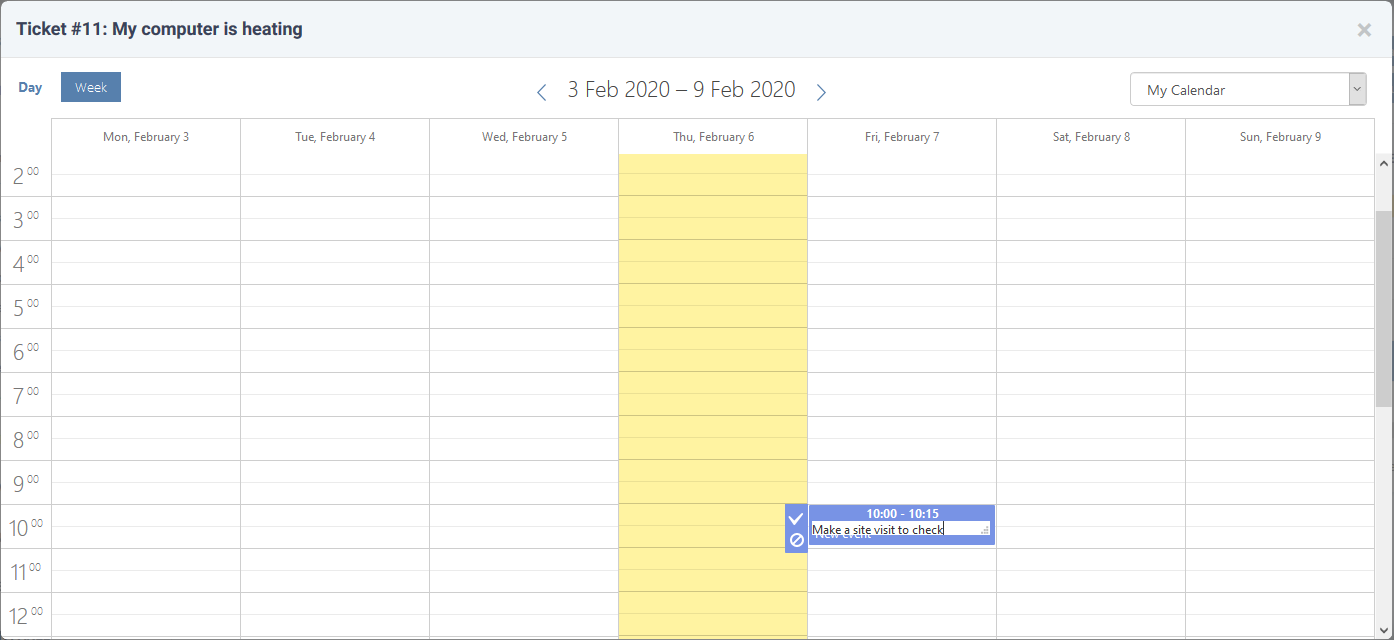
- Click the check-mark
to save the schedule
- The appointment is added to the calendar. You can view your calendar from the 'My Calendar' interface.
- The ticket is moved to the list under the 'Scheduled' category on the left.

Edit, reassign, or add collaborators to a ticket
- The 'Process' feature lets you reassign a ticket, update user information, change ticket category/department, add collaborators, and more.
- This feature is available for all ticket categories except closed tickets.
Use the process option
- Open the 'Staff' panel (see last link on the left)
- Click 'Tickets' then a ticket type ('Open', 'Unassigned', 'Overdue', etc)
- Select a ticket and click 'Process' at the top:


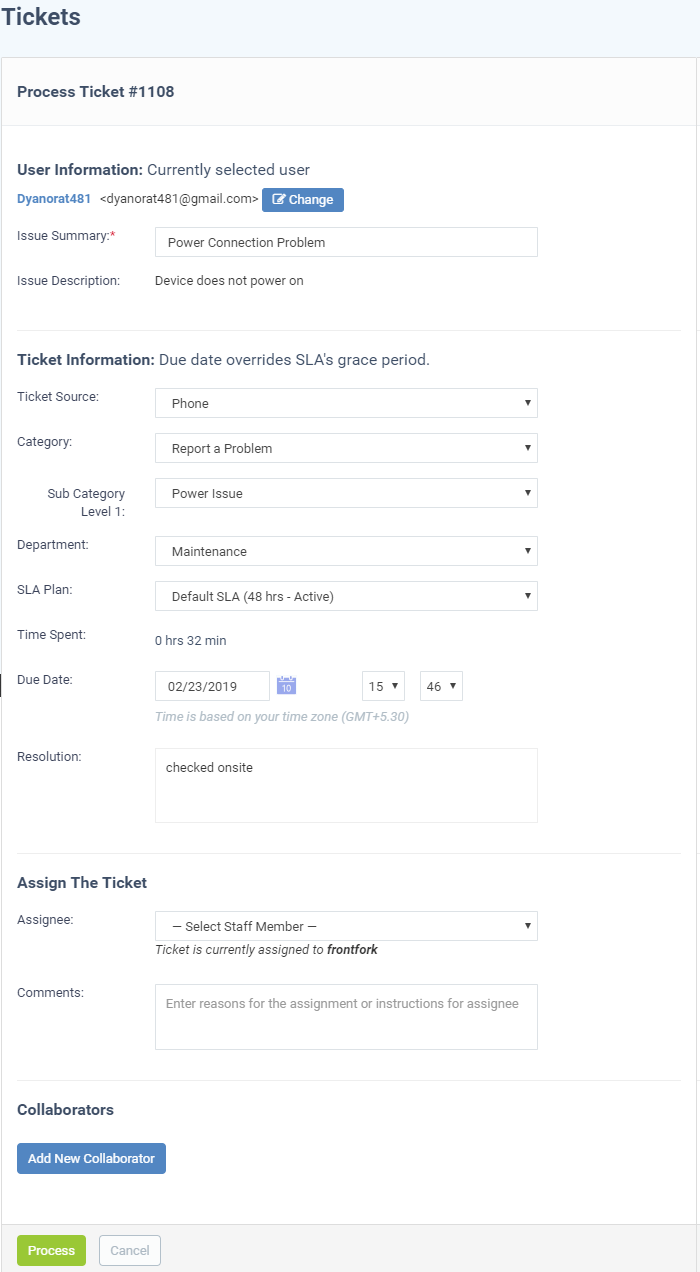
User Information
- User name - The person who submitted the ticket or for whom the ticket was created. This is is pre-populated. Click 'Change' to select a different user.
- Issue Summary - Brief description of the issue. Update if required.
- Issue Description - Ticket description provided by the creator of the ticket. This is not editable.
Ticket Information
- Ticket Source - The channel through which the ticket was created. The options available are 'Phone', 'Email', 'Web', 'API' and 'Other'. This is pre-populated and can be updated if required
- Category - The help topic under which this ticket falls. This is pre-populated and can be updated if required.
- Sub Category - Specific issue type as chosen by the person who created the ticket. For example, 'Overheating' may be a sub-category of 'Problem'.
- Department - The department to which to the ticket is currently assigned. This is pre-populated and can be updated if required.
- SLA Plan - The service level plan associated with the ticket. Use the drop-down menu to change the plan if required. The option chosen here will prevail even if the SLA plan for the 'Ticket Category' and 'Department' is different.
- Time Spent - Cumulative time spent on the ticket by all contributing staff members. This total includes time recorded automatically during a session and time manually added by administrator/staff.
- Due Date - The date and time by which the ticket should be closed. Change the date and time if required. This will override the date generated by default.
- Resolution - A description of the fix/solution. This could also be a description of the steps taken so far, and those that remain. This is set by the staff member attending to the ticket. Change the resolution if required.
Assign the Ticket
- Assignee - Person who is currently responsible for the ticket. You can change the assigned staff member if required.
- Comments - Enter instructions for the assignee or reasons for the assignment.
Collaborators
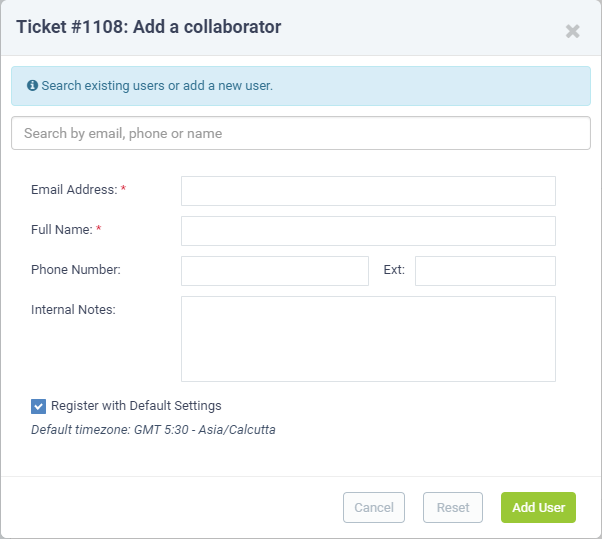
- Add people who also worked on the ticket as additional recipients for ticket updates.
- Click 'Add New Collaborator' to associate new or existing users with the ticket.
- Type the first few letters of username/email address of existing users in the 'Search' box at the top and select the user to add an existing user/staff
- Enter the email address, full name and other details, to add a new user.
- Click 'Add User'
- Type the first few letters of username/email address of existing users in the 'Search' box at the top and select the user to add an existing user/staff
- Repeat the process to add more collaborators
- Click the 'Process' button after you have made your changes. The ticket is updated per the new details.

View ticket materials and expense items
- Staff can add materials and expense items to a ticket if they were required to resolve the issue.
- Admins must approve these items. Once approved, they will be billed to the customer.
- The 'Materials' screen lets you all view materials / expenses added to the tickets, along with their approval status.
View ticket materials/expenses
- Click 'Tickets' on the left then select 'Materials':

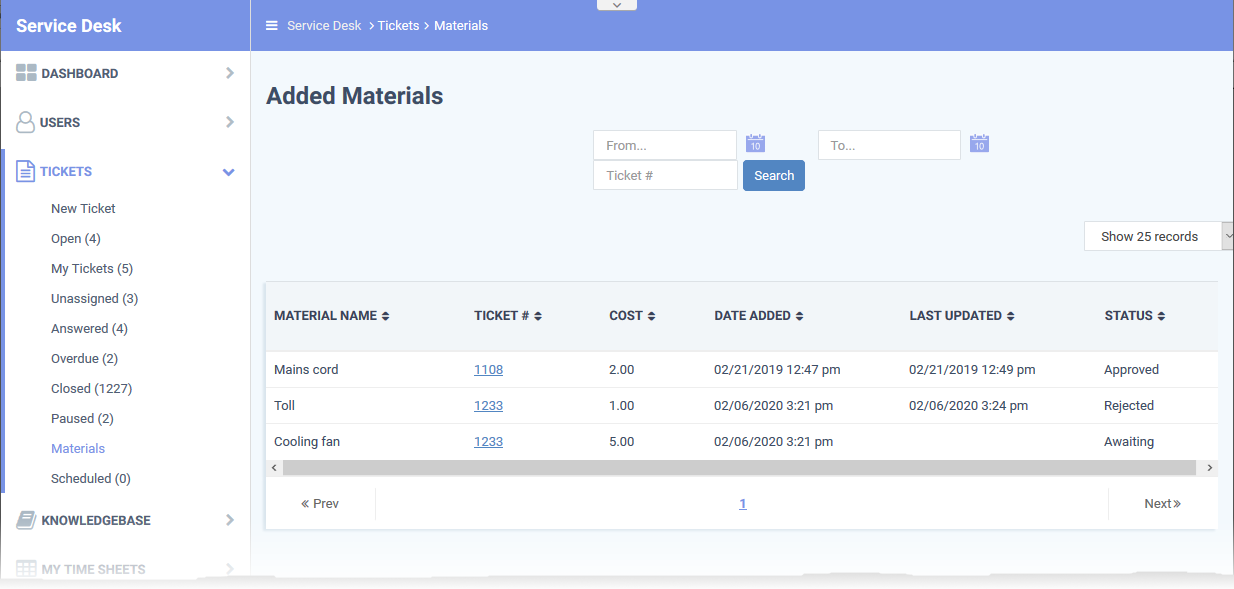
- Material Name - The label of the component used or the expense incurred
- Ticket # - The number of the ticket to which the material or expense item was added. Click the ticket number to view or update the ticket.
- Cost - The cost of the material/expense item as entered by the staff member
- Date Added - The date and time at which the item was added to the ticket
- Last Updated - The date and time at which the item details were last updated by the staff member
- Status - Indicates whether the material/expense was approved by the administrator. The possible states are:
- Awaiting - The expense item has been added to a ticket but has not yet been approved by an administrator.
- Approved - The expense item has been added to a ticket and approved for billing by an admin.
- Rejected - The expense item has been rejected by an administrator.
- You can close tickets if all tasks are complete. All billable time will be assigned to the customer.
- If required, you can also reopen closed tickets.
Close tickets
- Open the 'Staff' panel (see last link on the left)
- Click 'Tickets' then a ticket type ('Open', 'Unassigned', 'Overdue', etc)
- Select the tickets you want to close
- Click 'Close'

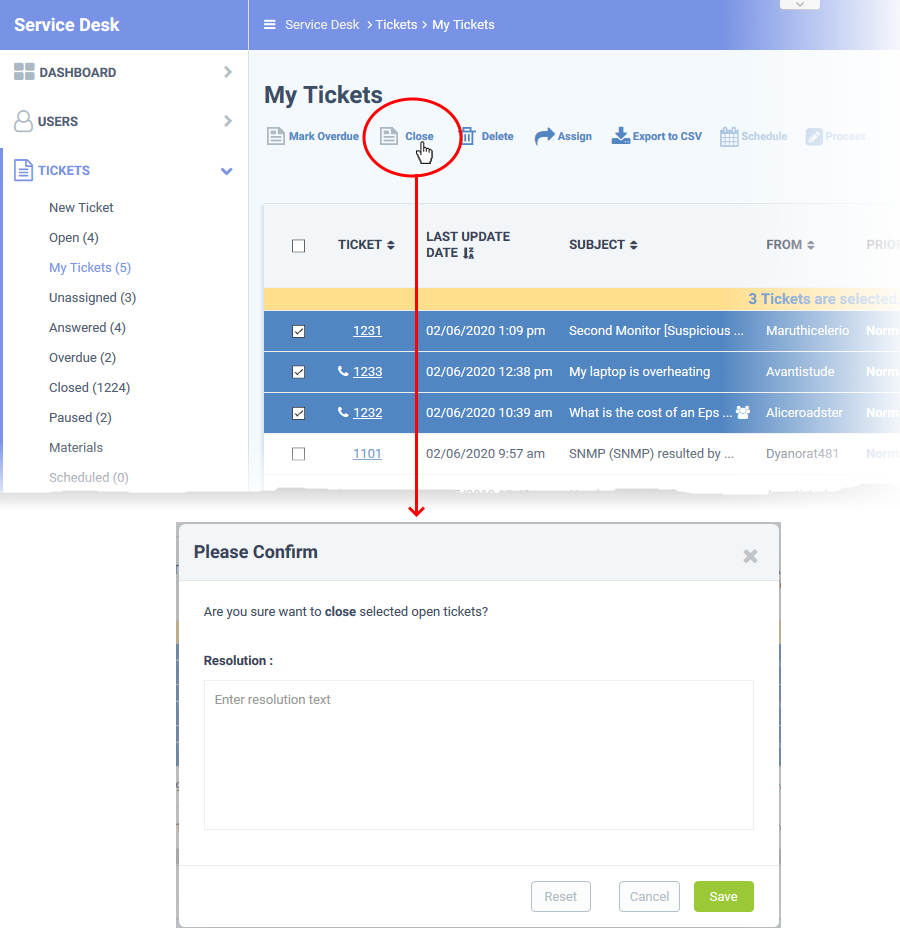
- Enter the resolution message for closing the ticket.
- Click 'Save'.
The ticket is updated with the resolution message. The ticket is moved to the 'Closed' category.
Reopen closed tickets
- Open the 'Staff' panel (see last link on the left)
- Click 'Tickets' then select 'Closed'
- Select the tickets you want to reopen
- Click 'Reopen'
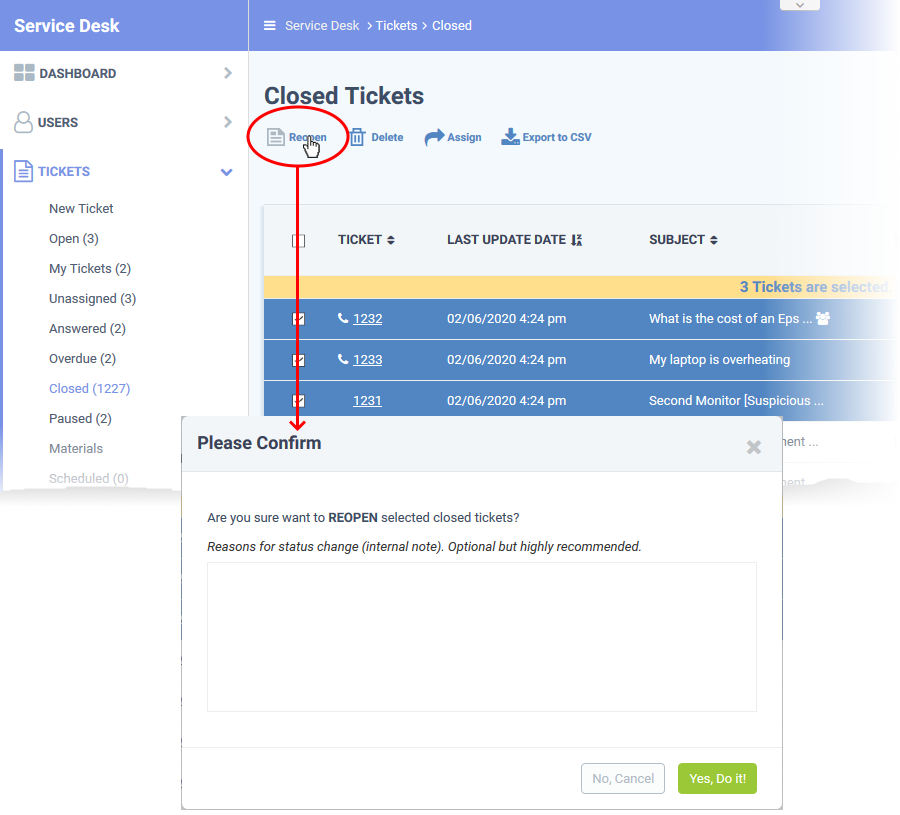

- Enter the reason for reopening the tickets and click 'Yes, Do it!'
- The message is added as internal note to the tickets
- The status of the tickets is changed to 'Open' and automatically assigned to the currently logged-in staff/admin.
- Open the 'Staff' panel (see last link on the left)
- Click 'Tickets' then a ticket type ('Open', 'Unassigned', 'Overdue', etc)
- Select the tickets you want to remove from Service Desk
- Click 'Delete'

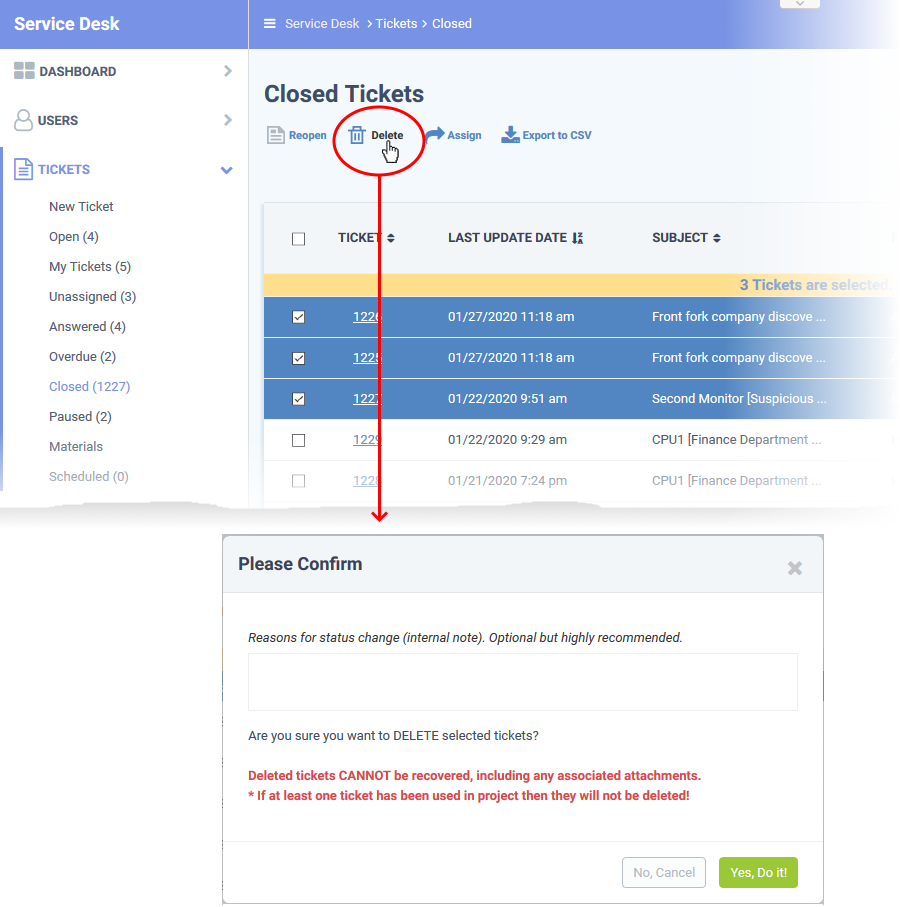
- Enter the reason for removing the tickets (optional).
- Click 'Yes, Do it!' to confirm removal.
- Note – Deleted tickets cannot be recovered.
Export tickets list to a CSV file
- You can save the list of tickets as a comma separated value (CSV) file for archiving and analysis purposes.
Generate a tickets report
- Open the 'Staff' panel (see last link on the left)
- Click 'Tickets' then a ticket type ('Open', 'Unassigned', 'Overdue', etc)
- Click 'Export to CSV' at the top
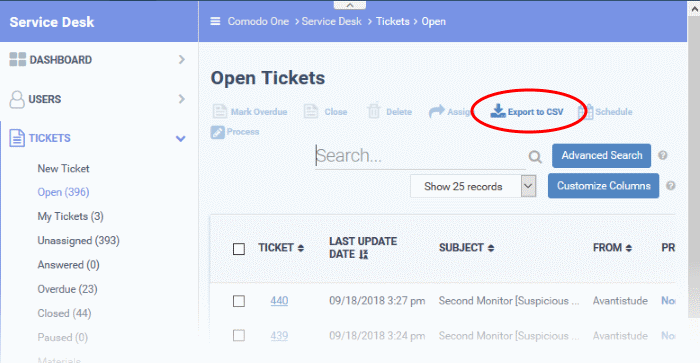

.csv files are best viewed in spreadsheet applications like Microsoft Excel and OpenOffice Calc.


---