How to configure port sets in a Windows profile
Click ‘Configuration Templates’ > ‘Profiles’ > click the name of a Windows profile > 'Add Profile Section' > 'Firewall' > 'Portsets'
-
A port set is a collection of one or more ports that you can reference in a firewall rule.
-
For example, you could create a group called ‘Outgoing Mail Ports’, which consists of port numbers 25, 465, 587, 2525 and 4065. You can then control traffic to all 5 ports by simply selecting the ‘Mail Ports’ group in a firewall rule.
-
Portsets can be made up of individual port numbers or port ranges.
-
This article explains how to configure a custom portset in Endpoint Manager.
Manage portsets
-
Login to Xcitium
-
Click 'Applications' > 'Endpoint Manager'
-
Click ‘Configuration Templates’ > ‘Profiles’
-
Open the Windows profile applied to your target devices
-
Open the 'Firewall' tab if it has already been added to the profile
OR -
Click 'Add Profile Section' > 'Firewall' if it hasn't yet been added:
-
-
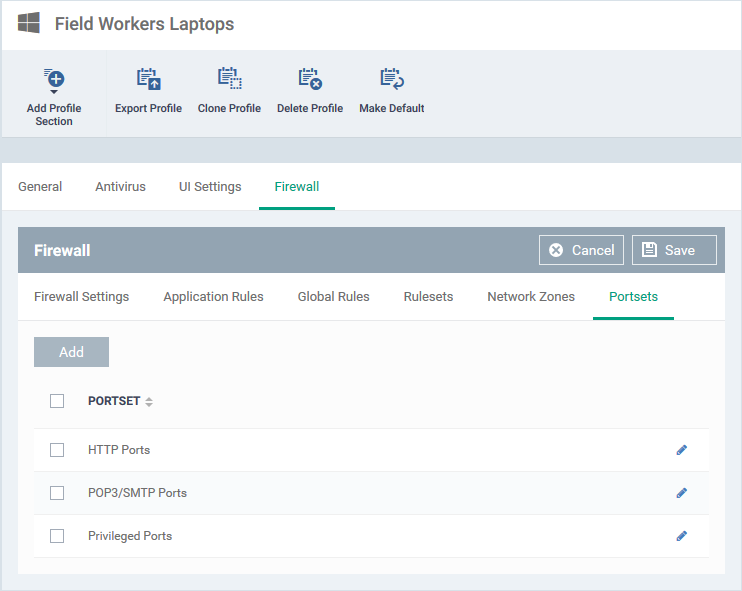
Click the 'Portsets' tab:
-
Endpoint Manager ships with three default portsets:
-
HTTP Ports: 80, 443 and 8080. These are the ports typically used for http traffic. Internet browsers uses these ports to connect to the internet.
-
POP3/SMTP Ports: 110, 25, 143, 995, 465 and 587. These ports are typically used to send/receive email. For example, by mail clients like Outlook and Thunderbird.
-
Privileged Ports: 0-1023. Privileged ports are so called because it is usually desirable to prevent users from running services on these ports. Network admins usually reserve or prohibit the use of these ports.
-
-
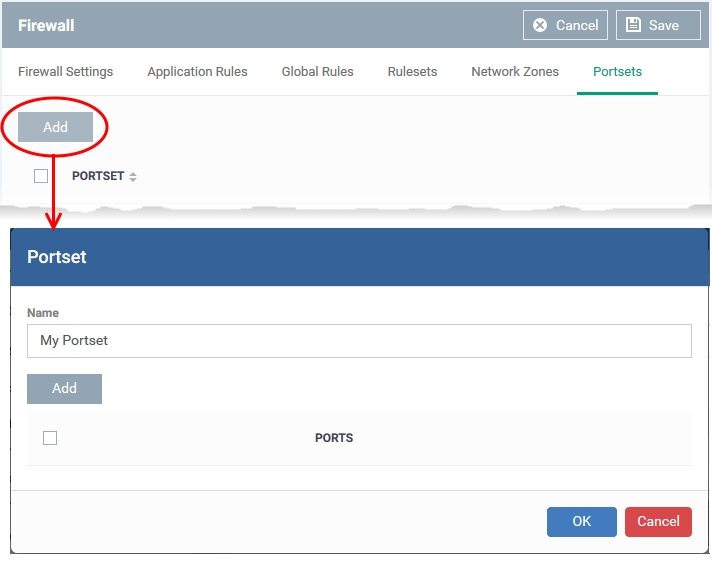
Click 'Add' to create a custom portset
-
Name - Enter a label for the custom portset. Once saved, the portset name will become available for selection in the firewall rule interfaces.
-
-
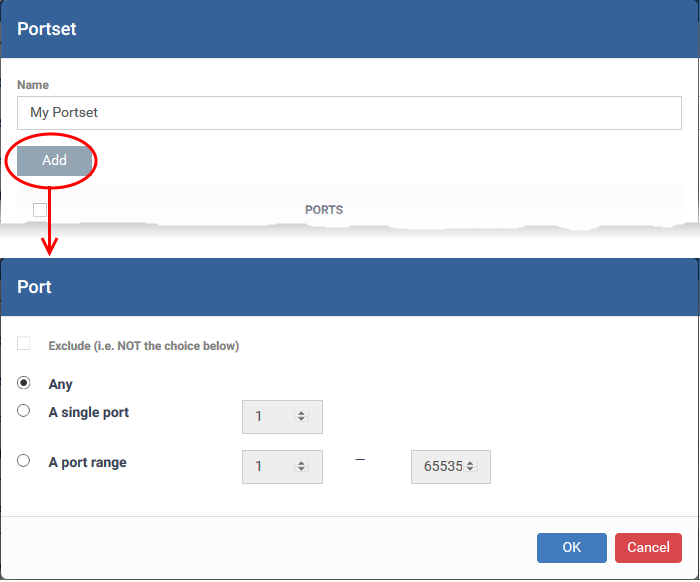
Click 'Add' to specify the ports you want to include in the set:
- Select your ports then click ‘OK’. Repeat the process to add more ports to the set.
- Any - Include all port numbers (1 - 65535)
- A single port – Enter the required port number in the box
- A port range - Enter the start and end port numbers in the respective boxes
- Exclude (i.e. NOT the choice below): Removes the port numbers you select from the port set.
You can use this to create exceptions within a port set. For example, say you wanted the set to address ports 1 – 200, but not port 50. First, click ‘Add’, specify a port-range of 1 – 200, then click ‘OK’. Next, click ‘Add’ again, enable ‘Exclude, specify port 50 , click ‘OK’. Your set would look like this:
- Any - Include all port numbers (1 - 65535)
-
Click 'OK' in the 'Port' dialog. The ports will be added to the new portset in the 'Portset' interface.
-
Click 'OK' in the 'Portset' dialog to add the set to the profile.
The portsets will be available for selection when you choose 'A set of ports' as source / destination port while creating or editing a firewall rule, to impose access restriction to the ports, on the devices applied with this profile.
- See How to configure internet access rights for applications via Endpoint Manager if you need details on constructing firewall rulesets for applications / file groups
- See How to create a custom firewall rule set in a Windows profile if you need details on creating firewall rules for a custom ruleset.
- See How to add global rules to firewall in a Windows profile for help to create global rules.
- Click the pencil icon beside a portset to edit its details.
Further Reading:
How to configure general firewall settings in a Windows profile
How to configure internet access rights for applications via Endpoint Manager
How to add global rules to firewall in a Windows profile
How to create a custom firewall rule set in a Windows profile


