How to run virus scans on devices from the security sub-systems menu
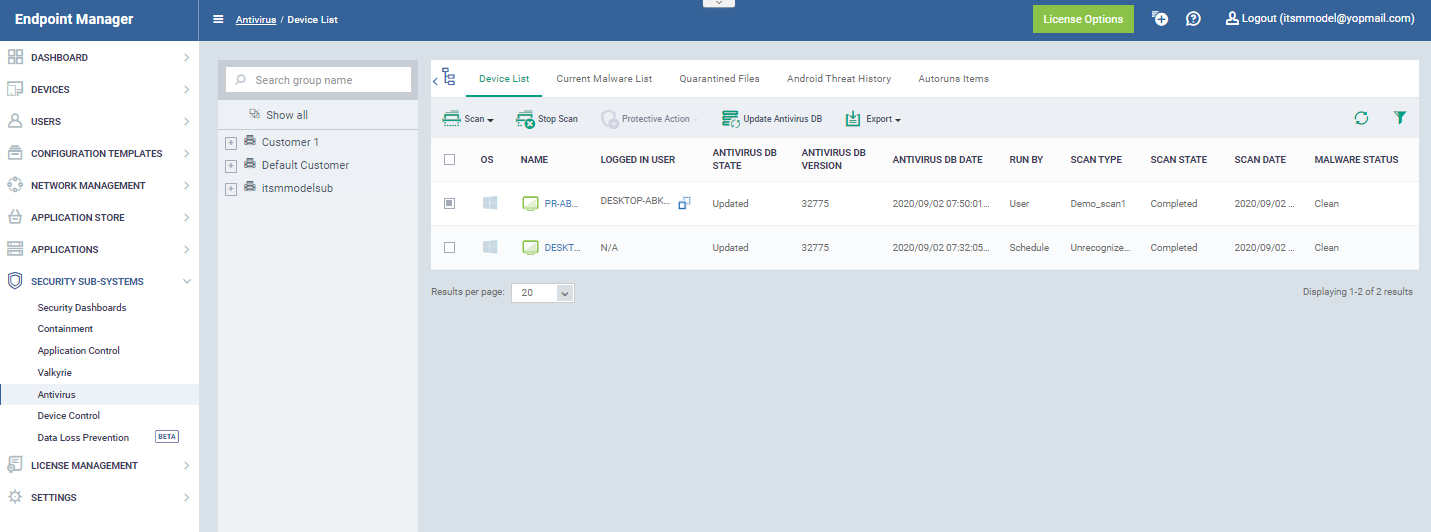
Click 'Security Sub-Systems' > 'Antivirus' > 'Device List' tab
- The ‘Device List’ shows all managed endpoints on your account along with their virus scan status.
- You can also manually run virus scans on target devices, update the virus database, and clean infected endpoints.
- Note. This area lets you run on-demand scans only. If you want to set up a scheduled scan instead, then please configure the ‘Antivirus’ section of the device profile.

Open the device list
- Log into Xcitium
- Click ‘Applications’ > ‘Endpoint Manager’
- Click 'Security Sub-Systems' > 'Antivirus'Click the 'Device List' tab
- Click the 'Device List' tab
- Select the devices you want to scan. They can be a mix of operating systems.
- Click the ‘Scan’ button, then choose the type of scan you want to run:

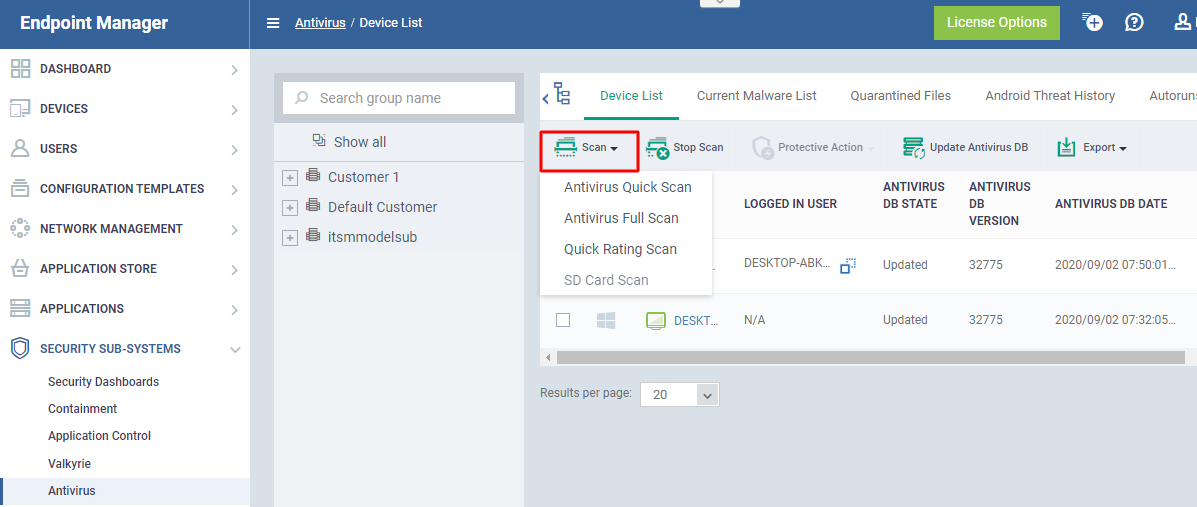
You can choose from the following types of scan:
- Full Scan - Scans every local drive, folder, and file on the device. The scan also covers any connected devices like USB sticks and external storage drives.
- Quick Scan - Scans critical areas of the device which are often targeted by viruses, rootkits, and other malware. Areas scanned include important files/folders and registry keys, system memory, auto-run entries, hidden services and boot sectors.
- SD Card Scan - Scans all files on secure digital (SD) memory cards attached to Android devices.
- File Rating Quick Scan - A cloud-based scan to determine the trust level of files on the device. The 'Quick’ scan checks the rating of files in commonly infected areas.
The possible file ratings are:
- Trusted - The file is safe to run on the device.
- Bad - The file is malware and should be removed or quarantined.
- Unknown - No trust rating is available for the file. Under normal conditions, ‘Unknown’ files are run in the container until their trust rating has been established.
- Trusted - The file is safe to run on the device.
The scan will commence immediately after you select the scan type. Scan progress for each device is shown in the 'Last Scan State' column.
You can also take the following actions from this interface:
- Protective Action - Applies to infected devices only (see the ‘Malware Status’ column’). This button lets you remove, ignore or quarantine all sources of infection on selected devices. The action you choose here applies to every piece of malware of the device. Alternatively, click the ‘Infected’ link to deal with each piece of malware separately.
- Update Antivirus Database - As the name suggests, these buttons let you install the latest virus database on all selected devices.
- Export - Select 'Export to CSV'. The CSV file is available in 'Dashboard' > 'Reports'. See this wiki page if you need help to download the report.
Columns:
-
OS - The operating system of the device.
-
Name - The label of the device on which the scan was run
-
If no name was assigned then the model number of the device is used.
-
Gray text color shows the device has been offline for the past 24 hours.
-
Click the name of the device to open its device details interface.
-
-
Logged in User - The name of the user currently signed-in to the device.
-
The user name is prefixed with the active directory (AD) domain or workgroup that the user is currently logged-in to:
-
Active Directory - Name is shown as <AD domain name>/<user name>
-
Workgroup - Name is shown as <workgroup name>/<user name>
-
No network - Name is shown as <device name>/<user name>
-
-
Click the icon
to copy the username to the clipboard.
-
-
Antivirus DB State - The update status of the virus signature database on the device.
-
Antivirus DB Version - The version number of the virus signature database on the device.
-
Antivirus DB Date - The date and time at which the AV database was last updated.
-
Run By - The source that initiated the last scan. An antivirus scan or a file rating scan can be initiated in the following ways:
-
Portal - Manually run by an admin from the EM interface.
-
User - Manually run by the end-user at the device itself.
-
Scheduled - Automatically run as per the schedule defined in the configuration profiles effective on the device.
-
-
Scan Type - Indicates the kind of the last scan ran on the device. The possible types of scan are:
-
Antivirus Full Scan - Applies to Windows, Mac OS and Android devices.
-
Antivirus Quick Scan - Applies to Windows, Mac OS and Android devices.
-
File Rating Quick Scan - Applies only to Windows devices.
-
Manual Scan - Applies to Windows and Mac OS devices
-
SD Card Scan - Applies only to Android devices.
-
Custom Scan Name - Applies to Windows and Mac OS devices
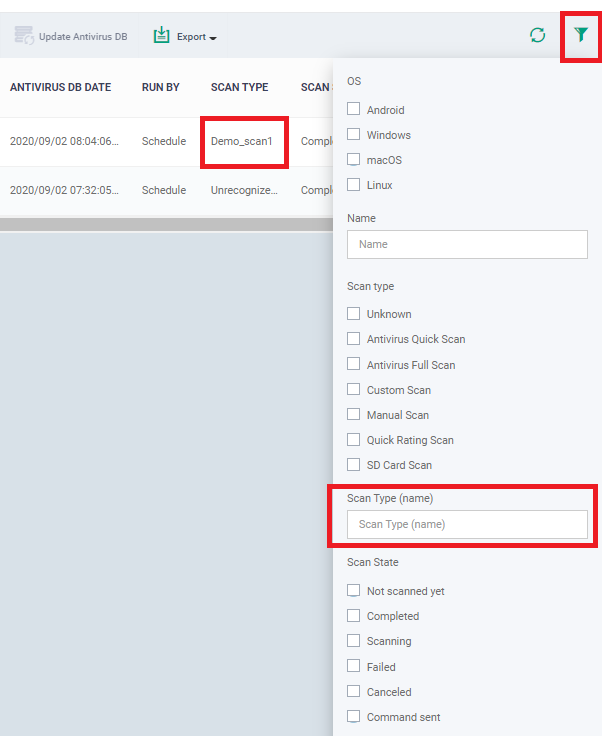
Custom Scan name provided while creating custom scan profile under 'Profiles' → 'Antivirus' as explained here.
We can also search using 'Custom Scan Name' by selecting filteroption.
-


-
Scan State - Status of the last scan run on the device. Possible states are:
-
Not scanned yet
-
Complete
-
Scanning
-
Failed
-
Viruses Found
-
Cancelled
-
Command Sent
-
-
Scan Date - The date and time at which the last scan was run.
-
Malware Status - The infection status of the device. Possibles states are:
-
Clean – Devices with no malware are listed as 'Clean'
-
Infected - Devices with untreated malware are listed as 'Infected'
-
Click the 'Infected' link to view a list of malware on all managed devices.
-
You can remove, quarantine or ignore the malware direct from this list
-
-
Related topics
- How to manage quarantined items in Endpoint Manager
- How to view every threat that has appeared on your managed devices
- How to view and manage unprocessed malware on your endpoints
- How to manage autorun items in Endpoint Manager
- How to schedule a virus scan in Endpoint Manager


---