North America
How to search for users, tickets and customers in Service Desk
Views
3732 times
Category
Service Desk
Tags
Click 'Staff Panel' > 'Users' > 'User Directory'
- The user directory shows all end-users who submit tickets to your support desk.
- You can search for a specific user to view their details, register the user, view their tickets, and more.
- Use the ‘Search’ box to do a simple user look-up. You search by username, email address or phone number.
Click 'Staff Panel' > 'Users' > 'Customers'
- The customers area shows all clients that you have added to Comodo One / Dragon / Service Desk.
- Use the ‘Search’ box to do a customer look-up.
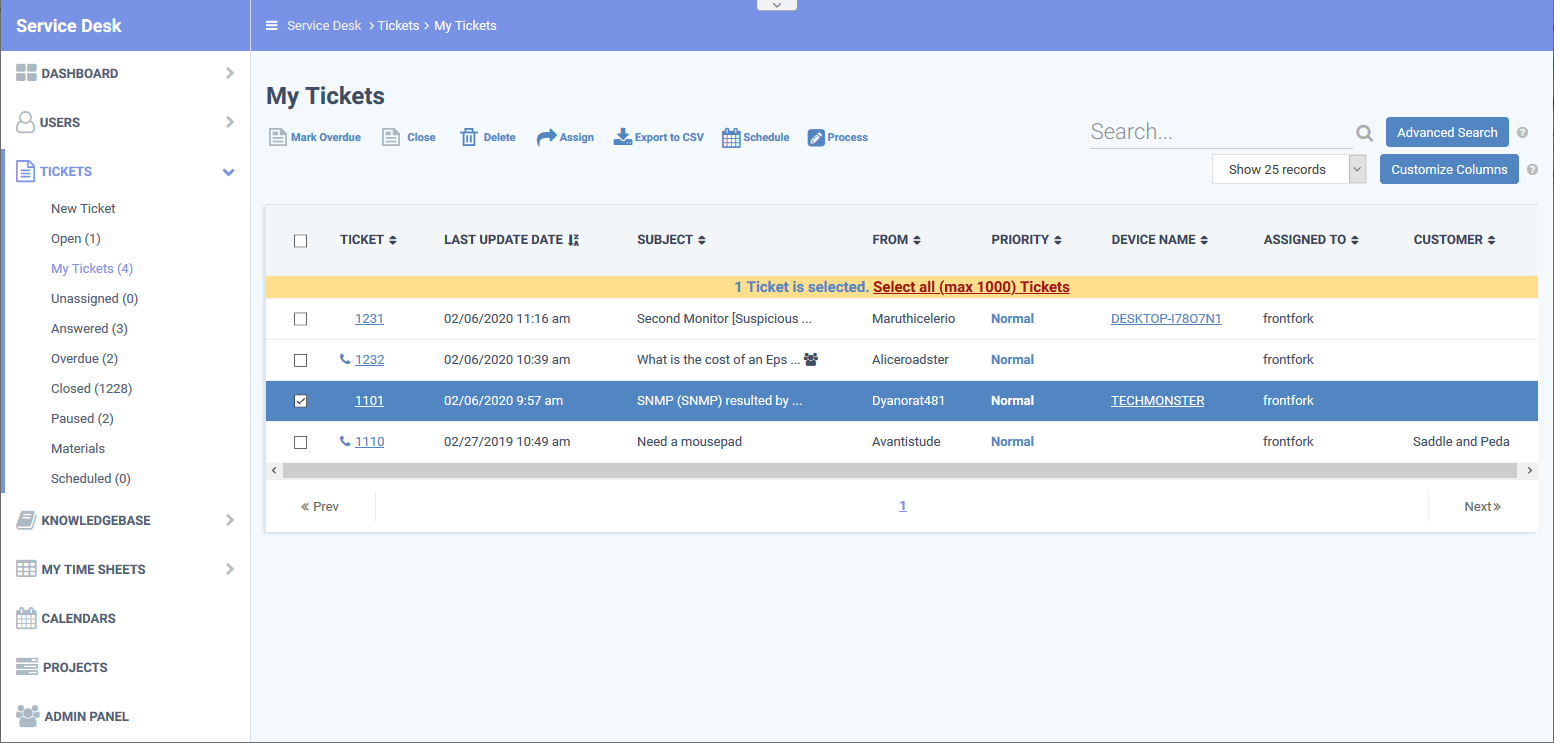
Click 'Staff Panel' > 'Tickets' > ‘Open’
- The tickets area show all submitted tickets along with their status, priority and assignee.
- Use the ‘Search’ box to do a simple ticket look-up. Click ‘Advanced Search’ to filter by ticket status, customer, department, issue category, and more.
- The search runs on all non-deleted tickets that exist in Service Desk, regardless of any filter you select in the left menu.
Use the following links if you need more information:
- Login to Comodo One / Dragon
- Click 'Applications' > 'Service Desk'
- Open the staff panel (see the last link on the left)
- Click 'Users' > 'User Directory'

- Click any column header to sort users in ascending / descending order.
- Use the ‘Search...’ box to look for users by username, email address or phone number.
- See this wiki if you need help to register and manage users.
- Open the staff panel (see the last link on the left)
- Click 'Users' > 'Customers'
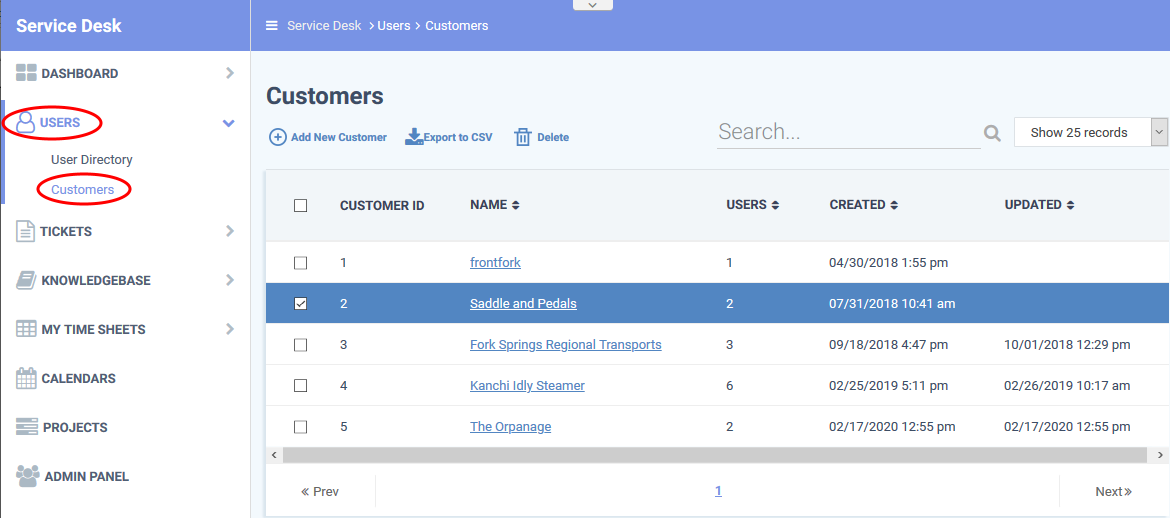
- Click any column header to sort customers in ascending / descending order
- Use the ‘Search...’ box to look for customers by customer name.
- See this wiki if you need help to manage customers.
- Open the staff panel (see the last link on the left)
- Click 'Tickets’ > 'Open' (to see all open tickets)
- Use the ‘Search’ box to do a simple ticket look-up. Click ‘Advanced Search’ to filter by ticket status, customer, department, issue category, and more.
- The search runs on every non-deleted ticket, regardless of the category you select on the left
- New Ticket - Create a ticket on behalf of a user. See 'How to create a new ticket on behalf of a user' if you need help with this.
- Open - Tickets that are not yet resolved. Click the ticket number to answer, transfer, reassign or schedule the ticket.
- My Tickets - Tickets assigned to the person who is currently logged-in. Click the ticket number to answer, transfer, reassign, schedule, or register time-spent on a ticket.
- Unassigned - Tickets that have not yet been assigned. Admins can assign tickets to staff by clicking the ticket number then the 'Assign' link.
- Answered - Tickets for which there has been at least one reply. Click the ticket number to review, reassign, transfer and more.
- Overdue - Tickets that were not closed within the period specified in the SLA.
- Closed - Tickets that are finished/complete. Click the ticket number to review, reopen, reassign etc.
- Scheduled - Tickets that have a set time by which they should be started and/or finished. The schedule is shown on the staff member's calendar. Click the ticket number to answer, re-assign, transfer, re-schedule, etc.
- Paused - Tickets that are not being worked on at the current time. The ticket can be resumed by the staff member assigned to the ticket, or by an admin. Click the ticket number then 'Resume' to do this.
- Materials – View material costs and other expenses added to tickets by staff. Material costs must be approved by an admin.
The columns you see depend on the filter you chose in the left-menu. You can modify columns by clicking the 'Customize Columns' button.
- Click ‘Tickets’
- Click your desired ticket filter on the left:
- Open
- My Tickets
- Unassigned
- Answered
- Overdue
- Closed
- Paused
- Open
- Click the ‘Customize Columns’ button:
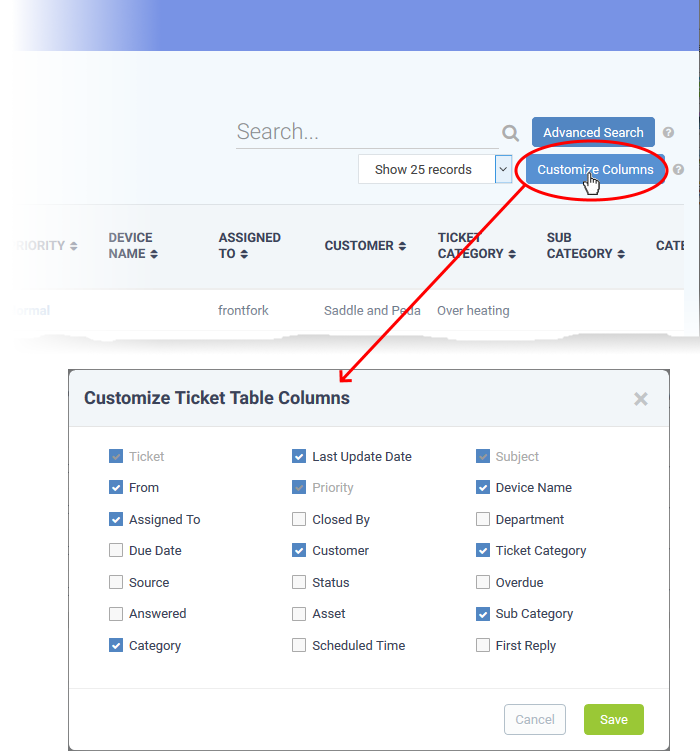
- Use the check-boxes to enable or disable columns as required
- Certain columns are mandatory for certain views
- Click 'Save' to add/remove selected columns
How to add, register and manage users in Service Desk
How to add and manage customer organizations
How to view, assign, schedule and manage tickets


CONTACT US
Call now!  (973) 859 4000 ext 3025
---